Simple solution to fine gold recovery

johnedoe

Bronze Member
Jan 15, 2012
1,489
2,242
Oregon Coast
Detector(s) used
White's V3i, White's MXT, and White's Eagle Spectrum
Cleangold sluice & prospectors pan, EZ-Gold Pan, and custom cleanup sluice.
Primary Interest:
Other
This was developed by Randy Clarkson, an expert in gold recovery designs.

A simple gizmo to help miners snag lost gold..... New gizmo could help placer miners snag lost gold | Yukon News

Also this by Randy Clarkson on fine gold recovery which is somewhat misleading in that this is mostly about commercial ops and 1" minus classification is considered fine....... The Clarkson Study Fine Gold Recovery

Here is a PDF presentation of the process....... http://www.geology.gov.yk.ca/pdf/141114_Nov1014_Grinding_for_Gold_Presentation.pdf ....... Thank you arizau for finding that PDF

Enjoy the learning.
 

Last edited:
Upvote 0
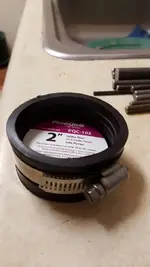
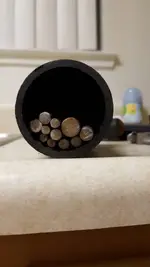
Ok, just got back from HD with a 2ft section of 2" ABS and these perfect removable caps. My rods are barely 4 inches so I didn't want to chance it on the 3 inch and end up with the same problem and I damn sure don't want to cut more rods... luckily I have a variety of rods so I can just use more of the smaller ones to get the same effect. Not sure yet if it's gonna be to narrow for the rollers on the tumbler until I cut the pipe but it's close. I guess if it's to small I can wrap it with something.

I'll try this and see if I can get it dialed in and then IF there is any gold in my Sands I can upgrade to a larger unit if necessary.
 

Attachments

  • 1448937953448.jpg
    1448937953448.jpg
    46.6 KB · Views: 103
Last edited:
Public service announcement:

Freshly cut steel rod, when wet WILL rust fast! Less then 24 hrs on the stainless steel sink = no bueno.
 

Public service announcement:

Freshly cut steel rod, when wet WILL rust fast! Less then 24 hrs on the stainless steel sink = no bueno.
Oh man,,,,,,, was that SS sink mama's sink?........ Definitely no bueno.......
 

I tried a weighted strap with my first printer-carcass mill. That's how I burned out the little printer motor! A frame is a better idea I think.
 

So the ABS pipe and the end caps work great. Easy to take on and off (don't need the clamps) and water tight. Wouldn't run on the tumbler though. I tried wrapping it with a half dozen materials but none would work. Man this tumbler is a POS. It can even roll the drum it came with well..

Now I did a small test using mostly smaller rods and some +20 material. I wanted to see if the smaller rods would crush the larger material. I just rolled it back and forth on the ground with a broom stick but only for 2 or 3 minutes cause it was a pain.

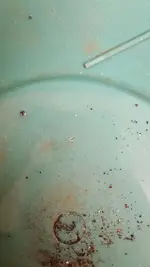
Didn't get a lot of crushing but I got some.... no gold on the classifier but I didn't expect any as this size material is easy to see with the naked eye. Or so I thought..in the pan I see a decent size piece of gold... that was unexpected! The only thing I can think of is, the gold was attached to some iron not coated by it and the iron fractured off ?... idk.. I'm not getting my hopes up just yet,but this gold came from nowhere.
 

Attachments

  • 1449028815725.jpg
    1449028815725.jpg
    51.5 KB · Views: 104
  • 1449028828246.jpg
    1449028828246.jpg
    38.7 KB · Views: 97
I tried a weighted strap with my first printer-carcass mill. That's how I burned out the little printer motor! A frame is a better idea I think.

Just an observation...IMO, A weighted strap, if it leaves no room for slop and is not friction free, effectively acts as a brake (motor overload/burnout). The object, be it by strap, frame/bridge or overhead rollers (and certainly the latter three are the best alternatives), is just to keep an unbalanced cylinder from bouncing completely out of position between the bottom two rollers.
 

Last edited:
Just an observation...IMO, A weighted strap, if it leaves no room for slop and is not friction free, effectively acts as a brake (motor overload/burnout). The object, be it by strap, frame/bridge or overhead rollers (and certainly the latter three are the best alternatives), is just to keep an unbalanced cylinder from bouncing completely out of position between the bottom two rollers.

Exactly!

I tried the weighted strap because it was quick and easy. Bad call but at least I learned.
 

Motor problem solved

I've been. Interested in this rod mill since I first learned of it in this thread. Been goofing around with it and it had not been going well unitl now. My first thought was to get a pair of rollers, spin it manually, maybe with a hand crank attached just to see if it would work.

I priced rock tumblers and found a cheap one on eBay. Since I though my daughter and I would get a kick out of polishing rocks I bought it for dual purpose. Well, who knew the polish grit was expensive and it is a 4 week process! Ok, no big deal as long as it can run without supervision. Well it can't, you need to watch it cause the barrel starts bouncing and needs to be turned around or whatever. Super loud and annoying because of the bouncing...24/7 mind you.... Pain...

So I finally started cutting rods and trying them on my tumbler.... Negative. As bad as the barrel with rocks ran , with rods it was even worse and would actually jam up complete. I knew this would lead to motor burn out and a lot of curse words would be uttered.

I was extremely frustrated about the whole deal as I got sands to run and I'm all cooked up inside because of winter. Left it alone for a couple days to think about why it Wasn't working and it hit me. Its the powered rollers. With the power to the rollers on my tumbler it would spin fast but as soon as weight was added it struggled to turn anything. It just struck me as way less efficient and bad design to have the power at the rollers. The rollers need to be free and power to the barrel. Much easier to figure if you have enough motor and eliminates the bouncing. I think the reason is the relatively heavy load and very un evern weight distribution. The weight is constantly shifting acting like a lopsided ball. This really messes with the contact and power transfer from the rollers.

Cleaning out the garage the other day I found a throw away cord drill and the light bulb went off. Cheap motor for rod mill problem solved. These could be had for 10-20 bucks at a garage sale and attaching is as simple as tape.


Last edited:
Good thinking. Any ideas on how to set the speed so you don't have to manually hold the trigger for 10-15 minutes? Maybe tear the drill apart, mount the motor from the drill and replace the frigger with a dimmer switch or something like that. (??)
 

Good thinking. Any ideas on how to set the speed so you don't have to manually hold the trigger for 10-15 minutes? Maybe tear the drill apart, mount the motor from the drill and replace the frigger with a dimmer switch or something like that. (??)

I was thinking to use some wire to hold the trigger. Kind of like a twist tie on a loaf of bread? If that makes sense. You could just tighten it till you get the right speed. Not sure if it will work but I think it might.
 

I've been running my rod mill pretty much non-stop since I started this little experiment. As soon as one batch come out, another is started. Still keeping notes on setups vs run time and results. Weather here has taken a downward trip in a hand basket so the remaining materials will have to wait until I can empty the drum without freezing my hands off. I'm still working strictly with the magnetic sands but have been finding a little gold in every batch.

I'm thinking of setting up a larger (spelled longer) drum as well.

Glad to see you in the rod mill gang Goldenirishman. I didn't even know you were running. I've been testing all week too. Did 30 min run and had the material going through the classifier up to 50% gonna try 45 min tonight but it's getting out of hand. I think the problem is overall my device is small and might not be delivering enough impact force to get the job done in 15 min like it is supposed to be. Either that or the Abs isn't hard enough compared to a steal drum. I'm gonna probably bump it up from 2x4 to 3x6 but that means cutting more rod.....yuk!

I am finding gold though...
 

Last edited:
I'm using a stock Harbor Freight dual drum tumbler Time and it's working well so far. I'm not grinding to flatten the micro gold so it can be caught in a classifier though. I'm grinding it as a pre-amalgamation step. The gold I've been finding is so small that amalgamation is the easiest way to get it out of the mix. Once I've built up enough materials I'll soak them in white vinegar for 48 hours to clean the gold which will allow the Mercury to bind with it easier. Then a good rinse and into the drum I've got reserved strictly for running with the Mercury. Once I've gotten enough amalgam to warrant it, I'll recover the mercury with a retort so I can reuse it. Once I finish up all the magnetic sands, I'll do pretty much the same with the non-magnetic materials.

One thing I'm looking for are some of the super fine screens to classify the materials under -100 mesh. I've gotten a line on some from a shop that sells pyrotechnic supplies for amateur firework makers. When the materials come out of my drum, they go through a 100 mesh screen like it wasn't even there.

Check with GoldpannerDave. A few months ago he found and purchased an inexpensive sieve set with several sizes smaller than 100 mesh to use for the same purpose. Maybe he will pipe up if he sees this post or PM him.
 

Last edited:
Check with GoldpannerDave. A few months ago he found and purchased an inexpensive sieve set with several sizes smaller than 100 mesh to use for the same purpose. Maybe he will pipe up if he sees this post or PM him.

Yes, I did. The link to the discussion about them is below. I am happy with them for what I wanted them to do (sieve cons). They are 60, 90, and 120 micron or about 215, 170 and 115 mesh. Aluminum frames and steel mesh wire for about $20.

http://www.treasurenet.com/forums/gold-prospecting/457285-120-90-60-micron-6-sieve-report.html
 

One thing I'm looking for are some of the super fine screens to classify the materials under -100 mesh. I've gotten a line on some from a shop that sells pyrotechnic supplies for amateur firework makers. When the materials come out of my drum, they go through a 100 mesh screen like it wasn't even there.

McMaster-Carr

Any size you want, they even tell you the actual hole size, I just glued them into classifier sizes I didn't use. Order them by 6 and you'll probably have it tomorrow.
 

McMaster-Carr

Any size you want, they even tell you the actual hole size, I just glued them into classifier sizes I didn't use. Order them by 6 and you'll probably have it tomorrow.

Actually Bob I'm liking the disks they offer. A short section of 4in ABS pipe to be used as locking rings, a couple of joiners with the ring in the middle of them and I'd be set. Slip the disk into the joiner then a section of pipe cut to the length of the joiner from the edge to the middle and a little ABS glue and it's ready to use as soon as the glue cures.
 

Last edited:

Top Member Reactions

Users who are viewing this thread

Latest Discussions

Back
Top