Simple solution to fine gold recovery

johnedoe

Bronze Member
Jan 15, 2012
1,489
2,242
Oregon Coast
Detector(s) used
White's V3i, White's MXT, and White's Eagle Spectrum
Cleangold sluice & prospectors pan, EZ-Gold Pan, and custom cleanup sluice.
Primary Interest:
Other
This was developed by Randy Clarkson, an expert in gold recovery designs.

A simple gizmo to help miners snag lost gold..... New gizmo could help placer miners snag lost gold | Yukon News

Also this by Randy Clarkson on fine gold recovery which is somewhat misleading in that this is mostly about commercial ops and 1" minus classification is considered fine....... The Clarkson Study Fine Gold Recovery

Here is a PDF presentation of the process....... http://www.geology.gov.yk.ca/pdf/141114_Nov1014_Grinding_for_Gold_Presentation.pdf ....... Thank you arizau for finding that PDF

Enjoy the learning.
 

Last edited:
Upvote 0
GoldpannerDave......
I guess I need to clarify the reading assignment.......:laughing7:

On pages 22 - 25 of the PDF you will see this........
A picture is worth a thousand words. Or in this case 4 pictures........

View attachment 1232638

View attachment 1232640

View attachment 1232641

View attachment 1232642

Yep, that is it. I am just trying it with a smaller tub and get all the other parameters satisfied at the same time.

Thanks for clarifying the assignment. :)
 

Bought 3 ft of 5/8, 1/2, 3/8, 1/4 and 1/8 rod at HD for 20 bucks. I'm going to use them with my rock tumbler drum. It's rubber lined but at least I'll have a really good variety of rod sizes, maybe to many? I decided to just hack saw them to size. About 4" for this small barrel. I should have broke down and bought s vice... but noooo I got cheap and am now sawing about 15-20 rods with nothing to hold the rod but my spare hand. Normally I think of some way to MCgiver something but with the limited tool collection I have so far I can't think of anything. I also need to order some classifier 's, I really only have 1 that is small enough mesh to be of any use. I think it's #20?.. lol.
 

Last edited:
Just ordered my sieves. #50, #70,#100. Is anybody using smaller then 100? Couldn't find any can someone post a link.

Just a matter of time now. I'm about half way through cutting my rods.
 

Just ordered my sieves. #50, #70,#100. Is anybody using smaller then 100? Couldn't find any can someone post a link.

Just a matter of time now. I'm about half way through cutting my rods.

McMaster-Carr

I just bought the screen I needed and glued it in over the sizes I didn't need. I got a set of 6" classifiers that was 10,20,30,40,50,60... Useless. (but cheap)
Now its 20,50,80,120,250,400. Watch your wire sizes and hole sizes when you start getting small, the mesh#s really don't mean much when you
start getting down there, the wire size really messes with the hole size.
 

How do you use the 250 and 400 mesh screens? (I mean things like: how do you end up with concentrates that small, do you crush & if so how, etc)
 

Last edited:
How do you use the 250 and 400 mesh screens? (I mean things like: how do you end up with concentrates that small, do you crush & if so how, etc)

How? Put the dirt in and shake. Underwater. But you knew that already. I haven't played with the black sand crushing thing yet.
Just gold cube concentrates. Some is crushed rock, some is just shoveled dirt.
I only do the top tray and save the bottom trays... By the time you get down to -400 there is almost nothing left.

I was literally losing hundreds of tiny little pieces of gold by not classifying it all the way down. Honestly its kind of pain in the butt. I've
basically just been going down to 120, grabbing the bigger stuff and tossing the rest in a bucket to deal with later.

And the Gold Cube, its grabbing that TINY stuff. -250 to +400, .0015 to .0025 inches... It is SMALL, I can't even get a good picture of it.

I wrote it up over in the journal section when I first got the tiny screens, if anybody is interested.
http://www.treasurenet.com/forums/prospectors-journals/437396-complete-newb-but-i-m-having-quite-adventure-i-haven-t-found-much-yet-4.html
 

You guys may also want to try a process utilizing Oleophilic Adhesion. I learned this technique from a fellow prospector that I met at one of my favorite gold bearing creeks.

It's a very simple cheap, fast and fun way to recover fine and micro sized gold from your -30 and smaller concentrates.

Simply smear a thin smooth layer of petroleum jelly (Vaseline) onto a flat smooth slick plate.
Hold the slick plate under water in a tub or if in the creek with a safety pan underneath it and shake the slick plate back and forth while pouring your wet concentrate through a sieve above it.

The gangue will not stick to the petroleum jelly however the gold will stick due to its oleophilic nature.

To remove the gold imbedded jelly from the slick plate use a body filler spreader to swipe off the petroleum jelly and then swipe off the spreader into a small jar.
To recover the gold from the jelly just use charcoal lighter fluid in the jar and shake it to dissolve the petroleum jelly. Simple as that!

The prospector I met was using this technique at the creek and my curiosity got the best of me so I had to ask what he was doing. Turns out he is a contributing writer for ICMJ's Prospecting and Mining Journal along with other publications. His name is Alex Dolbeare and the ICMJ issue that this technique was featured in detail was Volume 83 Number 8 April 2014

Go for the Gold
GG~

Bingo!
 

Sometimes I come to threads to be thankful for the problems I don't have:)
 

Attachments

  • 1447615142307.jpg
    1447615142307.jpg
    75.8 KB · Views: 90
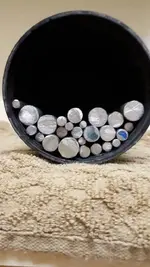
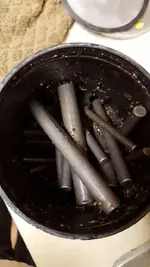
So I've spent most of the weekend hacksawing and filing 25 rods of varying diameter....what a pain in the ARSE!

I was pretty happy when I was done with everything though. With the rods in the barrels it looked very close to the original design, smaller of course.

My happiness is now anger and frustration... the rods will not stay flat. They keep getting Cockeyed almost instantly. After trying it 3 times with different amounts of rods I gave up.

The rock tumbler always makes the barrels bounce so I took it off and rolled it by hand.. as long as I was really carefully it would be OK but any quick starts or stops would throw the rods out of wack... ugh!

It did seem to crush the Sands though as about half went through the classifier.. any suggestions would be welcome...
 

Attachments

  • 1448851423547.jpg
    1448851423547.jpg
    60.8 KB · Views: 86
  • 1448851436369.jpg
    1448851436369.jpg
    61.1 KB · Views: 88
Last edited:
Sorry to hear of your difficulties. Your project looks pretty good, the right quantity and size variance of rods to the space.

Here are some things to ponder..........

How much end play do you have ? How long are the rods and how deep is the rock tumbler barrels?

In the PDF, Clarkson said the rods should be about a 1/2 inch shorter than the mill, I thought this was a bit much but I think that prevented the rods from catching at an angle between bottom and lid and jamming which would have started the other rods jamming.

Another thought ..... How deep is the barrel you are using and what is the diameter of the barrel?
If they are the same that could cause problems as well.
Looking at the images of Clarkson's mill it looks to be almost 2 times deeper than it is in diameter.
Hope this helps.
 

Last edited:
I think your right the barrell is 4 1\4 × 4 1/2

I cut them about 1/4 inch shorter then the barrell depth. Damn the last thing I want to do is cut more rod..
 

I think your right the barrell is 4 1\4 × 4 1/2

I cut them about 1/4 inch shorter then the barrell depth. Damn the last thing I want to do is cut more rod..

Oh Man...... I am sorry to hear that, but that is most likely the problem.......

Now in you best slick willie imitation.... "I feel your pain"
 

Well.. I guess it's back to the drawing board! :banghead:
 

Well.. I guess it's back to the drawing board! :banghead:
You'll get there. just a minor glitch, My trip to Whales head this weekend was a glitch.... better next time it will be............. Yoda!!!:laughing7:
 

Well.. I guess it's back to the drawing board! :banghead:

Find a narrower barrel or a longer one. With the rods you have cut, you need a narrower one so the rods stay parallel to each other and oriented in the length direction. Mine is a less symmetrical tumbler than yours. Also I have a smooth running motot (not fast enough but I will fix that this winter).
 

So I've spent most of the weekend hacksawing and filing 25 rods of varying diameter....what a pain in the ARSE!

I was pretty happy when I was done with everything though. With the rods in the barrels it looked very close to the original design, smaller of course.

My happiness is now anger and frustration... the rods will not stay flat. They keep getting Cockeyed almost instantly. After trying it 3 times with different amounts of rods I gave up.

The rock tumbler always makes the barrels bounce so I took it off and rolled it by hand.. as long as I was really carefully it would be OK but any quick starts or stops would throw the rods out of wack... ugh!

It did seem to crush the Sands though as about half went through the classifier.. any suggestions would be welcome...

Lesson learned here... Barrel length and rods must be a fair bit longer than the barrel diameter so that the rods will stay more or less oriented in a parallel position.

If you can find a suitable barrel (smaller diameter) you not only will solve the problem you have you will also improve the efficiency. How? The smaller diameter barrel will spin at a slightly higher RPM closer to that of the desired critical speed that is illustrated in the original presentation! This assumes that currently your drive roller spins at a fixed speed (speed is not manually adjustable).

You may be able to find some suitably sized pvc or abs pipe (or?), cap one end and figure out a way to seal the other end so that it can be easily removed for charging and clean out. A threaded rod through the center of the barrel and a wing nut come to mind to keep the loose cap in place.

Good luck.

PS You could continue to use what you have if you can loosely strap or bridge over the barrel so that it does not jump off the rollers. Not going to be very efficient though.
 

Last edited:
Lesson learned here... Barrel length and rods must be a fair bit longer than the barrel diameter so that the rods will stay more or less oriented in a parallel position.

If you can find a suitable barrel (smaller diameter) you not only will solve the problem you have you will also improve the efficiency. How? The smaller diameter barrel will spin at a slightly higher RPM closer to that of the desired critical speed that is illustrated in the original presentation! This assumes that currently your drive roller spins at a fixed speed (speed is not manually adjustable).

You may be able to find some suitably sized pvc or abs pipe (or?), cap one end and figure out a way to seal the other end so that it can be easily removed for charging and clean out. A threaded rod through the center of the barrel and a wing nut come to mind to keep the loose cap in place.

Good luck.

PS You could continue to use what you have if you can loosely strap or bridge over the barrel so that it does not jump off the rollers. Not going to be very efficient though.

Yes, 3" PVC with caps would do it. I looked into that before Ducky gave me a motor to change the rpm's. That might be a solution, MTTS.
 

Yes, 3" PVC with caps would do it. I looked into that before Ducky gave me a motor to change the rpm's. That might be a solution, MTTS.

Hi Dave,

Just thinking ahead....As you approach critical speed the rods will climb the wall and unbalance the barrel in that direction. One thought is to have an overhead set of rollers or wheels on a removable frame that traps and stabilizes the barrel in place. Or for a quick and dirty fix, a strap or bridge like I suggested in my last post above.

Gives you something else to think about or do in your limited time off from family and country.
 

Last edited:

Top Member Reactions

Users who are viewing this thread

Back
Top