Placer Claim Mined Out?

desertgolddigger

Bronze Member
May 31, 2015
1,102
2,116
Twentynine Palms, California
Detector(s) used
Bounty Hunter Time Ranger
Primary Interest:
Prospecting
I belong to a local club that owns a claim. This club has had this claim for many years, and acquired it after the old timers had mined it previously, and others after they commercial outfits closed up.
I walked quite a bit of the 160 acre claim, and noted that just about every wash had been worked. Most of the surface nuggets has also been detected by those with gold detectors. In other words, this place has been picked over and over and over.
But I m a stubborn type of person, and I figured, just watching how people ram their puffer and blower drywashers, that some gold was just being blown through them. maybe not much, but some small stuff that never got a chance to settle behind the riffles.
I know many of you would never go to the effort of digging for three to four hours through the tailings in these washes. Again, I'm a bit stubborn, and anyway, I just wanted to have some fun locally, instead of driving 300 miles roundtrip to something that gives a little more for less effort.
I've spent the last three weeks, digging a few times a week along about 30 yards of wash, and have recovered just about a gram of gold. That might not seem like much, but I have only dug up 5 grams, not counting this one gram in almost 20 years out here drywashing in the desert of southern California.
As you would know, things always seem to go wrong. My gas powered blower motor decided it was time for the repair shop, and haven't heard from the shop in two weeks. So I purchased a WORX WG521 corded electric leaf blower to use with my Royal Large drywasher. I'm using a portable generator to provide the power. And it actually is working better than with my old gas powered blower. I have to run the blower on the lowest speed, or I just blow everything through the riffles. Results are very good, as I am getting gold specks so small that I will have to use the Blue bowl in order to recover them.
I'm not only getting a little gold, I'm having some fun, and I am getting a good workout. I've lost 10 pounds since I started. So things are going well.
I'm still digging test holes around the old time hard rock mines in the hope I will find where the gold has drifted downhill below these mines. So far just a couple specks here and there. I figure I just have to move laterally one way or the other before I get something better Of course, I' don't really know if the old timers stripped the hillsides. Even if they have, they apparently aren't as thorough as I am. I hope that I may be lucky and find a larger piece of gold that the old timers, previous placer miners, and detectorists have missed.
Hope everyone is having as much fun as I have been having.
 

Upvote 50
didn't do much this morning other than mill some of the rock I picked up yesterday. The rock was very damp apparently, even though it didn't feel that way to me. I couldn't classify it because of that.

But I went ahead and sluiced 15 cups of it, and again found the very small gold particles. While it wasn't like yesterday, it still is a source of gold for me until I find my own ore deposit. Not having it classified does make panning a bit harder.

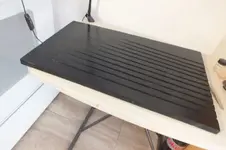
I did cut and Paint my Mini Table. Not pretty, but good enough for learning.
 

Attachments

  • Table Cut and Painted.jpg
    Table Cut and Painted.jpg
    73.4 KB · Views: 29
After about a week of waiting to see if any of my mining club members might volunteer to help me move the big base table I built, I decided to do it this morning, along with panting those massive cement piers. My Facebook ask for help got me over 70 thumbs up, but nothing else.

Anyway, After gigging the two trenches, and trying very hard to get the four piers aligned, and leveled, I finally decided they were close enough to at least put the table o n top of them.

Moving actually proved not too difficult. I got my hand truck, and a ratcheting strap, placed the monster on the conveyance, and strapped it securely. Took me about five minutes to move it.

B ut getting the monster onto the four piers was something I never want to try again. But I finally managed, and got the piers shifted to their proper positions.

I used a level and found three piers actually level with each other. Had to use the RV jacks I purchased years ago to jack it all up so I could level and position the pesky low pier, but finally muscled it in. Another check had everything as close to vel in both directions as I could manage.

I ack filled the two trenches, using the extra dirt to bring the ground around and under the table to level with the pier tops

I'll need to wait a few weeks for things to settle before I actually use eight screw and two 1/2 inch bolts into each of the legs. I'm sure by then, I'll need to shim under some legs. I have some short pieces of 4x4's I can cut thin wafers from for that purpose.

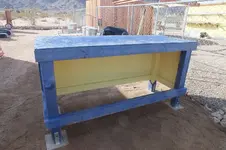
After being so long winded describing my ordeal, here's a picture of the result.

Oh, I'm taking a day off to go have some fu n Prospecting and picking up more of what my view is good gold in the old timer mine waste pile.
 

Attachments

  • Base Table on Cement Piers.jpg
    Base Table on Cement Piers.jpg
    199.1 KB · Views: 28
Was out at the club claim yesterday, just looking around at what I hope would give me a possible small hard rock dig. Last time out I'd gotten one speck of gold in a steep shallow wash.

Yesterday's walk about showed me that this particular hill did get hit heavily by the prospectors. I saw two possible shallow digs with white quartz scattered about.

I only manage to look at less than a tenth of just one side of this hill, and dug four more test holes with negative results. I had to quit, as my left foot couldn't handle the strain. I sure hope my appointment with the podiatrist will give me good news, but my own doctor said it is arthritis. If it is, then there probably isn't anything that will help except pain relievers.

I'll keep working this hill until I finish it, just in case these early, and modern prospectors might have missed something.

I'm going out on a limb with this statement. My view is there's still pockets of gold, but that mother nature just hasn't eroded things enough to uncover them. Unfortunately, the little prospector, with minimal tools and equipment will never find them. What I'm hoping for is that somewhere one has been slightly exposed, and that I'll get lucky.
 

I received more parts for my mini shaker table experiment. The slotted DIN rails work quite well with the linear rail block bearings. I had to drill some slot ends slightly larger for the 6mm screws, but everything aligned well, and they sit on the rail, and move smoothly.

My two planter boxes I'll be using to catch material that comes off the table edge also arrived. I had to used a chisel to scrape off a few plastic ridges so that my wood blocks will seat flatly. Once I get all these sub assemblies done, I post some pictures
 

Needing a little help with my shaker table build. Jim in Idaho said to make sure I build the thing strong, and look for photos/videos of the underside.

I've seen only small glimpses in either format, but not a complete underside of the shaker tabletop underside, and the platform beneath that, which holds the motor, gear system, and adjustment hardware.

I'm trying to do this as well as possible, but it seems that the manufacturers of the commercial tables apparently don't want to reveal their tables workings.

And yes, I Googled, and apparently don't know the proper question to get what I'm searching for.
The 'Superpanner' photos should help.

A connecting rod assembly from front steering of a garden tractor is already made just needs to be mounted to your drive shaft / crank shaft motor. This should require no machine work other then drilling holes to mount the machine bolt stud and nut with both ends of the rod assembly.
The drive shaft / crank shaft end on the motor may have to be welded / machined.
 

Needing a little help with my shaker table build. Jim in Idaho said to make sure I build the thing strong, and look for photos/videos of the underside.

I've seen only small glimpses in either format, but not a complete underside of the shaker tabletop underside, and the platform beneath that, which holds the motor, gear system, and adjustment hardware.

I'm trying to do this as well as possible, but it seems that the manufacturers of the commercial tables apparently don't want to reveal their tables workings.

And yes, I Googled, and apparently don't know the proper question to get what I'm searching for.
Caley, I'll pull the deck off of mine later, and get some pics to post. In the meantime, I got some video of your driver running my old table. I'll post a link on the Shaker Table Build thread.
Jim
Jim
 

Here ya go Caley, it's pretty basic. The table floats back and foruth on the pipe being held by the 2 pieces of HDPE, UHMW or whatever it is... Then the angle is set with the bar hold down in the pics below.
Here is the gear box. That bar with the nylock is the only thing holding the table angle in place.
20240214_143528.jpg


Then here's a few more -
20240214_143532.jpg
20240214_143537.jpg


Here's the water bar with the holes about 2.4" apart.
20240214_144954.jpg

20240214_144947.jpg


I'll post more pics in the next thread
 

Running that single support rod down the center was pure genius on Wilfley's part. I slapped my head when I saw that on the one I rebuilt. That allows the deck to pivot, without moving the main support frame. That man was SHARP!
Jim
 

Then this is the angle adjustment and a basic or partial hold down to help hold the angle. The real angle hold down is that nylock nut in the first set of pictures. After that's set tight, then you tighten the handle on the all thread below to the angle you want which is about 6° for this one.
Screenshot_20240214_151044_Gallery.jpg
Screenshot_20240214_151124_Gallery.jpg
Screenshot_20240214_151115_Gallery.jpg
Screenshot_20240214_151105_Gallery.jpg


Here's our basic pic before set up just for fun. -
Screenshot_20240214_151044_Gallery.jpg
Screenshot_20240214_151124_Gallery.jpg
Screenshot_20240214_151115_Gallery.jpg
Screenshot_20240214_151105_Gallery.jpg
received_5219122678205970.jpeg
received_7874642225896541.jpeg


If you need more, just ask, then don't forget the owners manual posted a few pages back
 

Here's a few pics of what I did on mine, Caley. Had I know about Wilfley's single-rod method, I would have used it. One advantage of that, actually two, is that the deck is easily and quickly removed, allowing multiple decks to be used. The other is a simple tilt mechanism, rather than tilting the entire subframe, as I did. Now, I would lean toward the flexing supports ala orophilia. A big advantage of that is how quiet they operate...I like that. In my design the rods are clamped to the subframe, and the deck slides on the rods. In Wilfley's design the rod is
fastened to the deck and the rod supports, on which the rod slides, are fastened to the subframe.
P2150001.JPG
P2150002.JPG
P2150004.JPG
P2150005.JPG
P2150006.JPG
P2150001.JPG
 

Here's the hdpe that holds the bar and the bar under the table.
Hey Reed, did you get your table repaired? Looks pretty good. When are we going to get video? I need video, it's winter up here...LOL He said to the guys in Hawaiian shirts
Jim
 

Great photos Gents. Now I can see how basic the table stiffening system is. Just a rectangular box of 1x2's glued underneath.

I'm still trying to understand all those photos though. I can't figure out the table rides. Are there wheels somewhere, or does it ride on Teflon blocks? Last night my brain wouldn't stop on how to ride on something that moves back and forth so quickly. I finally came to the conclusion, that on my big table, linear bearings and rails should work, but I lime the simplicity of Southfork's caster wheels. If I go that route, the shaker tabletop would just drop on top, instead of me struggling trying to get a linear rail system aligned, and installed

I had my observatory roof sitting on two dozen casters, and they worked pretty good on a 200+ pound roof. The tabletop will only be 20 or so pounds I imagine. And I have all those caster wheels when I changed my observatory roof to using V rails and wheels Guess I wasted more money on that fancy rail system.
 

Then this is the angle adjustment and a basic or partial hold down to help hold the angle. The real angle hold down is that nylock nut in the first set of pictures. After that's set tight, then you tighten the handle on the all thread below to the angle you want which is about 6° for this one.
View attachment 2131452View attachment 2131453View attachment 2131454View attachment 2131455

Here's our basic pic before set up just for fun. -
View attachment 2131452View attachment 2131453View attachment 2131454View attachment 2131455View attachment 2131456View attachment 2131457
I am guessing those HDPE blocks are super hard and slick like Teflon, and that the bar running through the shaker table stiffening boards underneath the table, glides atop those bearing blocks
Seems the table is has that rod attached to the drive system, and moves at several hundred strokes per minute, and glides on those HDPE blocks. But how do you stabilize the table, and yet allow for tilt adjustments on two axis? I'll have to look at these pictures again, and hope I can see how that's done.
 

Caley, the table just sits on the blocks by dead weight. The tilt mechanism is attached to, and rotates the rod to adjust the table back-to-front slope. That little block Reed is holding is the tilt mechanism. It has a groove filled with lubricant and i forget how it attaches, but the groove allows the table motion for the tilt adjustment...that's the most inelegant part of Wilfley's design IMHO....LOL. There are no rollers, casters, etc on either of our units....it's all sliding on self-lubricating plastics, like UHMW, or teflon, or Delrin, etc. On mine, I used Delrin bushings glued into the ABS plastic ribs, which are glued to the bottom of my ABS plastic deck, with Gorilla glue. Typically, you can't glue the self-lubricating plastics, but if you roughen the surface, it works well enough for this purpose.
Jim
 

MIne just has the front to back tilt, some have both. The slight tilt in line with the motor is fixed on mine but it can be shimmed if ever needed.
I'm busy this week, so I'll try to get it put back together and then film it next week. We ran it a couple of weeks ago, and it works fine. But we pulled it apart to size for a custom stainless rod & to build in a better angle lock.
 

Sounds great, Reed. My Wilfley didn't have longitudinal tilt. The guys at Denver Mining Supply, or whatever it was called, said that for really fine gold, the table should be tilted up on the cons end, but only 1/4" per 36" of table length.
Jim
 

Great photos Gents. Now I can see how basic the table stiffening system is. Just a rectangular box of 1x2's glued underneath.

I'm still trying to understand all those photos though. I can't figure out the table rides. Are there wheels somewhere, or does it ride on Teflon blocks? Last night my brain wouldn't stop on how to ride on something that moves back and forth so quickly. I finally came to the conclusion, that on my big table, linear bearings and rails should work, but I lime the simplicity of Southfork's caster wheels. If I go that route, the shaker tabletop would just drop on top, instead of me struggling trying to get a linear rail system aligned, and installed

I had my observatory roof sitting on two dozen casters, and they worked pretty good on a 200+ pound roof. The tabletop will only be 20 or so pounds I imagine. And I have all those caster wheels when I changed my observatory roof to using V rails and wheels Guess I wasted more money on that fancy rail system.
Caley I'm not sure the casters are the way to go I had problems. My table was jumping around I added hold down springs it works better. I realigned my drive and changed the way I bolted the motor and drive also it needs some guides to keep the table from walking sideways. I found part of the problem was the drive rod was hitting the support table no wonder it was jumping lol. I have linear rails and support bearings on the way for backup Happy mining.
 

Top Member Reactions

Users who are viewing this thread

Back
Top