Metal Detectiing TN. cave / Anybody done this?

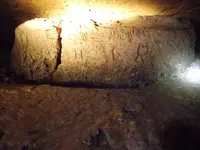
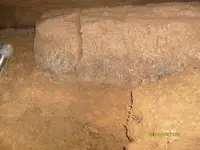
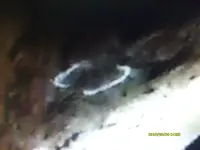
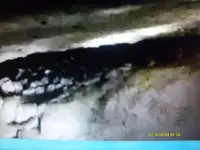
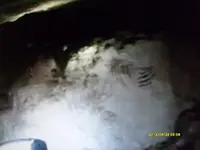
Brad... I got to thinking about the etched mound after we talked last night. I believe and think that everyone will agree, that it was great that you were able to take pictures and video of the mound when you did! Due to the void underneath it, which was apparently from water and mud flowing between it and the actual rock cave floor and due to the fact that it was sinking, I believe that it was and still is at risk of being totally destroyed by nature itself. I don't know if you can or would even want to find where the water and mud is flowing into and undercutting the mud/dirt on top of the rock floor but if you do, you might want to try to block it's flow, so that it will not continue to undercut the etched mound. I know that you believe that it may be impossible but we need to try to find a way to harden the etched mound and actually move it to the high rock shelves just inside the entrance of the cave. Yes, it will be hard and maybe impossible to accomplish but we already know that someone carved it out and moved it to it's present location just on the other side of the cutout. Just a thought that we all (you, Chelsea, your grandson, son-in-law, Jordan and myself) need to discuss and maybe accomplish on a joint combined effort. Once we get the etched mound into natural light, I am almost certain that the remaining hidden etchings will be more visible to the naked eye and to the cameras and video recorders.

Frank

Is the mud underneath soft enough to slide a sheet of plywood a little bigger than the mound under it so it can be moved? Or a steel sheet? Not too thick so its not heavy but strong enough to carry the mound? It would be thinner then the plywood and cut through the mud better. Good luck moving it in what little space you have.

Clay

Clay,

Hopefully, Brad will chime in on this and offer his thoughts! I know that he is real busy with family over but I am sure if he can get a break, he will post his comments. I am only theorizing that the etched mound can be moved because it was moved at some time in the past. However, we don't know in what condition it was in when it was moved! Was it a dried mud mound as it is now or was it wet mud and similar to the state in which it was created naturally from mud flows inside of the cave?? We don't know! Does anyone know of a substance that could be sprayed on the etched mound to harden and stabilize it in it's current environment which is a semi-moist environment with occasional Lime drippings from the ceiling of the cave? I believe that the etched mound is too fragile in it's dried mud state and Brad believes that it weighs too much to move without damaging it. Whether we attempt to move it and risk damaging or we leave it in place and still risk it suffering damage, is the delimma faced! I believe that if it can be moved, we not only may be able to finally see the etchings that are too weak to see with the naked eye and all of the camera and video equipment used due to the darkness and lighting problems but we might actually be able to preserve it. The etchings on this mound combined with the etchings on the other mounds much further back in the cave, might finally bring all of the parts to the puzzle together!


Frank
 

Frank,

I'm not sure. Something like a polyurethane?? You can pour that pretty thick. Ever seen a bar with that on it. I just don't think it would stick to the mud/dirt. You'd probably make an impression of it but probably not a good one. Hard to say. A plaster of Paris mold of it would be good if it wouldn't mess it up. I would get pictures of all etchings before they're gone. Then try and piece the puzzle together if you can.

Clay


Clay,

I mentioned this before to Brad but I dismissed it's use because I don't think it will hold the etched mound together. 3M Spray on Glue might be the perfect medium to preserve the etchings and even those that cannot be seen due to the mound's location and due to the lighting problems. Since it appears that the etched mound will be evntually destroyed by nature and if there is no other way to save it, we could spray it with the 3M Spray on Glue, then let it dry for weeks or more, then peel it off the mound. The sheet of glue peeled away, should have captured all of the etchings. Once removed from the mound, will the etchings be identifiable remains the big question!!??


Frank
 

Clay,

I mentioned this before to Brad but I dismissed it's use because I don't think it will hold the etched mound together. 3M Spray on Glue might be the perfect medium to preserve the etchings and even those that cannot be seen due to the mound's location and due to the lighting problems. Since it appears that the etched mound will be evntually destroyed by nature and if there is no other way to save it, we could spray it with the 3M Spray on Glue, then let it dry for weeks or more, then peel it off the mound. The sheet of glue peeled away, should have captured all of the etchings. Once removed from the mound, will the etchings be identifiable remains the big question!!??

Frank

Frank,

Good question! I would do a test run first. Do some etching on a regular mound then spray it and see how it comes out. If it works then do the mound. If it doesn't then you'll have to think of something else.

Clay
 

Good morning folks.... I'm glad some of you folks are trying to help me preserve this mound. The only way to get behind it is to destroy it or move it. And Frank, I believe your right that eventually "mother nature" will break it up.... even without my "help". I now believe that's why we have the crack on left side now. I was sure surprised to find the opening running under the mound. For a minute (still thinking now) I thought maybe we were on to "something". When we got near the mounds base there was a real dark colored layer of something running horizontal through the mud about 5" deep and 3/4" thick. It was on top of the opening below it. And this black layer ran very straight. At first I thought it was a rotten board but it had a grainy feel to it... not like wood fiber.

Now... moving the mound is a thought I have every time I see it. But this thing weights A WHOLE LOT! Clay I'm thinking using a piece of steel is better also. But even this idea is WAY OUT THERE. Making a sled out of the steel and then pulling. Getting this sled under the mound is possible and moving it from its base is possible but getting it OUT OF THE CAVE (without harming it) seems an impossible task. But I might be able to get it to higher ground (5-6 ft.).... MAYBE. And if I was going to move it this option should have been attempted 1st before I dug in front of it. I'm guessing it weighs 500lbs. or more.

Putting something on the face of the mound would be a risky task to preserve etchings. Using another mound 1st could be done. It has a very wet surface so finding something that would "stick" would be a challenge. The surface chips easily also.

The original request of this thread was seeking advise on how to MD this cave. Since I am a newbie to MD'ing I knew I would need help. DOES ANYONE HAVE ADVISE ON HOW TO SET UP MY MACHINE TO USE IN THIS ENVIROMENT? It's a Whites Spectrum XLT e-series. The reason for this is I DO NOT believe this area has been properly scanned yet. And I still believe this cave was used for ancient housing and much later by Indians or during the Civil War. The fire damage up front on the ceiling is evidence to this and back by the mound area there was fire evidence also.

Jordon will get latest video posted soon. And just a remainder for those viewing for 1st time a video link is on PG. 20 Post #385. And there are many photos laced throughout this thread of this cave and the etched mound.
 

Last edited:
Hello to all. I have to work until 7 tonight and we don't have wi-fi at my work. I will post our most recent decent tonight once I'm off. Cheers everyone.
 

Hello Frank. Sorry it's taken me so long to respond. I would love to accompany you and Brad on your site you need help with. Let me know when you have in mind, as I will need time to request off. Look forward to meeting you as well. Cheers.
Brad and Jordan... Great video! I loved every minute of it and you are right Brad, it brought back bad memories of me wanting to get the hell out of there as soon as I knew that it was a Limestone Cave! I hope when you go back Thursday, that Jordan will film Brad crawling through the dugout section of the mud mound/wall (i.e. before the etched mound on the left), so that folks on TNnet can get a real perspective of how confined the space is inside the cave at that point.(**) I am 6' 1" and around 240 pounds and while crawling through the dugout portion of the mud mound/wall, my' butt and back were scraping the ceiling of the cave. Some of the pics and video just really don't give folks a true perspective of how small the cave truly is in respect to height from floor to ceiling and from wall to wall! I also want to point out to those who think the etchings 51 yards inside the cave and also the ones further back, were done by ancient man or Native American Indians, I believe that you are wrong. In all of the caves explored by Dr. Simek and his colleagues that had cave art hundreds of yards upwards to a mile or more into cave, these caves were fairly easily navigated. In that I mean, that you could walk upright and maybe sometimes stooped over but never were they one their' bellies crawling to get to the areas were the cave art was located. In Brad's cave, once you get to about 40 to 45 yards into the cave, the rest of the journey is mainly on your' bellies or hands and knees and for this reason, I am almost certain that the etchings were not done by ancient man or Native American Indians! As to who made the etchings, Brad, Jordan, Brad's grandson and daughter Chelsea as well as myself, would like to know and also when and the reason.

(**) Note: I also want to stress the point that this dugout portion of the mud mound/wall was done on purpose to funnel or cause someone to choose this path of travel for a reason (sort of like funneling Deer to a place in the barbed-wire fence where you tied the top wire to the 2nd from top wire to make a low spot in the fence, so that the Deer would choose to cross there)! And that reason, was so that whoever did crawl through the dugout portion of the mud mound/wall would immediately see the dried mud mound wall with the etchings on it, once they came out on the other side.


Frank

P.S. Jordan, welcome to the Cave crawling/Cave etchings Nut Team! I hope to meet you some day when I get back out to visit Brad or maybe you could come with Brad when we try to get the boulders out of the creek that is blocking the flow from the eroding Volcanic Pipe and which contains at least some Gold and Silver. However, we hope that once opened, it will flow with lots of Gold and Silver along with other heavy metals and precious Gems.


End
 

Folks until I learn how to get my White XLT Spectrum to ground balance inside the cave (if possible) or a better MD comes along I guess I'm going to start excavating up front by the large fire pit. Does anyone have an opinion on what size screen might be best to start out with when I built some sifters? I was thinking maybe 1/4" screen...? Thanks.... Brad
 

Hello Frank. Sorry it's taken me so long to respond. I would love to accompany you and Brad on your site you need help with. Let me know when you have in mind, as I will need time to request off. Look forward to meeting you as well. Cheers.

Jordan... I would hope to get this done or at the least started before the end of the month as I try to sell at Flea Markets on the weekends and Ginseng Season for the State begins September 1st and for the National Forest (if I get selected for a Permit) is open from September 16th through the 30th. Combine that with the fact that my' oldest daughter and 5 grandchildren are having to move in with me and my' middle daughter, to state that things will get hectic around here is an understatement! The trip is dependant upon when Brad is going to be free and able to travel to near the site to meet, the weather cooperating and no emergencies or problems concerning the transition at my' home. Maybe you, Brad and myself can coordinate (plan) exactly what days will be best and we may need at least two days, if the task cannot be accomplished in one day. I will see about putting together some cheap Gold and Gem traps that can be placed downstream of the hole, to catch any Gold or Gems that may flow out in our absence and we are successful in getting it unblocked or unclogged by the boulders. We will also need to remove the evidence of the unclogging if possible or place ropes around the boulders (for removing them again later), ease them back into the hole for the time being and cover any evidence of the ropes and work done. Although, there may not be a significant amount of Gold, Gems or anything else released when the hole is unclogged, I am hoping that we will make a major find and one that may require filing a Claim isf the situation warrants!


Frank
 

Last edited:
Folks until I learn how to get my White XLT Spectrum to ground balance inside the cave (if possible) or a better MD comes along I guess I'm going to start excavating up front by the large fire pit. Does anyone have an opinion on what size screen might be best to start out with when I built some sifters? I was thinking maybe 1/4" screen...? Thanks.... Brad

Brad,

A 1/4 screen is good. That's what I use. Hopefully the material you screen is dry because mud is a pain. Don't know how much dry you have with all the water around there.

Clay
 

Brad,

A 1/4 screen is good. That's what I use. Hopefully the material you screen is dry because mud is a pain. Don't know how much dry you have with all the water around there.

Clay

Oh no Clay.... why would it be dry for me? No it's ALL MUD. I expect maybe 8-12" of soil have washed inward after the landslide near the mouth and it's all very wet. But at least I'll be up near the mouth of cave working. I really don't know what to do with this mound area now...? It isn't going anywhere nor is the one way back... Maybe dig around it some more and see what happens. Hopefully Jordon gets the newest video posted tonight of us digging around that area. Later..... Brad
 

Alright, Break out the pressure washers! Brad you take right side, Frank you take the left side. Jordan and I will hold up a screen covering the entrance and you two spray the mud through the screen. Wouldn't that be nice!

Since it is mud its a good thing you have water. I would build a screen. Make a square with 2x4's about 2' by 2' then attach the screen to one side. I used a staple gun to attach the screen. Long staples but it only last for so long. From the weight of the material it starts to pull the staples out so then I have to restaple, again and again. So you'll probably want to nail strips of wood into the 2x4 to hold the screen. Attach 4 2x4's for legs however high you want it. I use four 5 gallon buckets to hold it up. Just the right height for sitting in a chair. I have another screen that's a lot stronger made the same way but I used expanded metal for screen. The holes are 1/2". I use horse shoe nails or U shaped nails to hold the screen on. It never comes apart. Works great when I'm out gold prospecting or digging in an old ghost town.

So why am I telling you all this? I don't know? I'm sure you know how to make a screen. Maybe give you a idea or two. I would put the screen at the edge of the cave so you push the screened mud out and down the hill. Bring a few buckets for mud and one for water to help wash the mud through the screen.

Ok I'll shut up now. Let me know how it goes.

Clay
 

Wow, that sounds as if it will be a exciting next couple of months for you. I will mark down on the schedule at work for two days off here in the next two weeks. I will do this tomorrow. I assume that you are free, weekdays or weekends? I usually have Wednesdays and Thursdays off anyways, so maybe that is a possibility? Let me know amigo.
Jordan... I would hope to get this before the end of the month as I try to sell at Flea Markets on the weekends and Ginseng Season for the State begins September 1st and for the National Forest (if I get selected for a Permit) is open from September 16th through the 30th. Combine that with the fact that my' oldest daughter and 5 grandchildren are having to move in with me and my' middle daughter, to state that things will get hectic around here is an understatement! The trip is dependant upon when Brad is going to be free and able to travel to near the site to meet, the weather cooperating and no emergencies or problems concerning the transition at my' home. Maybe you, Brad and myself can coordinate (plan) exactly what days will be best and we may need at least two days, if the task cannot be accomplished in one day. I will see about putting together some cheap Gold and Gem traps that can be placed downstream of the hole, to catch any Gold or Gems that may flow out in our absence and we are successful in getting it unblocked or unclogged by the boulders. We will also need to remove the evidence of the unclogging if possible or place ropes around the boulders (for removing them again later), ease them back into the hole for the time being and cover any evidence of the ropes and work done. Although, there may not be a significant amount of Gold, Gems or anything else released when the hole is unclogged, I am hoping that we will make a major find and one that may require filing a Claim isf the situation warrants!


Frank
 

Alright, Break out the pressure washers! Brad you take right side, Frank you take the left side. Jordan and I will hold up a screen covering the entrance and you two spray the mud through the screen. Wouldn't that be nice!

Since it is mud its a good thing you have water. I would build a screen. Make a square with 2x4's about 2' by 2' then attach the screen to one side. I used a staple gun to attach the screen. Long staples but it only last for so long. From the weight of the material it starts to pull the staples out so then I have to restaple, again and again. So you'll probably want to nail strips of wood into the 2x4 to hold the screen. Attach 4 2x4's for legs however high you want it. I use four 5 gallon buckets to hold it up. Just the right height for sitting in a chair. I have another screen that's a lot stronger made the same way but I used expanded metal for screen. The holes are 1/2". I use horse shoe nails or U shaped nails to hold the screen on. It never comes apart. Works great when I'm out gold prospecting or digging in an old ghost town.

So why am I telling you all this? I don't know? I'm sure you know how to make a screen. Maybe give you a idea or two. I would put the screen at the edge of the cave so you push the screened mud out and down the hill. Bring a few buckets for mud and one for water to help wash the mud through the screen.

Ok I'll shut up now. Let me know how it goes.

Clay

Well Clay... what you stated above is pretty much how I envisioned it. Woodworking is my main hobby (not mud mounds) so making a sifter didn't seem like rocket science. I also thought about getting a small 12 volt water pump or just putting the sifter right under the overhang where water pours over at the opening and use this "running water" source also. If possible in the streambed I'll put a small bucket to catch water also for sifting. I'll also carefully cut another 1/4" "spare screen" to lay on top of the 1st to cut the openings to 1/8" if ever needed. Once I get it back there it's becoming part of the landscape forever. Well that's unless my Dublin born friend Jordon wants to pack it out.... NOT!!!!
 

Jordon just called me from his "new phone" which he learned is NOT CAVE PROOF... nor is his "good light".... and also very hard on 9MM's... to tell me he gets off work at noon today and will post the mound digging video to youtube this afternoon. Hopefully this video will show another view on how tight this area is and how hard it is to work. Upon viewing video I'd sure like some ideas on possibly why this mound was put, built and/or shaped where it is located. And not to mention the one further back into cave. I honestly don't know what to do at this point except to excavate up front. Any further opinions or thoughts would be GREATLY appreciated. Thanks.... Brad
 

Limitool , I would'nt chance taking your XLT into the cave & water that far . Besides , what are the chances that there is much metal to need the discrimination . If your that determined to detect , I would get one of these . Small & compact to go with you in tight places . Best of luck to you and your crew .

Treasure Products, Inc | Home of the Vibra-Probe

Sir I TOTALLY agree. And alternative plans are in the works. I do not believe much and/or any metal is to be found much further than just past this lighted area where this etched mound is located. Thank you very much for your thoughts and interest.... stay tuned.... Brad
 

Well today Jordon and I went back to the cave again with a different MD. My buddy Frank who lives in East TN. bought a couple of MD from Craigslist in my Nashville area. We went and got them for him and one of them was a Whites Surfmaster II. This MD was much more user friendly within the cave environment. We left at sunrise to go to cave and MD the entire etched mound area of the cave. We never got a single hit. This was a bitter pill to swallow but at least we now know. And last week we dug 18" deep in front of mound (down to bedrock) and found nothing buried in front of it. Now there is a hole going back into cave wall behind the mound but we cannot reach it without destroying the mound. And moving it is going to be a HUGE undertaking. The video we took last week is still waiting to be uploaded to youtube. Jordon's GoPro camera is giving him fits trying to format for upload. He's still working on it (SORRY). So I guess we'll now work in front of cave using a sifter and see if some artifacts can be found. I'll attach a before / after picture of front of mound. The video (when uploaded) will much more clearly show this cramped area. Thanks Frank for letting us use your MD @ cave.
 

Attachments

  • Z1.JPG
    Z1.JPG
    1.8 MB · Views: 163
  • S6302839.JPG
    S6302839.JPG
    1 MB · Views: 144
I took some photos from the earlier videos that we're try to STILL post. Not only is there the "main" or 1st mound just after light ends but there are others further back. Some are very squared off… top, front and sides. They do have etching on them but they are very faded. There are some with vertical lines and some with horizontal lines but the lines appear to be "measured and uniform". But these "other" mounds are now in an even harder to reach place. The one's I'm showing are not good photo's but there the best I can do right now from the video. Behind these mounds (photo 854 - 856) is a large tunnel which extends back 10-15 feet or more.

I am totally frustrated by not being able to get the whole 1st video of our deep cave exploration and/or our last one posted on YouTube w/link (sorry). Jordon has tried but still can't figure it out even after contacting Youtube. And he has posted many. Hopefully soon he'll figure it out (I can't).

Photo ending in 854 and 856 are of the same two mounds which are in a really hard to reach spot. Much harder than the 1st etched mound I've shared thus far.

Photo ending in 852 is a white mark which appeared while viewing the video. This is just above the 2 pictured mounds on this post.

Photo ending 847 is close up of top of mound from pic 856-854 with a pile of black pebbles piled on top. Another mound has the same black pile of pebbles stacked on its top also.

Photo ending 844 shows some deep etched grooves engraved upon it with others very faded.

Photo ending 848 show another mound with the same black surface upon it as the one up front of cave near its mid section to its base.

I'm sorry the photos are not good… they are much clearer on the video we're trying to post. But none the less I truly wish I understood their meaning. Ancient man, KGC or outlaws or someone long ago having a field day. But if it’s the latter someone really…. REALLY …. went through some effort.
 

Attachments

  • S6302854.JPG
    S6302854.JPG
    655.4 KB · Views: 155
  • S6302856.JPG
    S6302856.JPG
    729 KB · Views: 147
  • S6302852.JPG
    S6302852.JPG
    653.7 KB · Views: 132
  • S6302848.JPG
    S6302848.JPG
    526.9 KB · Views: 135
  • S6302847.JPG
    S6302847.JPG
    709.7 KB · Views: 121
  • S6302844.JPG
    S6302844.JPG
    651.8 KB · Views: 133

Top Member Reactions

Users who are viewing this thread

Back
Top