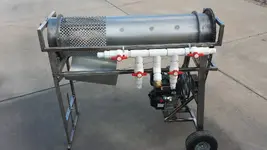
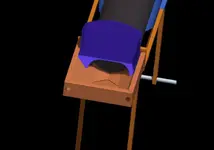
12 INCH TROMMEL BUILD

I think its a very good possibility. Let me think about it and I will email you. Something that comes to mine is hydraulic water driven motor rotating a half-shaft mounted to your hopper. This half-shaft would have an adjustable counterweight that you could adjust the amount of vibration... You can also control the flow for the amount of vibration.
Ya, send me some crude sketches, I'd like to try something like that. With the 3" pump I have the extra water volume and velocity to drive something.
 

I think its a very good possibility. Let me think about it and I will email you. Something that comes to mine is hydraulic water driven motor rotating with adjustable counterweight that you could adjust the amount of vibration... You can also control the flow for the amount of vibration.
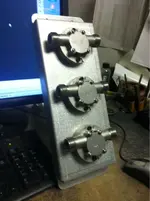
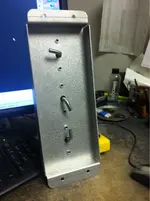
I like it. I had the 3 pumps sitting around so I'm goning to do a test. See how much vibration I can get out of 3 mounted together.
 

Attachments

  • image-3974063302.jpg
    image-3974063302.jpg
    57.9 KB · Views: 114
  • image-1237214018.jpg
    image-1237214018.jpg
    68.7 KB · Views: 129
I like it. I had the 3 pumps sitting around so I'm going to do a test. See how much vibration I can get out of 3 mounted together.

I can tell you from first hand experience that when running multiples the counter weights all need to be synchronized. Best to link them together so they stay in sync.

Otherwise they will fight against one another greatly reducing the desired effect.


GG~
 

Last edited:
I can tell you from first hand experience that when running multiples the counter weights all need to be synchronized. Best to link them together so they stay in sync. Otherwise they will fight against one another greatly reducing the desired effect. GG~
That's gonna be tricky. I can start the same but there's nothing to keep the impeller from slipping or one going faster than the other. I just gotta try it and see what happens.
 

If you don't get the desired affect with the three pumps then try just a single pump. It's really going to depend on the rpm / water flow in producing the vibration. Additionally do those pumps have bearings where the rotation is at on the counterweight?
 

If you don't get the desired affect with the three pumps then try just a single pump. It's really going to depend on the rpm / water flow in producing the vibration. Additionally do those pumps have bearings where the rotation is at on the counterweight?
I was thinking 3 pumps in 3 different places on the washplant.
No bearings. Well, rubber bearings. I don't think the RPMs will be high enough.
 

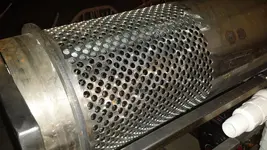
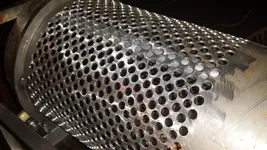
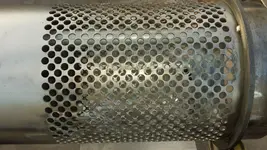
I had some drilling to finish up today where I started and finished. Was off about 3/8" of being dead on of having the pattern perfect, but having to calculate 39+ inches circumference of the cylinder and making and printing the drill template I would say its not bad. The spray bar is temporary mounted. Once the hopper has been mounted I then will disassemble to paint and plate the trommel. Hopefully it will be put to use soon as I will have diggers and dirt hauler to help.

T200.jpg T201.jpg
 

With lots of time on my hands and being able to work with only one arm I managed to take a wire wheel and begin cleaning up the cylinder and frame. The cylinder I decided to take and have it cadmium plated. Yeah I know the chute is along ways from the cylinder. The chute goes on the top rail but I can't lift the cylinder out from the cradle right now. A new chute and hopper is being made by JustBent. This old chute I will be refabricated into a chute for the discharge end of the trommel.

I want to thank Jay (JustBent Technology) for offering to help me as I really can't do much in lifting, digging, twisting, etc. for months (maybe up to 1 year) until I am completely healed. Russau understands this process of a complete shoulder replacement as he has had both shoulders replaced. I have very little strength in the right arm but have gain lots of range in movement. Next week I begin limited strengthening of the muscles in my right shoulder.

I do have some welding still to do and I am hoping I can do this in a few weeks. The water header assembly is being held on with clamps right now, I need to make permanent clamps to hold the water header assembly. Also I need to install the nylon bushings to keep the cylinder from walking. These bushing will be installed under the cylinder at each end. The U bolts that holds the spray bar needs to be cut and acorn nuts will be installed.

Dang with every photo I keep being reminded of the 1 missed hold I need to drill. You can see the center punch. When you look at the cylinder in person you can't see this missing hole due to the 1400 plus holes, but the photo shows the missed hole.

T202.jpg T203.jpg
 

Last edited:
Looking great AZ. I know it's slow going but that just means you get to put the time into detail. I'm working 58 hours a week right now and on my one day off I mostly feel like sleeping lol. On a positive note I should have the money for the trommel and our family vacation in November within the next month and a half due to all the overtime. Your doing way better than I am even injured, or should I say repaired and recovering, as you are. Keep up the good work and the rest of us informed. I'm still reading all the posts even though I'm not posting much.
 

Look like your about ready to pick z color. Or 2
I remember you saying somewhere it was gonna be a desert color? Are you gonna paint right over the cad plate, the outsides not gonna wear.
 

Look like your about ready to pick z color. Or 2
I remember you saying somewhere it was gonna be a desert color? Are you gonna paint right over the cad plate, the outsides not gonna wear.

Jay the problem with powder coating the cylinder as you know its a rather thick coating process of which will narrow the openings in the 1/2" holes. This is why I am choosing plating the cylinder as its only a few thousands thick. I think once it comes back from coating will see what it looks like. I know it will be a gold color of which I am ok with. Just got to come up with a color for the frame that will look good. The water header I am going to paint as well.

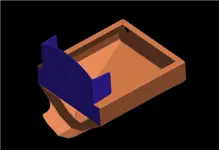
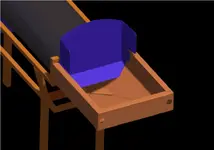
Here are the last images Jay has done for the hopper.

Hop6.png Hop7.png
 

AZ i didnt have my shoulders replaced. i had rotator cuff surgury on both of them. as far as the water driven pulsating/vibration. keep it simple! (K.I.S.S.) just think of a smaller Pelton wheel for the drive and another wheel that has a partially cutout peice for the vibration. and your (now pulsed) water going through this side of the device. not knowing the diameters and load of what your needing, you will have to play with ratios for this water driven device to work.
 

Jay it just hit me just after I posted your drawings. If any large rocks are placed into the hopper the blue screen on the bottom side will stop the rocks from entering into the trommel.. What the distance from the bottom of the screen to the bottom of the hopper?
 

AZ i didnt have my shoulders replaced. i had rotator cuff surgury on both of them. as far as the water driven pulsating/vibration. keep it simple! (K.I.S.S.) just think of a smaller Pelton wheel for the drive and another wheel that has a partially cutout peice for the vibration. and your (now pulsed) water going through this side of the device. not knowing the diameters and load of what your needing, you will have to play with ratios for this water driven device to work.

JustBent is needing the vibration on his Big Red machine I had brought up the water driven trommel cylinder based on a trommel I had saw a few weeks ago.


Last edited:
Jay it just hit me just after I posted your drawings. If any large rocks are placed into the hopper the blue screen on the bottom side will stop the rocks from entering into the trommel.. What the distance from the bottom of the screen to the bottom of the hopper?
Anything you want it to be.
 

Jay the problem with powder coating the cylinder as you know its a rather thick coating process of which will narrow the openings in the 1/2" holes. This is why I am choosing plating the cylinder as its only a few thousands thick. I think once it comes back from coating will see what it looks like. I know it will be a gold color of which I am ok with. Just got to come up with a color for the frame that will look good. The water header I am going to paint as well.

Here are the last images Jay has done for the hopper.

<img src="http://www.treasurenet.com/forums/attachment.php?attachmentid=926587"/> <img src="http://www.treasurenet.com/forums/attachment.php?attachmentid=926588"/>

AZ, REMEMBER that you could use high temp silicone stoppers in the holes to prevent powder coating the inside of the holes. Look up powder coating supply and I believe it is Ewing that sells those in bulk. Either way you go the coatings are going to wear out. If you want to make the cylinder last longer you might consider having the entire thing hardened.
 

Last edited:
Powdercoat will only add about .005. Big whoop. It will look way better painted than zinc plated. The plating is pretty hard, it might last a day. Your best option, I think, is skip the cad plate, powdercoat, then coat the inside with a spray on rubber coating. You can't harden unless the alloy is right to begin with. What did you make it out of?
 

Powdercoat will only add about .005. Big whoop. It will look way better painted than zinc plated. The plating is pretty hard, it might last a day. Your best option, I think, is skip the cad plate, powdercoat, then coat the inside with a spray on rubber coating. You can't harden unless the alloy is right to begin with. What did you make it out of?

As for powder coating I am just thinking back when I took my boys BMX frames to be powder coated by Tucson Spray Technologies. They screwed up and did not cover the openings where the bearings press in for the cranks and it was a ***** to clear the coating to seat the bearings. I remember how thick the coating was. The cylinder was rolled from mild steel.
 

As for powder coating I am just thinking back when I took my boys BMX frames to be powder coated by Tucson Spray Technologies. They screwed up and did not cover the openings where the bearings press in for the cranks and it was a ***** to clear the coating to seat the bearings. I remember how thick the coating was. The cylinder was rolled from mild steel.
If the guy puts it on thick it might be .006 a side. Even if it was .010 a side it really wouldn't make a lot of difference. That's just me tho, you gotta make this the way you want, I'm just puttin my 2cents in.
 

Top Member Reactions

Users who are viewing this thread

Back
Top