Placer Claim Mined Out?

desertgolddigger

Bronze Member
May 31, 2015
1,102
2,116
Twentynine Palms, California
Detector(s) used
Bounty Hunter Time Ranger
Primary Interest:
Prospecting
I belong to a local club that owns a claim. This club has had this claim for many years, and acquired it after the old timers had mined it previously, and others after they commercial outfits closed up.
I walked quite a bit of the 160 acre claim, and noted that just about every wash had been worked. Most of the surface nuggets has also been detected by those with gold detectors. In other words, this place has been picked over and over and over.
But I m a stubborn type of person, and I figured, just watching how people ram their puffer and blower drywashers, that some gold was just being blown through them. maybe not much, but some small stuff that never got a chance to settle behind the riffles.
I know many of you would never go to the effort of digging for three to four hours through the tailings in these washes. Again, I'm a bit stubborn, and anyway, I just wanted to have some fun locally, instead of driving 300 miles roundtrip to something that gives a little more for less effort.
I've spent the last three weeks, digging a few times a week along about 30 yards of wash, and have recovered just about a gram of gold. That might not seem like much, but I have only dug up 5 grams, not counting this one gram in almost 20 years out here drywashing in the desert of southern California.
As you would know, things always seem to go wrong. My gas powered blower motor decided it was time for the repair shop, and haven't heard from the shop in two weeks. So I purchased a WORX WG521 corded electric leaf blower to use with my Royal Large drywasher. I'm using a portable generator to provide the power. And it actually is working better than with my old gas powered blower. I have to run the blower on the lowest speed, or I just blow everything through the riffles. Results are very good, as I am getting gold specks so small that I will have to use the Blue bowl in order to recover them.
I'm not only getting a little gold, I'm having some fun, and I am getting a good workout. I've lost 10 pounds since I started. So things are going well.
I'm still digging test holes around the old time hard rock mines in the hope I will find where the gold has drifted downhill below these mines. So far just a couple specks here and there. I figure I just have to move laterally one way or the other before I get something better Of course, I' don't really know if the old timers stripped the hillsides. Even if they have, they apparently aren't as thorough as I am. I hope that I may be lucky and find a larger piece of gold that the old timers, previous placer miners, and detectorists have missed.
Hope everyone is having as much fun as I have been having.
 

Upvote 50
The last super cons (mesh 200-299) got processed. Weight wise, they didn't compare to the previous (mesh 180-199), but it had the most gold particles.

At lest I now know the general size and quantity I'm getting (mesh 180-299), is about 90 percent. I can save the bigger mesh size concentrates for about a year before needing to clean them up.
 

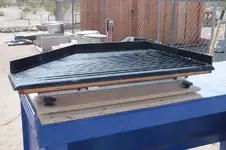
Finally got the table mounted on the base. I'll have to purchase knobs and 1/4-20 x 6 inch bolts, as the set I have are not long enough. They barely allow for adjustment of the table for 1/2 inch drop back to front, and level on the riffles.

I'm using a set straight up bolt in the base board. The rail mount board has four 1 inch holes in the four corners. I am using fender washers with 1/2 inch holes and slightly smaller washers with 3/16 inch holes The sequence is from bottom to top, 1/4 inch nut, 3/16 washer, 1/2 inch fender washer, rail mount board, 1/2 inch fender washer, 3/16 inch washer, and the knob. All this, with the one inch holes allows for play when the rail board is tilted.

I would like to use wing nuts below each 1/4 inch nut, so I can tighten things up, once I get the table angles set. This is another reason why I need the longer bolts with floating hold down knobs. It'll all allow for finer adjustments.
 

Attachments

  • ST 3 Knobs.jpg
    ST 3 Knobs.jpg
    159.9 KB · Views: 25
I decided to do the last batch of super concentrates (300 minus).

I figured, as there was so little in the container, there wouldn't be much gold, and I was wrong! Admittedly the weight would barely register on the scale, but the line was nearly equal to the 200-299 mesh gold, and of course that means there were even more specks of gold in the pan.

I'm really happy with this testing and its results. I just need to keep on accumulating the concentrates, and eventually, either the shaker table, or maybe Miller table will be able to give me clean gold.

If I haven't said this before, my goal is one ounce of this tiny gold (mesh 100 and smaller). I'd love to find a hard rock source, but I still have all these waste piles where I'm getting fair gold. Haven't been skunked ever since I discovered just how small gold can be, and now know how to look for it, and sluice, and pan it.
 

Finally got the table mounted on the base. I'll have to purchase knobs and 1/4-20 x 6 inch bolts, as the set I have are not long enough. They barely allow for adjustment of the table for 1/2 inch drop back to front, and level on the riffles.

I'm using a set straight up bolt in the base board. The rail mount board has four 1 inch holes in the four corners. I am using fender washers with 1/2 inch holes and slightly smaller washers with 3/16 inch holes The sequence is from bottom to top, 1/4 inch nut, 3/16 washer, 1/2 inch fender washer, rail mount board, 1/2 inch fender washer, 3/16 inch washer, and the knob. All this, with the one inch holes allows for play when the rail board is tilted.

I would like to use wing nuts below each 1/4 inch nut, so I can tighten things up, once I get the table angles set. This is another reason why I need the longer bolts with floating hold down knobs. It'll all allow for finer adjustments.
Wow nice job looks professional.
 

I managed to set up a temporary platform for my drive unit, and connected it to the table. No speed control used. It ran very well!!

Everything is back inside, except the shaker table. Covered that with a very large plastic bag, and rope wrapped around to keep it in place.

Will build the drive unit platform tomorrow.

I finally figure out the Jim provided two different length drive shafts. Now I won't be hitting the stops on the rails.

Once that's done, I need to figure out how to to keep the electronics, variable voltage power supply and speed control dry. I have another power supply for my little 12 volt pump, and speed control to regulate the flow of water.
 

I've gone to the umpteenth plane for table support, and adjustment. I'm going to a three leg system like what Jim made mew. I figure it must be a whole lot easier to adjust with just three legs (one in back)

I installed the five inch carriage bolts in the wood strip that I then crewed down to the base table. Had to use a one inch hole thingy to make the top recess 1/4 inch to allow the carriage bolt and washer to sit without raising the board.

I just finished painting these two boards so that they are at least resistant to water.

Tomorrow I'll paint the rails board, and get that installed when it's dry. Want all exposed wood painted with outdoor enamel like I did with the base table.

Sorry Guys. If you were wanting to see things done quicker, isn't going to happen. I'm rather methodical when it comes to building things. Do it one step at a time to ensure it's all just right.
 

On another front. When I traded my big 80 gallon trough I was using with my mini sluice, for a 40 gallon one to use with my mini sluice, I cleaned out the super fine slag that was in in the bottom.

Today I ran that material, and got a really good line of the 300 minus sized gold. I do this about every six months, and always get a good amount of this fine gold.
 

I wonder if this rain will ever stop? It's not hard, but it is almost constant. I managed to squeeze in the final spray painting of the shaker table, in between storms, but I think it'll take days to dry because of the low temperature and humidity.

I also managed to sluice another 4/5th bucket of milled and classified material before the rain started. Got a very nice line of the tiny stuff.

Hope everyone is having a nice weekend, though I imagine most are indoors, trying to keep dry and warm.
 

Last edited:
I wonder if this rain will ever stop? It's not hard, but it is almost constant. I managed to squeeze in the final spray painting of the shaker table, in between storms, but I think it'll take days to dry because of the low temperature and humidity.

I also managed to sluice another 4/5th bucket of milled and classified material before the rain started. Got a very ice line of the tiny stuff.

Hope everyone is having a nice weekend, though I imagine most are indoors, trying to keep dry and warm.
Warm and sunny N. California were sluicing here the last few days running low on water fast.
 

I'm happy to see you getting things done, Caley. I respect your diligence! Table looks great! We're finally getting some sunshine up here, and the snow is melting. I'm building a feed auger for the dry sluice right now. Hope your rain quits soon.
Jim
 

I'm happy to see you getting things done, Caley. I respect your diligence! Table looks great! We're finally getting some sunshine up here, and the snow is melting. I'm building a feed auger for the dry sluice right now. Hope your rain quits soon.
Jim
Jim, Glad you're finally getting some nicer weather. The rains have stopped, but I doubt that's the end of it. And the winds are the strongest I've ever seen since I moved up here some 23 years ago.

I have the motor/drive unit platform assembled. I need to size things up one more time tomorrow before adding some paint.

After that I need to figure out how to protect my electronics. The shaker table can only be outside, as I don't have a barn, ot a covered area. The code enforcement people want you to submit pans for such, and that cost $3K, though my backyard neighbor seems to have gotten around that requirement. Maybe I can figure out how to put up an 8 X 8 X 8 four poster cover. If not, I have a heavy duty outdoor furniture cover. But the electronics are a puzzle for me right now. Need to do some research on how to protect two 120V to DC power supplies, a motor speed control and what not.

On another front. I keep running my concentrates from the mini sluice, and the gold keeps getting smaller and smaller. Right now the gold is barely visible under 10X. I'm guessing that's around 500 mesh, or smaller. I just wonder if this shaker table will eventually be able to catch that small and maybe smaller.
I doubt you'll get a very high percentage of the gold in that size range, Caley. You'll get some of course. To do very much you'll need to remove as much of the magnetic sand as you can, and classify as tight as possible. You'll probably want to do at least a couple of reruns, too.
Jim
 

I doubt you'll get a very high percentage of the gold in that size range, Caley. You'll get some of course. To do very much you'll need to remove as much of the magnetic sand as you can, and classify as tight as possible. You'll probably want to do at least a couple of reruns, too.
Jim
Thanks Jim. Guess I'll be doing it the same old way, multiple sluicings. I get very little gold bigger than 180 mesh. Most is smaller than that.

EDIT: 3/18/24 - Finished cleaning out the bottom of my water troughs for the second time. Got very little gold. But the first round from yesterday has confirmed both my sluices are dialed in as well as possible.

I upped the magnification I've been using from 5X to 10X, and saw even smaller gold. At 10X, the gold was at the limit of visibility. I need to research just how small that is.
 

Last edited:
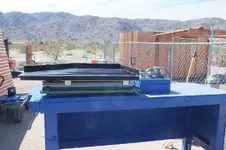
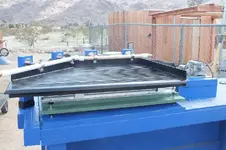
Here's a picture of the Table attached to drive atop mount.

For those curious about the black knobs, they are part of my system for adjusting the table to the desired tilt. There are three of these, two in front and one on back center.

They consist of a bolt with a black knob, a nut, big one inch washer, 2 inch fender washer, tilt board, 2 inch fender washer, 1 inch washer nut, spacer, and black knob. While not as easy to use as Jim's legs,m All I need is to loosen the appropriate knob, and nut, and then tighten those.

The table is set at the starting position, with riffles level, and 1/2 inch drop per foot, front to back.

EDITED: Just went out with a power supply to make sure all works, and it does like a chimp. Sure is a noisy bugger.
 

Attachments

  • ST Attched to Drive.jpg
    ST Attched to Drive.jpg
    163.4 KB · Views: 26
Last edited:
Here's a picture of the Table attached to drive atop mount.

For those curious about the black knobs, they are part of my system for adjusting the table to the desired tilt. There are three of these, two in front and one on back center.

They consist of a bolt with a black knob, a nut, big one inch washer, 2 inch fender washer, tilt board, 2 inch fender washer, 1 inch washer nut, spacer, and black knob. While not as easy to use as Jim's legs,m All I need is to loosen the appropriate knob, and nut, and then tighten those.

The table is set at the starting position, with riffles level, and 1/2 inch drop per foot, front to back.

EDITED: Just went out with a power supply to make sure all works, and it does like a chimp. Sure is a noisy bugger.
Looks great what's next?
 

Caley, that's terrific! Nice piece of work, and hearing it runs OK is good news. I'm not surprised it's a bit noisy. I think that probably comes from play in the slides. But that slight play reduces friction, so no big deal on the noise.
Jim
 

Looks great what's next?
Right now I'm working on the supports for the water bars. Just finished painting the wood supports. Hope to get the water bar holders and supports installed today. I'll post a picture of that when done.

Still need to cut the PVC pipe, drill the holes, and glue on the fittings after that. Probably get that done tomorrow.
 

Caley, that's terrific! Nice piece of work, and hearing it runs OK is good news. I'm not surprised it's a bit noisy. I think that probably comes from play in the slides. But that slight play reduces friction, so no big deal on the noise.
Jim
Thanks Jim. I made sure the rails are well lubricated. Just hope the ball bearing bearings stand up to the rapid movement for a few months, at least.

I ordered the retaining ring pliers, so I can use all those spares I have on hand, especially the delrin plastic ones.
 

My experience with Delrin is very good. I used it quite a bit in various devices over the years. My only complaint is it tends to get squeeky. Now I prefer HDPE.
Jim
 

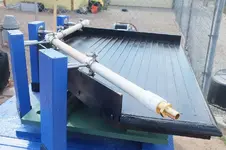
Here's a mockup of my water bar system. I need to get different ends for the place where the brass fittings go. I want the fittings in the center, not the ends.
 

Attachments

  • Water Bar 1.jpg
    Water Bar 1.jpg
    171.5 KB · Views: 21
  • Water Bar 2.jpg
    Water Bar 2.jpg
    139.8 KB · Views: 19

Top Member Reactions

Users who are viewing this thread

Back
Top