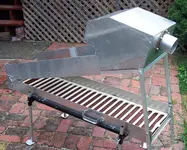
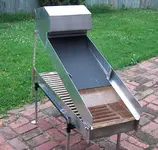
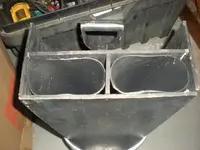
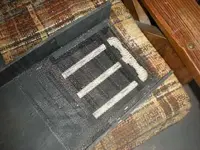
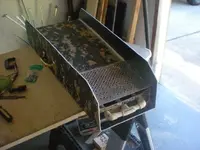
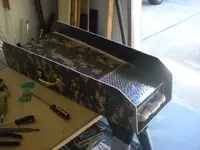
My Diy Fluid Bed Gold Trap Sluice

Looks good. I'm going to be setting one up to go at the bottom of my current Highbanker. As it is we can have three guys shoveling into it as fast as we can and I couldn't overload it. If you look at my YouTube you can see the last vid where I was running it with the letrap at the end to see if anything was making it through and after four hours and three guys shoveling we only found ten or eleven tiny little flakes of superfine flour gold. Like yours I'd like to know for sure that I'm getting all the gold I possibly can get but without having to set up two full length sluice beds. We will be running the Highbanker with gold hog matting next time we go out. We did our last cleanup with it and it didn't miss a flake. Cut the concentrates down to almost a half a pan compared to a quarter bucket like what I will get out of my Clarkson style rifles and miners moss.

Your header design is real nice. Looks very adjustable. How do you know that your flow is right in the fluid bed? Is there some trick to adjusting that? and your stand all out of pvc must have lightened things up quite a bit. That's some good work there.
 

Thanks. There is a pressure gage and valve on the left side to make sure the pressure is not too high or too low. I try to keep it around 7 psi. Just enough to keep the bed fluid.


This was one of the adjustments I made also. I had made the holes in the fluid bed tubes too big and pressure was low.

Robert
 

1/8"! Way too big for the size bed and inlet pipe. 16 holes, 3 rows per pipe and 3 pipes!

Went up to 1" inlet and 1/16" holes.

Robert
 

It helps to increase the pressure into the trap once it gets full of heavies, also you don't want to make the trap too deep either. I've found you get best results when the bottom of the tubes are positioned no more than 1/2" off the bottom of the trap and the trap overflow is no more than 1/2" above the top of the tubes. (too much weight from material building up above the tubes will choke off the fluidization)

I now go with 3/32" holes in the tubes instead of 1/8". :icon_thumleft:
Also when supplying the tubes with a pump it helps to have a fine screen over the foot valve to prevent the holes in the tubes from getting clogged.

Fluid beds rule!
My latest is a 4' long 14" wide trap with 26 tubes :o Fed by a 4" dredge!

fbc1.jpgfbc2.jpg


GG~
 

Last edited:
your HBer looks real good! the only thing i dont like about it is that s s s s s h h hovel.i stutter every time i got to say it!:)

Not sure I undddddderrrrrstand.......The dirt isn't going to jump in the highbanker!
 

Ah! Yes! Plans are already underway to add a suction nozzle to have the highbanker/dredge combo! You need a 12 year old to do all the shovelling for you like I did! He loves it!

I am also redoing the manifold and adding a 1.5" output for the dredge.

Robert
 

I've found you get best results when the bottom of the tubes are positioned no more than 1/2" off the bottom of the trap and the trap overflow is no more than 1/2" above the top of the tubes. (too much weight from material building up above the tubes will choke off the fluidization)

I now go with 3/32" holes in the tubes instead of 1/8". :icon_thumleft:
Also when supplying the tubes with a pump it helps to have a fine screen over the foot valve to prevent the holes in the tubes from getting clogged.

Fluid beds rule!
GG~

GG, I just tried my home build today for the first time. Complete failure. Looking at this post gives me hope.

I was not getting much agitation in the fluid bed at all - and I was using funnels to help with the pressure to the tubes. I had pretty nice water flow also, but still not enough agitation to flush the light material out. My bed filled up quickly and stayed that way. So smaller holes worked more efficiently?

I believe my tubes were a bit high also - probably part of the problem.

This was my first attempt and I knew it was weak, so I've already made another. Still have to put my punch plate on and then it's ready to go. Second model is a lot tighter and follows your specs exactly (except for material) I'm hoping for better results on this one.

Here's pics of my offending funnels and tubes. I was really surprised by it's complete failure as I thought it would handle a slow feed at least, giving enough time to flush the bed - NOPE!

funnels.JPGFB.JPG
 

GG, I just tried my home build today for the first time. Complete failure. Looking at this post gives me hope.

I was not getting much agitation in the fluid bed at all - and I was using funnels to help with the pressure to the tubes. I had pretty nice water flow also, but still not enough agitation to flush the light material out. My bed filled up quickly and stayed that way. So smaller holes worked more efficiently?

I believe my tubes were a bit high also - probably part of the problem.

This was my first attempt and I knew it was weak, so I've already made another. Still have to put my punch plate on and then it's ready to go. Second model is a lot tighter and follows your specs exactly (except for material) I'm hoping for better results on this one.

Here's pics of my offending funnels and tubes. I was really surprised by it's complete failure as I thought it would handle a slow feed at least, giving enough time to flush the bed - NOPE!

View attachment 794435View attachment 794436


Do not expect any agitation. Fluidization is accomplished when the material that fills the trap is not packed so tightly that you cant slowly push a finger down through it.
As long as your overflow port is lower than the rest of the trap, including slightly lower than the height of the bottom of the ramp that leads into the trap everything should work fine.

Once the trap is filled with material the heavies will still sink to the bottom while the lighter material gets washed out over the overflow port at the end of the trap.

GG~
 

I did not have a diverter baffle either, so after the bed was full it seemed like the material was just washing across the top. The material was packed in there pretty hard. In the video's I've seen, you can push your finger in pretty easily - not so with mine.

My second model is done except for the punch plate, so I'll try that one next time. I guess I need to have more faith and let it run for a while before panicking.

Thanks. Sid

Fluidization is key, and after much experimentation I've found that most diy traps (including my original design) are too deep.
The 1/2" below the tubes and no more than 1/2" above the tubes is a good formula. I also found that adding holes pointing straight down an inch apart in addition to the ones on the sides of the tubes is also a good idea.

One more thing and I hate to admit it ....... using those 1/2" tubes was not the best idea for the width of the trap. 3/4" pvc would have been much better (or else going to four 1/2" tubes) so that the distance between the tubes could have been less, plus more water could enter the ends of the 3/4" tubes making fluidization easier. (I originally used three 1/2" tubes because that's what bazooka uses)

I hardly ever use mine as a stream sluice and almost always use it as a highbanker which allows me total control of the fluidization by use of a ball valve. Although last weekend I had to use it as a stream sluice because I forgot to take my gas can :BangHead:
(I would have siphoned my gas tank but was very low on gas and too many miles away from a station to risk it)

GG~
 

Last edited:
I wondered about enough water getting into the tubes from the back, for as you say, three 1/2" entrance holes are pretty small. And I still wonder if I should keep the funnels for I believe it would increase pressure and help a lot.

I'll add some holes to the bottom of the tubes inside the bed - I like that idea.

I imagine it took quite a bit of tweaking to get the right formula, no matter who or how it's made - so I'll keep the faith and try again.

Meanwhile for the slow water that I'm working in, I just gave Angus a call to order his 'Adventurer'. Can't wait to try it out.

Thanks again GG for helping.

Sid
 

My newest project. Made out of Kydex which was easy to work with, but kind of heavy. I could not find any punch plate locally (which amazed me) so I made my own out of a sheet of galvanized steel. 3/16's holes. Took forever to drill all them suckers.

I'll cross my fingers and hope the fluid bed works as intended.

Am thinking of placing brackets along the sides so I can use spikes to anchor it in the gravel bars at my spot as there are no rocks I can wedge it into and no rocks big enough to hold it down.

2.JPG1.JPG
 

Have not weighed it yet, but I'm thinking close to 10 pounds - ouch.

Yes, I used a small torch to warm it up and bent it accordingly. For cutting I just scored it with a blade and snapped it. Unfortunately kydex is hard to cement and I went through 4 different types of glue, epoxy and finally PVC cement. I'm still not really comfortable with the joints, so I reinforced with screws.

This stuff molds very well at low temperatures. Mostly used for making molded hand gun holsters. Very easy to do and tough as hell.
 

i used ABS plastic and its appropriate glue. once the glue sets up, its one peice and wont come apart.EVER!and i use my heat gun to heat this for the bends and i use a sheet metal break to form the 90s.bending it at ambienant temps will work (sorta) but itll form small cracks at the bend and youll have to apply/brush ABS glue on both sides of the bend to keep it from cracking.
 

That sheet is where I got my ideas from. Tried the 400 series loctite and the Weld-on - face to face would hold, but not edge to face.

It does seem to work well so far, but it's also pretty heavy. I'm thinking of trying to mold an angus mackirk style out of it. You can put a sheet in the oven and it comes out like a sheet of soft rubber. Lay it on your mold, cover with foam and press. It's stretching capabilities are supposed to be awesome.
 

Top Member Reactions

Users who are viewing this thread

Back
Top