Making A Miller Table Using A Rubber Mat For The Surface

AzViper

Bronze Member
Sep 30, 2012
2,038
2,251
Arizona - Is there any other state worth visiting
Detector(s) used
Fisher Gold Bug Pro, Nokta FORS Gold, Garrett ATX, Sun Ray Gold Pro Headphones, Royal Pick, Etc.
Primary Interest:
Prospecting
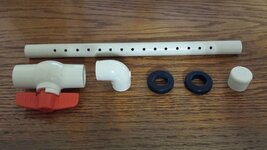
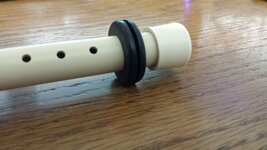
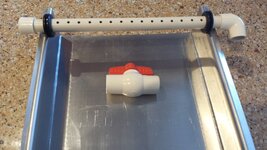
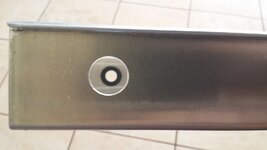
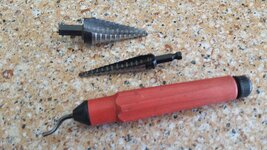
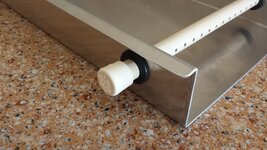
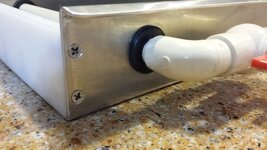
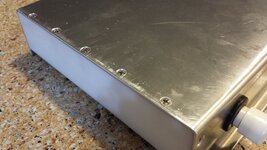
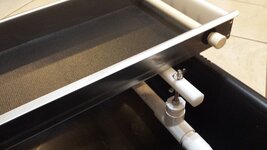
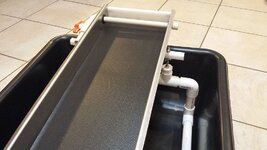
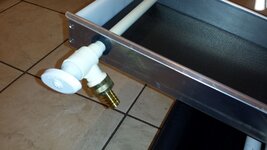
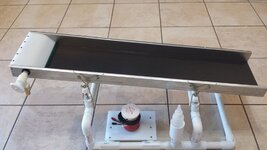
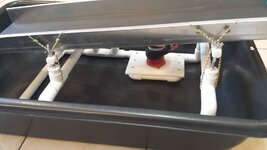
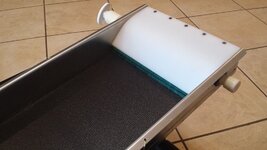
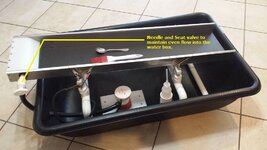
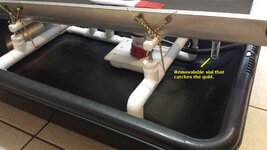
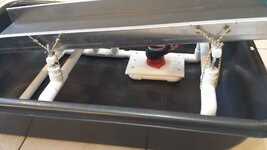
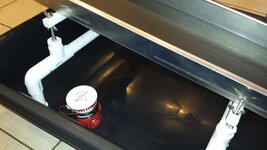
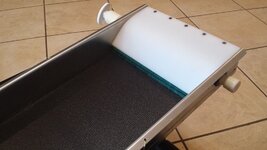
As you can see I have taken a different approach in securing the 1/2" CPVC tubing by using a rubber grommet. Using a Unibit I was able to size the holes slightly small than the OD of the inner grove of the grommet this makes the ID of the grommet slight smaller. This allows the CPVC tube to be very tight within the grommet. The CPVC tubing is sealed and no chance of leaking around the grommets. The 1/8” holes are pointing downward and onto pad within the water box. I installed a top made from a 1/4" cutting board and angled so that the bottom of the front plate will be about 1/2” off of the easy liner for water to escape from under the plate through the Scotch Brite. Some of the photos you will see a ball valve but the finished Miller Table I used a needle and seat valve from Loew's of which will allow for finer adjustment and even out the water flow.

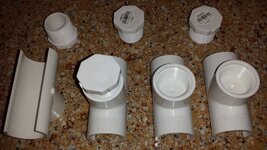
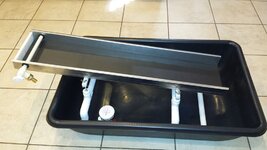
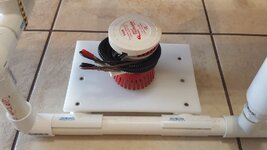
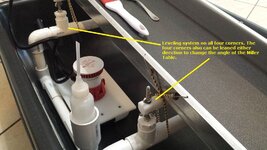
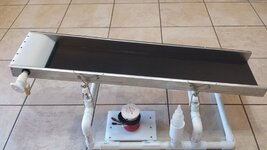
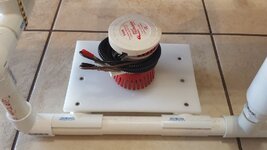
To finish off the Miller Table fine gold recovery system I built a PVC stand with stainless steel all-thread and wing nuts at each corner so I can adjust the level of the table. A 500 GPH 12 volt Attwood was used. I used PVC T fittings that snap over 3/4" PVC pipe so that I can tilt the front or the back of the table to adjust the angle.

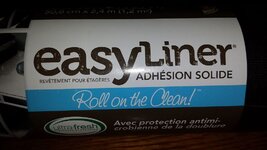
Some of you are having trouble locating Easy Liner here is a link to all the vendors who may carry the product. Granted every store may or may not carry the product. EASY LINER VENDORS

This is what your looking for SOLID Solid Easy Liner® - Black | Duck® Brand EASY LINER

If you cannot find it in your area then buy it online from AMAZON

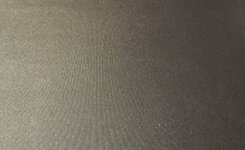
Duck Brand makes many different colors, textures, widths, and lengths of shelve liners, your looking for Easy Liner Ultra Fresh and currently its made in three colors of White, Tan, or Black. Below is what the texture looks like. The surface has a very slight texture to it, its solid and smooth.

EASY LINER.jpg


T225.jpg T224.jpg T223.jpg
T226.jpg T228.jpg T229.jpg
T227.jpg T231.jpg T232.jpg
T219.jpg T217.jpg T218.jpg
T233.jpg T220.jpg T221.jpg
T222.jpg T247.jpg T248.jpg
T250.jpg T251.jpg T265.jpg
T266.jpg T267.jpg T268.jpg

MAKE SURE ONCE ON THE YOUTUBE VIDEO TO SWITCH OVER TO 720p TO VIEW THE VIDEOS IN HIGH DEF.


Last edited:
Upvote 0
Looks like it's working great! I don't know if you have run a big variety of materials yet but I would be interested in knowing if some materials on your mat reacts like it does on the Lowe's mat. I have found that some very fine black sand just glues down to the mat and even running a high volume of water will hardly move it. A friend brought over some iridescent mica looking material from a mine in Nevada that he had crushed mostly into fine powder. I put it on the table and the extremely tiny particles seemed to be glued to the mat. The +12 material moved on out but the -100 stuff and smaller wouldn't move. Even had a hard time brushing it off. The material seems to have a very strong attraction to some materials. Probably why it works so well with the gold.
I have yet to run the 100+ con but will tomorrow and get back with you. As you know the angle needs to be adjusted and water flow for each of the mesh sizes. What I am doing right now is trying the table out with different size gold from very very fine to the bigger gold to see what sticks and holds. I need to find a better brush as I am having gold get stuck in the bristles.

I may be wrong in my thinking but I have to wonder if keeping the angle at a steeper slope will allow the smaller gold to hold better as the edges of the gold will catch in the small ridges of the mat. In the second video I am having to catch small gold traveling even with the water flow cut so far back that at times the table is becoming dry.
 

Last edited:
It looks like you are getting the hang of it and things are going well. It takes some time to get these figured out and tuned in for the different sizes of gold. Gold from different parts of the country will act very differently as well. Once you get them wired, they can be one of the handiest tools you have. You just have to keep playing with them and trying different angles and water flows.

It's strange the way that material has such a strong affinity for metals but has a very little with water at low volumes. I've scrubbed mine with soap and a scrubbing pad and even lightly sanded it and it makes no difference. I've never run into this with any other surface.

No matter what the surface, you will always have one or two flakes that will take off down the table and they won't necessarily be the smallest either. I'm still trying to figure that out myself. I wonder if they are not pure gold and so don't have the weight.

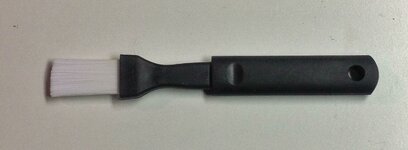
I have a box with many brushes that I have tried this year from the very expensive the the very cheap. Still looking but the best I have found so far is a nylon basting brush found in housewares dept of supermarkets. Has courser bristles and gold doesn't seem to stick to it very well. Looks like this.

Brush.JPG

Looking forward to how the next run goes.
 

I didn't search the whole thread, what did you use to secure the top of the snuffer to the table?

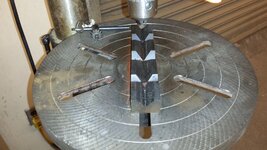
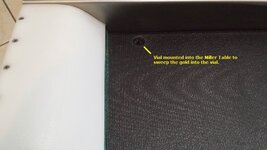
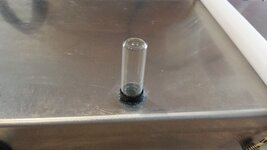
Keith I have redone my vial bottle setup. Using a step drill bit I drilled (From the bottom) the hole slightly bigger than the vial cap leaving the rubber mat with a hole about 1/8" smaller than the hole in the aluminum. With a sharp razorblade I cut slits in the mat from the inside hole of the mat to the edge of the aluminum, I cut maybe 10 slits. From the topside of the Miller Table I forced the cap into the hole. This made a very tight fit as the rubber mat was between the cap and the aluminum. Next I set the cap slightly below the rubber mat surface. I then took super glue and applied glue the circumference of the cap. Then using clear Silicone I applied a layer the circumference of the cap on the bottom side.

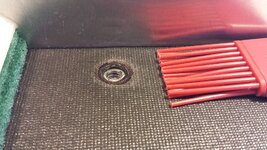
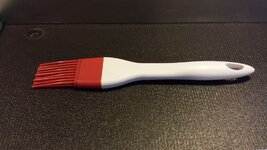
I also picked up a rubber bristle brush I think will work perfect.


Looking forward to how the next run goes.

My next video I am going to run 100 mesh and mostly black sand that's peppered with all sizes of gold to see how well the black sand clears the mat. I will do this on Wednesday as I want to give the Silicone a good 24 hours to setup and be completely dry.

T261.jpg T262.jpg T263.jpg
 

Here is a video of the 100 plus mesh black sand being run down the table. I did not add any gold to it but specks of gold can be seen sticking to the mat. I did not bother to retrieve them as I was busy scraping the pan to make a quick video. As you can see the black sand clears the mat quickly. The water flow is very lite as very fine gold is attaching to the mat. The video camera just does not pick it up.


Looks to be running very well...:occasion14:

With my table I'll run the -100 mesh a bit slower, but if the
gold stickin' then you're good to go. I have learned to re-run
the -100 cons a second time, just to make sure I got it all.

That idea of the sponge is a WINNER!
americanasmiley.gif~original


Last night I finished a Miller Table that was made for Ken down in Cal., and
rather than use a piece of material as a "flattener" I simply cut a piece
of towel to 12"x16" and folded it over several times till it was about 3"
wide. Just set it under the spray bar and once it was fully soaked
it released the water evenly across the table. Couldn't ask for more!

Not like you've never heard this, but Dude, you're one hellofa fabricator..:occasion14:
 

Last edited:
I ran a half of a quart of material on mine this morning. I really want to install that vial, I am just hesitant of cutting up the table. I guess I can always make another, huh? No guts, no glory!
 

I ran a half of a quart of material on mine this morning. I really want to install that vial, I am just hesitant of cutting up the table. I guess I can always make another, huh? No guts, no glory!

Keith see if you can lift the edge of the mat at the very end. If you can't then whatever Black Magic used to secure the mat is very strong. You may not have any trouble if the mat is really secured. My mat on the other hand can be lifted and this is why fillings from drilling got between the mat and the aluminum and I had to pull the mat back just past the hole to clean the filings and lay the mat back down.
 

Looks to be running very well...:occasion14:

With my table I'll run the -100 mesh a bit slower, but if the
gold stickin' then you're good to go. I have learned to re-run
the -100 cons a second time, just to make sure I got it all.

That idea of the sponge is a WINNER!
americanasmiley.gif~original


Last night I finished a Miller Table that was made for Ken down in Cal., and
rather than use a piece of material as a "flattener" I simply cut a piece
of towel to 12"x16" and folded it over several times till it was about 3"
wide. Just set it under the spray bar and once it was fully soaked
it released the water evenly across the table. Couldn't ask for more!

Not like you've never heard this, but Dude, you're one hellofa fabricator..:occasion14:

Mike, thanks... If what I build helps others with ideas that leads to others building their own gear then I have achieved the best reward, they made their own equipment based on my ideas. The Scotch-Brite idea came from GoodGuy so I take no credit, but I will say it works really well to even out the water flow.
 

That is a great looking table you built, and it seems to work just fine. I used to use a blue Bowl to but since i built and used a Miller Table i sold the Blue Bowl. In your last vid. i think i hear a Mourning dove in the back ground. I do miss being in Tucson and hearing the doves. Best of luck to you.
 

That is a great looking table you built, and it seems to work just fine. I used to use a blue Bowl to but since i built and used a Miller Table i sold the Blue Bowl. In your last vid. i think i hear a Mourning dove in the back ground. I do miss being in Tucson and hearing the doves. Best of luck to you.

LOL... You are correct in hearing Doves. Although it was afternoon when the video was shot. Must of been a confused Dove.
 

Using 100 plus mesh con with added gold with the table set at 5 degrees and water set to where it just covers the table I was able to get the gold to stick and the black sand to flow away from the gold. Lost a few very small pieces of gold but for whatever reason this happens as the gold just does not want to stick. Most likely I caused the issue due to trying to sweep the gold into a pile while under flow.

What is needed is a designated area on the table where the operator can control the flow separated from the main flow channel. This would allow the operator to sweep the gold into the area with less flow and not worry of having gold take off. Ok my brain is already thinking of how to do it with a control valve on either end with the water line having a block in it. With my Miller Table being 8" wide ID the water line would have 6" designated to the main water channel and 2" designated for slow water flow near the vial gold recovery hole. During the working of con the gold would be pushed towards the recovery hole with less flow in this area to keep gold from taking off. Hmmm... Nah... going to let someone else run with the idea. I am done messing around. Time to get the trommel finished and put into operation then use this table while in the field to clean the con of the bigger gold and bring home the left over con to run at a much slower flow to recovery the fine gold.

T264.jpg
 

My final thoughts on my Miller Table. The Easy Liner purchased at WalMart used for shelf and draw liner works very well. I have found that the Miller Table works best at 5 degree angle to hold the coarse and fine gold, but this will always depend on the gold being captured from your area. Water flow rate will be up to the user to decide in watching how the gold sticks.

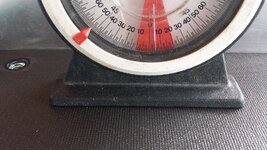
The Miller Table is far easier to use than the blue bowl system I built and much quicker to process the con while in the field where I plan to use the table and not worry about the ultra fine gold. The ultra fine gold will be saved for the raining days to mess with at home. I wanted something to take the con from sampling, trommel, sluice box, drywasher and process quickly. There is nothing I would change in the Miller Table I built as its very lite and portable. The entire frame, table, pump can be remove as one entire unit and the black tub can be used for other needs while out on a long weekend of prospecting and mining. Leveling from side to side is very easy using the thumb nuts while changing the angle can be done by leaning the Miller Table forward or backwards using the pivoting T fittings I found at Lowes Home Improvement. With the simple dial indicator setting the angle is a breeze... The Scotch-Brite pad that the spraybar sprays water onto works great in releasing the water to a nice even flow over the entire width of the table. The 36" long table is nice as I have found some fine gold clear down at the bottom but this was the results of water flow while testing. A shorter table would work just as well but may not be as stable within the tub as the 36" table.

In all I really like the way the table works and can't wait to use it in conjunction with the trommel and drywasher if I ever get a chance to find dry dirt in Arizona, not that I have been looking very hard for the dry dirt.

T248.jpg T247.jpg T250.jpg T251.jpg
 

Last edited:
What I noticed is that when you alter the water flow in any way, it increases the flow under the disturbance. Let's say you pull your brush out and sweep some gold UP the table. What you have done is sweep water up there as well. Then, that water is released as you pull the brush away. The released water is now flowing down the table with the constant flow water. You may effectively double the amount of water flowing down the table in that area. That is what blows the gold out. I may be right, maybe wrong, but that is what I have observed. What the answer is to solve the problem in my mind is to simply wait until you have only gold on the table before you attempt to alter the water flow. Possibly use a small tray that hooks on the end of the table, and at this point, sweep all the gold DOWN to the end of the table for collection? Or, have a small diverter valve that you can turn on in addition to the constant water to blow the gold down the table? I am imagining a small painters type tray that hooks into position, and a y before your ball valve. That y would go into the spray bar AFTER the constant flow that you have adjusted. That way, when you crack the second valve, you release enough water to flush the table?
 

Another idea I saw, but can't find the video for is a small vacuum. You could wire a small 12v vacuum directly to the same battery that runs your pump. Feed the suction line for vac into a small tupperware container. Then, plumb a line coming out of the tupperware container so that you can suck up gold with it. Put a spigot on the bottom of the tupperware to release water is it gets full. If I manage to find the video, I will post it up for you to look at.
 

Another idea I saw, but can't find the video for is a small vacuum. You could wire a small 12v vacuum directly to the same battery that runs your pump. Feed the suction line for vac into a small tupperware container. Then, plumb a line coming out of the tupperware container so that you can suck up gold with it. Put a spigot on the bottom of the tupperware to release water is it gets full. If I manage to find the video, I will post it up for you to look at.

Keith,

I saw that but it did not interest me, had I liked it I would have saved to my favorites. The vial mounted to the bottom of the table works great as the gold falls directly into the vial. Unscrew the vial put a lid on it and your done.
 

What I noticed is that when you alter the water flow in any way, it increases the flow under the disturbance. Let's say you pull your brush out and sweep some gold UP the table. What you have done is sweep water up there as well. Then, that water is released as you pull the brush away. The released water is now flowing down the table with the constant flow water. You may effectively double the amount of water flowing down the table in that area. That is what blows the gold out. I may be right, maybe wrong, but that is what I have observed. What the answer is to solve the problem in my mind is to simply wait until you have only gold on the table before you attempt to alter the water flow. Possibly use a small tray that hooks on the end of the table, and at this point, sweep all the gold DOWN to the end of the table for collection? Or, have a small diverter valve that you can turn on in addition to the constant water to blow the gold down the table? I am imagining a small painters type tray that hooks into position, and a y before your ball valve. That y would go into the spray bar AFTER the constant flow that you have adjusted. That way, when you crack the second valve, you release enough water to flush the table?

I don't want to be sweeping all the gold down to the bottom. The vial works perfect. You just need to alter your water flow just before clean up to the point the water is having a hard time covering the mat. The velocity of water at this point is not enough to dislodge the gold yet it will allow the black sand to flow downward.
 

Last edited:
Another idea I saw, but can't find the video for is a small vacuum. You could wire a small 12v vacuum directly to the same battery that runs your pump. Feed the suction line for vac into a small tupperware container. Then, plumb a line coming out of the tupperware container so that you can suck up gold with it. Put a spigot on the bottom of the tupperware to release water is it gets full. If I manage to find the video, I will post it up for you to look at.
Goo Goo Gold Prospecting - YouTube
 

Top Member Reactions

Users who are viewing this thread

Back
Top