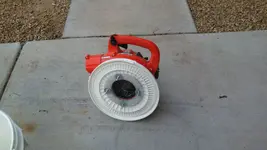
Build Your Own Vacuum / Blower

azviper
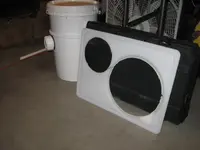
Received all the parts you recommended in your first post and i have installed the 2" Compression fitting with your recommended grommet and have to say it is a very superior fit compared to the black fitting i ordered just in case, from a prospecting site. Really happy with that. I also cut the two bulkheads needed and am now waiting for the Echo 255 blower i ordered today from Wise Sales with Free Shipping and no sales tax (shipped today too)
Buy a ECHO PB255 Handheld Blower | Wise Sales
When i get it all done i will post a photo.
Thanks for all the help.
Joe

KAZ...... how is yours coming along?_____
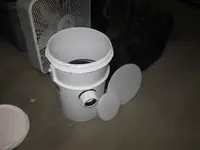
IMG_2947.JPG
 

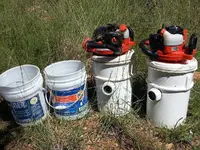
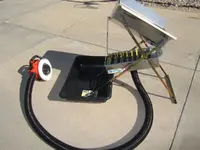
Looks like your vac is going to be a copy of these two fantastic vac's. Plus your vac can double as a blower for a drywasher as mine does.

G8.jpg S8.jpg Roy5.jpg
 

Last edited:
I like your build so much it's going to be an exact copy. I have a drywasher but it's a Keene Bellows which does a pretty good job...... You sure like your Tide Detergent LOL
 

I need to order a bucket. I will get it done this week. I think I just need to get a blower housing off ebay and replace the housing on my new one. The recoil went out of it, so that needs to be addressed as well. I have the hose,compression fitting, and grommet(thanks keith). So, bucket and bulkheads. I have been looking for cutting boards. I bought a set of bamboo ones thinking I could trade my girl for some of her old ones, and they are all too small. Or too thin. So, she got new cutting boards. I got nada. Oh well.
 

I need to order a bucket. I will get it done this week.
I got the exact one as azviper recommended

I think I just need to get a blower housing off ebay and replace the housing on my new one. The recoil went out of it, so that needs to be addressed as well. I have the hose,compression fitting, and grommet(thanks keith). So, bucket and bulkheads. I have been looking for cutting boards. I bought a set of bamboo ones thinking I could trade my girl for some of her old ones, and they are all too small. Or too thin. So, she got new cutting boards. I got nada. Oh well.
I got one large 20x15x1/4 cutting board from walmart and was able to cut both out of it and staying inside the gravy drip line too

I'm getting excited with this build as i wanted one for a long time

Joe


IMG_2948.JPG
 

I like your build so much it's going to be an exact copy. I have a drywasher but it's a Keene Bellows which does a pretty good job...... You sure like your Tide Detergent LOL

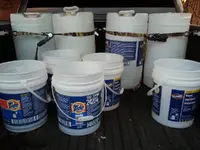
I have an endless supply of Tide and Downey buckets and barrels. Can't have enough of either of the barrels or buckets.

yyyy.jpg IMG_1586.jpg S7.jpg 15 Gallon.jpg
 

AZ you have got to have the cleanest cloths in America!!:) my wife used to be able to get me all the buckets i could ask for, but she retired and that ended that! i still keep about 30 buckets around!
 

AZ you have got to have the cleanest cloths in America!!:) my wife used to be able to get me all the buckets i could ask for, but she retired and that ended that! i still keep about 30 buckets around!

The endless supply comes from the corporation I work for. The buckets and barrels are tossed with no deposit on them. Why they can't be recycled I have no clue. Once in the landfill it would take hundreds of years to breakdown if they would even breakdown. So I try to be green as I can, collect the barrels and buckets and give them away when I can. When the barrels get to be more than I can store I run an ad on CL and sell the barrels for $15.00 each to pay for my gas money to go mining.
 

Joe,

I see that you used either a jigsaw or saw-saw to cut the circles, what's your plan to cut the inner hole as these are the most important? It looks like you have a center hole in the pieces you cut out. Also is the Ultra High Molecular Weight Polyethylene you used 3/8" or 1/2"? Reason I ask is screw length and if you can purchase screws this long in the diameter you need.
LOL.... I knew you where going to catch that saw cut. My Router Jig busted 1/2 way around and i had to finish it with a Jig Saw going very slow and then spinning it on a belt sander to clean it up.......I realize the inner cut has to be really clean and just got another jig made up for the router.... I did a lot of woodworking years back and don't like sloppy work. The thickness of the cutting board is 3/8" and i will cut longer screws if need be. good eye to catch that saw cut

I have just down the street the best Ace Hardware in America. They have the largest fastener, nut, and bolt selection I have ever seen, stainless steel, chrome plated, etc. This Ace has been open for nearly 52 years and one of the originals from back when I was a kid still works there. The Ace Hardware was in a strip mall of which they have expanded to include all the buildings. They have a home and garden center, a complete hobby shop, arts department, paint center, appliances, etc. If you run into trouble finding the needed screw let me know.

When I built my router jig and I know not everyone is going to have a router on hand, but it was simple to cut the circle inner or outer. All I had to do is drill a 1/4" hole for the pivot pin to ride in, set the diameter and cut the outer circles. Now cutting the inner circle is the tricky part because the center pivot is being cut away and as you near completing the cutout the center pivot wants to give way. Here is how I tackled the problem of loosing the center when cutting out the circles with a router without screwing or nailing the plastic down to MDF. On the outer edge of the circle cut-outs place two-side tape in 8 areas. Next place two-side tape around the center pivot hole just within the area that's being cut away. Now tape the plastic circles to a piece of MDF. If the pivot pin on the router jig is longer than the thickest of the plastic your cutting you will need to take a 1/4" drill bit and drill down into the MDF. The two-side tape will secure both the pieces from moving during this short time of being cut with a router.
The two sided tape is a nice idea...... I was going to just brad nail it in place and then fill the holes created when done but i like your tape idea better. Hopefully the blower is here by the weekend.
Thanks for all the great tips as they helped a lot

Joe
 

I am thinking that no pictures of my contraption are gonna be posted. I know I have a jigsaw, but I am not sure about blades. May have to use the dremel again. And a knife. I will just take a pic from 40' away...
 

I am thinking that no pictures of my contraption are gonna be posted. I know I have a jigsaw, but I am not sure about blades. May have to use the dremel again. And a knife. I will just take a pic from 40' away...

KAZ
I'm not that far from you and can cut the bulkheads with my router if you want (exit 229 behind the anthem mall)


Keith:
Pics will follow for sure. I'll bet plenty others are doing the build that we don't hear from...... I actually did not have a 3" hole saw and used a razor knife to slowly score and then cut a 3" hole for the compression fitting after i made the mark with a circle compass
 

Keith
I'm not that far from you and can cut the bulkheads with my router if you want (exit 229 behind the anthem mall)


Keith:
Pics will follow for sure. I'll bet plenty others are doing the build that we don't hear from...... I actually did not have a 3" hole saw and used a razor knife to slowly score and then cut a 3" hole for the compression fitting after i made the mark with a circle compass
Fixed. AzViper and I actually share something in common.
 

What do you share in common?
 

I am thinking that no pictures of my contraption are gonna be posted. I know I have a jigsaw, but I am not sure about blades. May have to use the dremel again. And a knife. I will just take a pic from 40' away...

LOL... That's funny. You make do with whatever you have on hand.
 

Last edited:
I got my bucket yesterday. I finally gave up on trying to make my pool tab bucket work. SO, tomorrow I need to get over to walmart and get a cutting board and get it all put together. While I am talking to you, why didn't you put the inlet higher on the bucket? Seems like you could get a lot more in there if you put it above the ring. I would think that the deflector would take care of any problems
 

Joe,

Did you get your gas blower?

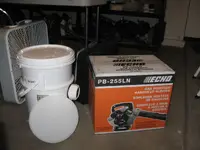
I got it late thursday night..... Haven't had time to even open the box yet. So much to do with honey do's and grandkids it will probably be about the middle of next week til i get it started. I cheated a little though. went out yesterday and did some hand sniping/sampling but Nada. LOL. Not enough hours in the day if you know what i mean but i sure am excited to get it finished and put to use
Notice in the background above the bucket..... A bottle of Rum that i forgot about.....Hmmmm! might have to take a little nip.LOL

IMG_2949.JPG
 

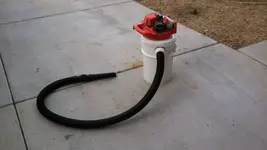
Well, the battle is over. I got it all assembled. First off, I didn't have a router, nor even a blade for my jigsaw as I feared. I started cutting the cutting board(thanks for the locate Joe)with my dremel. That is REALLY slow. So, I used a drill bit and punched holes all around, then used the cut-off wheel to finish the cuts. Then, put the pieces in my vise, and use the grinding wheel to smooth the pieces out and bring them out to their final dimensions. Got all the bulkheads and lid cut that way. Got all the holes drilled and reamed for screws. Then, I test fit the screws with washers on the cover for the blower. No go. The vanes on the blower hit the screws. Because of the washers. I looked it over, and didn't want to forgo the washers. So, get the dremel out and shave down the vanes where they were hitting. Test fit again, no go. More shaving, and finally, all came together. I used a piece of steel mesh screening to block off the hole. The only thing left to do is to make a deflector. One cool thing about this project is that when I was done, and it looked like it snowed in my garage, I had a tool to clean up all the mess....IMG_20140112_155143_602.jpgIMG_20140112_155205_055.jpg
 

Top Member Reactions

Users who are viewing this thread

Back
Top