Build Your Own Vacuum / Blower

Workikng on mine as we speak. The bucket I am using is a spin style with a locking tab. It's a chlorine tablet pool bucket. Tall. The first problem I ran into is that the lid has a tall lip, and combine that with the offset neck on the blower, looks like I have about a 1" gap to fill on top of the lid. Headed off to HD in a few to see what they have to fill it. I plan on using some mesh screening in place of the plastic guard. The guard on this blower snaps on to the housing. Seeing as how those snaps got ground off a few minutes ago so that the housing would sit flat, I think using some screening would do the trick. I will just use fender washers to hold it on.
 

Last edited:
Good Luck on the build...... The screening over the guard is a good idea in case a larger rock kicks up. I can't proceed any further until parts arrive. The hard part is getting the $200 for the echo 255 as i would really like to have new
 

Workikng on mine as we speak. The bucket I am using is a spin style with a locking tab. It's a chlorine tablet pool bucket. Tall. The first problem I ran into is that the lid has a tall lip, and combine that with the offset neck on the blower, looks like I have about a 1" gap to fill on top of the lid. Headed off to HD in a few to see what they have to fill it. I plan on using some mesh screening in place of the plastic guard. The guard on this blower snaps on to the housing. Seeing as how those snaps got ground off a few minutes ago so that the housing would sit flat, I think using some screening would do the trick. I will just use fender washers to hold it on.

Yep looked at those buckets as my buddy has a pool cleaning service. This is why I went with the bucket I did...
 

I seen that one on craigs list and at 90 miles from me my gas guzzlin 10mpg pickup would cost me about $70 round trip...... gettin close to new. I have another one i am keeping my eye on right now. but i appreciate the look-up :)
 

Looks like I will have to get imaginative. There are no screw holes in my housing. Maybe i can preset and precut the screws. Caulk the fender washers and nuts in place. Then, wait to dry a couple of days. Then, put the locktite on the screws themselves when I put it together. Look at me, Murphy and I working together once again...
 

Joe, PM me your mailing address and I will send you the rubber grommet you need to use the compression fitting. I could not find the grommet locally in Tucson and ordered a half dozen of the grommets online and have two remaining and Kaz is getting the other grommet.
That was nice to offer the grommets but i ordered three of them yesterday from the company that you supplied the link to in your initial post.
Thanks,
Joe
 

I was out and about today and looked at many gas powered blowers from Stihl, Echo, Husqvarna, Craftsman, Poulan, Hitachi, Homelite, Toro, Ryobi, Makita, Tanka, or Troy-Bilt. Outside of Echo no other brand offers the simplicity of mounting advantages of the Echo PB-251 or the Echo PB-255.

Now I am not going to say that I or someone else cannot make other Gas Blowers work cause I know I can, but I know that within 2 hours of having either of the two Echo models in my hands I can have a complete Vac-Pac built and ready for service. No other gas blower including other models made by Echo offer these advantages of mounting the blower housing to the lid of a container with a few 1/4" bulkheads cut and drilled to fit.

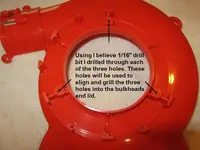
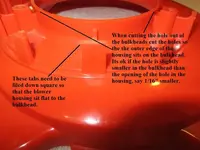
The question has been ask as to how the blower housing attaches to the lid. Once you have the housing removed from the blower, this is the housing section that has the finger guard installed. Place the housing so that the three screw holes are facing upwards. Next use a drill bit that fits the screws holes but does not remove any of the plastic of the holes on the sides of the holes. What your going to be doing is drilling through the house so that you can use these three holes as drill guides.

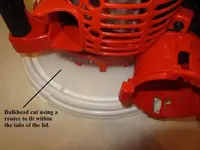
Hopefully you have made your 1/4" cutting board bulkheads for the inside of the lid and the topside of the lid and have cut the center hole slightly smaller that the OD hole of the blower housing as you want the blower housing to rest on the 1/4" bulkhead. Now place the 1/4" bulkhead housing on a wood surface that you can afford to drill into. Next place the blower housing down onto the bulkhead. Align the blower housing with the bulkhead so that the holes of the bulkhead and the blower housing are perfectly aligned. Next take your drill and drill through the blower hosing through the 1/4" bulkhead. Once you have one of the bulkheads drilled you can now use this bulkhead as your drilling template to drill the other bulkhead. Next you can take the top bulkhead and center it on the bucket lid and mark where you need to cut the hole and drill the holes.

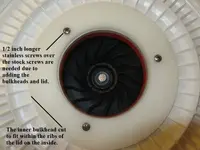
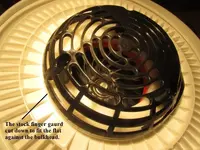
To put the entire assemble together with the cut-down finger guard you will need to go to the hardware store and buy three new screws of matching thread design about 1/2" longer. Assemble the components just as you took the finger guard off with the exception of installing the bulkheads, lid and blower housing.

Here is a link to the router jig I built. Not sure there is enough info to copy from. Router Jig

If anyone has any questions PM me and we can talk by phone...


H1.jpg PB-255 Bulkhead.jpg PB-255 Inside Bulkhead.jpg
PB-255 Finger Guard.jpg PB-Hole.jpg
 

Last edited:
Those pics sure spell it all out...... thanks for taking the time to post them.
I always seem to come up with questions but in the pics it looks like the three screws that go thru the blower up top into the bulkeads and lid and protrude out the bottom (inside) Did the blower guard inside use those same three screws to hold the guard in place or did you use three separate screws into the bottom side bulkhead?_______ It looks to be the same three mounting screws.
Joe
 

They are the same screws. That is why that blower is better for mounting than the one I have. Mine doesn't have any screws like that. Come to think of it, that is how I will do it. Get a couple of those threaded inserts made for wood. Heat up the plastic, and insert them into the housing. Thanks for jogging my noggin. I have been racking my brain on how I was gonna do this.
 

Joe,

If you were to flip this housing over after its been removed from the blower those three holes from the factory DO NOT penetrate through to the inside of the plastic blower housing, but you need to drill through those holes and penetrate through the blower housing with a slightly smaller drill bit than each of the three holes. This blower housing will be your drilling jig once you center the large fan hole of the blower housing with the large hole in your bulkheads. Once you have these large holes aligned you then can take your drill while drilling from the inside of the blower housing drill through each of the three small holes into the bulkhead. Now you will need to enlarge these three holes in the bulkheads and lid ONLY so that the screws will easily pass through the bulkheads. These screws will attach all the components in this order, finger guard, inside bulkhead, lid, outside bulkhead, then screw into the Echo blower housing. This is why you need new screws that are 1/2" longer. Now once you have the components screwed together look to the inside of the blower housing and make sure that the screws are flush to the plastic blower housing. If they are sticking out you will need to remove each screw one at a time an slightly file or grind the screw down. If you don't the screws will come in contact with the fan blade once you assemble the blower housing with its other half of the blower housing containing the fan and motor.

Hopefully this all makes sense once you have all the components in front of you. I know its sounds like an undertaking but its very simple. Once its assembled you have simply the best Vac on the market, better than anything you can buy cause all the other Vac's (Keene, Jobe, Royal, Vac-Pac, Arizona Gold, Etc.) that I know of have not taken these steps nor use the Echo PB-255 blower, 6 gallon sealed screw on lid, sealed intake fitting, 1/4" bulkheads on either side to secure the blower motor to the lid, and deflector to keep the paydirt from being exhausted and last but not least a Vac that the end user that has built and saved $$$...
 

They are the same screws. That is why that blower is better for mounting than the one I have. Mine doesn't have any screws like that. Come to think of it, that is how I will do it. Get a couple of those threaded inserts made for wood. Heat up the plastic, and insert them into the housing. Thanks for jogging my noggin. I have been racking my brain on how I was gonna do this.
Somehow i helped out here.....without even trying LOL :)
 

Joe,

If you were to flip this housing over after its been removed from the blower those three holes from the factory DO NOT penetrate through to the inside of the plastic blower housing, but you need to drill through those holes and penetrate through the blower housing with a slightly smaller drill bit than each of the three holes. This blower housing will be your drilling jig once you center the large fan hole of the blower housing with the large hole in your bulkheads. Once you have these large holes aligned you then can take your drill while drilling from the inside of the blower housing drill through each of the three small holes into the bulkhead. Now you will need to enlarge these three holes in the bulkheads and lid ONLY so that the screws will easily pass through the bulkheads. These screws will attach all the components in this order, finger guard, inside bulkhead, lid, outside bulkhead, then screw into the Echo blower housing. This is why you need new screws that are 1/2" longer. Now once you have the components screwed together look to the inside of the blower housing and make sure that the screws are flush to the plastic blower housing. If they are sticking out you will need to remove each screw one at a time an slightly file or grind the screw down. If you don't the screws will come in contact with the fan blade once you assemble the blower housing with its other half of the blower housing containing the fan and motor.

Hopefully this all makes sense once you have all the components in front of you. I know its sounds like an undertaking but its very simple. Once its assembled you have simply the best Vac on the market, better than anything you can buy cause all the other Vac's (Keene, Jobe, Royal, Vac-Pac, Arizona Gold, Etc.) that I know of have not taken these steps nor use the Echo PB-255 blower, 6 gallon sealed screw on lid, sealed intake fitting, 1/4" bulkheads on either side to secure the blower motor to the lid, and deflector to keep the paydirt from being exhausted and last but not least a Vac that the end user that has built and saved $$$...

It all makes perfect sense ..... I just don't want to ruin an expensive housing when i do find a 251 or 255 blower .... It will sure be nice to have something with more power compared to my DeWalt 18 volt 2 gallon vac with a battery life of about 15 minutes per battery..... I also hooked a 12 volt wheelchair AGM Battery to it that gives me no more than an hour..... Your vac-blower will be a welcome relief
 

Thanks Keith. I just got the grommet today. Really appreciate it. Today I was using the bar,wire brush,paint brush and scoop method of cleaning bedrock. Gonna be nice to not do that anymore. Now, I just have to figure out and fix why my starter pulley/rope is not engaging the crank. Brand new blower. Murphy strikes again. And, I didn't even see his shadow this time....
 

Thanks Keith. I just got the grommet today. Really appreciate it. Today I was using the bar,wire brush,paint brush and scoop method of cleaning bedrock. Gonna be nice to not do that anymore. Now, I just have to figure out and fix why my starter pulley/rope is not engaging the crank. Brand new blower. Murphy strikes again. And, I didn't even see his shadow this time....

Wow I only sent it out in the noon mail yesterday and it was delivered today. Regular mail at that...
 

Keith,
Happy New Year to you too and everyone else too.
You've explained everything perfectly and it is greatly appreciated as i always wanted to do this.
Many Thanks,
Joe
 

I will use the caulking I use at work. It is NP-1. One part urethane. Really good stuff. Beats the hell out of silicone.
 

Butyl Tape is really good too as it's really sticky and conforms to irregular shapes..... but you have to pull the blower off.
I have to look up that NP-1 as i always like to try a new compound.
 

Ultra High Molecular Weight Polyethylene or UHMW of which the cutting boards are made from I have yet to find any adhesive that will stick to this product. I use this product to make many jigs for my routers and the only way to secure this product to each other is to screw it together outside of hot welding the product to each other. Any sealants you use will only fill the void. In the case of the Echo PB-255 the blower housing will sit flush onto the bulkhead and any sealant that is applied will squeeze out anyone but its the extra assurance that its sealed and no vacuum leaks...
 

YOu may be right on nothing sticking. Maybe just some compression then. Like foam weather stripping.
 

Top Member Reactions

Users who are viewing this thread

Back
Top