55 Gallon Fluid Bed Highbanker

Nicely done, not often something new comes along. So sweeet, operation looks perfect, great example of the KISS principle in action, my youngest grandkid could set it up and be running in a heartbeat. What are you setting the throttle on your pump at? Thought of a quick easy mod to help with cleanouts- install a hose fitting with a quick connect for a small coil hose with spray head somewhere in the manifold. Maybe add a flange or some type of connection on the discharge giving you the ability to attach some sort of a catch basin that would allow you to tilt the minny me over and rinse the cons right into it with no spill risk. Do you still have the top from the barrel? might be able to fashion a simple spray deflector to rest on top of the feed chamber to keep you a tad dryer. Please don't thimk I'm trying to pick on your build in any way at all, I'm a hopeless tinkerer and can't help myself. I really love what you got there and can't wait to build and try out my own- thanks again.

Absolutely not. In fact, clean up was real easy. I have a knock out plug in the bottom of this one as with the larger one. Additionally, I did install a hose connection on the manifold. So when I am done for the day, I set Minny Me over a bucket, remove the knock out plug, and use the hose to rinse the cons into the bucket. The water wasn't too bad actually, that wet dog look was a result of failing to glue a couple of fittings in my haste to build, and BOOM!!! it's a gusher. Thanks for the input though.
 

Thanks for taking the time to do the videos! Your weather is looking pretty sweet!

It's about to get cold and ugly here in the next 24 hours. I'm taking Minny Me to the AMRA outing tomorrow, rain, snow, or shine, then back to the honey hole for a half day on Sunday. The weather on Sunday should be a little better.
 

Sorry pain pills have turned me into Capt. Obvious, I went back and rewatched the vids and you've already addressed my suggestions- DUH! I've been thinking this would be a great low cost machine for locking up and hiding on a remote claim. Bring in some pipe for gravity feeding and your set. If some s-head with sticky fingers decides he needs it more than you well at least your not out a grand or more.
This is what I've decided to use for mine, the blue obviously will be the portion that is cut away. Decided to leave the back high to retain the molded in handles and provide a large bulkhead for mounting manifold and such.

Picture keeps flipping on me, would someone please be so kind as to PM Capt Obvious (me) and tell me how to fix this please?
 

Attachments

  • photo.JPG
    photo.JPG
    886.8 KB · Views: 295
Last edited:
Just lay the can on it's side and retake the pic! LOL Sorry, I barely manage my own electronic problems!
 

Sorry pain pills have turned me into Capt. Obvious, I went back and rewatched the vids and you've already addressed my suggestions- DUH! I've been thinking this would be a great low cost machine for locking up and hiding on a remote claim. Bring in some pipe for gravity feeding and your set. If some s-head with sticky fingers decides he needs it more than you well at least your not out a grand or more.
This is what I've decided to use for mine, the blue obviously will be the portion that is cut away. Decided to leave the back high to retain the molded in handles and provide a large bulkhead for mounting manifold and such.

Picture keeps flipping on me, would someone please be so kind as to PM Capt Obvious (me) and tell me how to fix this please?

Wow this is a first, I clicked it to enlarge, then clicked it to max and the pic is straight on the maxed size but not the rest :) haha, good trick TNet :) but April fools is a month away :evil6:
 

The pic did the same for me!

Very nice fluid bed! Great job!
 

Fowled, the washing of the material is easy enough. I think getting the fluidbed just right is the key in this project. When I watch the exchange in the bottom, a sediment ramp forms from the last spray bar to the drain hole. There is approximately 3" from the middle of the last spray bar and the barrel wall. I think this space creates a low pressure area thus creating hte ramp. Keep that in mind when you do your fluid bed. Being that you are using a square garbage can, you can cover more area of the fluid bed. My concern is if you have the last set of spray bars too close to the drain hole, you wont have that low pressure area and instead would be lifting material off the bottom to be flushed out, including heavies. Does that make sense? You can always make mods as you go but I would leave your last spray bar a few inches from the drain hole. If it works, great. If not, make adjustments and close the gap. I got lucky on my set up. Trial and error is how we succeed. I like the built in wheels. Replace the axle and put some 10" HF off roaders on that thing and take it anywhere you want to go.
 

The pic loads strangely, form the right side over rather than the usual top to bottom, I am just happy that this page of the thread loads normal to read :D First page is still nuts.

Nice job on the whole deal. I have concern about flow control.. Ever consider a GPM meter?
 

You might consider a reverse chute under the grizzly mesh to direct feed and water towards the side opposite of the drain to allow introduced material a better chance to settle.

The buildup next to the drain is probably mostly lighter material that was on its way to the exit but dropped out as it lost rising current from the tubes. Pan a sample from that area to see if it contains heavy black sand. If not you are probably good to go.
 

Last edited:
I do have a deflector plate under the grizzly bars. The material that builds up is very little and not a concern. Everything is working fine. I was advising Fowled for his build indicating he wants to have that low pressure area. Great advice though. Thanks. Most of the ideas for my build came from TN.
 

Found a smaller trash can with a 7 x 14 rectangular bottom. I get what your saying about the negative pressure zone by the discharge. Rumaged around in the bone pile and this mock up of 1/2" is kind of what I'm thinking. The discharge is a downspout flange so I can add on pipe or the green deal to get water away from work area or direct into a sediment basin. You read my mind on the 10" tires. Going to sacrifice another blue barrel to skin the bottom of the wheel barrow sled. Thanks again for letting us tag along and rob your ideas.

It flipped 'em again, I give up, uncle!
 

Attachments

  • photo 1 (1).JPG
    photo 1 (1).JPG
    719.2 KB · Views: 160
  • photo 2 (1).JPG
    photo 2 (1).JPG
    541.5 KB · Views: 184
  • photo 2.JPG
    photo 2.JPG
    689.1 KB · Views: 173
  • photo 1.JPG
    photo 1.JPG
    845.2 KB · Views: 188
Last edited:
to many beers with em painpills, woohoo
 

to many beers with em painpills, woohoo

You know momma, that ain't gonna happen! Shoot I'm such a light weight I'm cutting them into thirds just so I can somewhat function in a normal fashion. Grandaughter was "babysitting" me yesterday while Nana went to town, we got involved with the highbanker build and didn't hear her come up the driveway. Grandaughter pulls on my jacket sleeve and say's "Papa, Nana's home and your busted!" then runs away and bails on me. Papa is on house arrest today, no highbanker.
 

Minny functioned perfectly. I just wasn't working a good gold bearing area. Took my son out today, back to the honey hole. After 2.5 hours, ran out of material. But my son is going home with .9g for today's efforts.

ImageUploadedByTreasureNet.com1425249535.556057.jpg

Sorry, no vid of Minny.
 

QNCrazy,

I am wondering if an angled plate around the discharge hole at the bottom might help retain heavies so more of the lighter material could be washed out?

I am going to shamelessly steal your idea and see how it works in more sandy areas. Got a few washes to hit here on some private property I gained access to.
 

QNCrazy,

I am wondering if an angled plate around the discharge hole at the bottom might help retain heavies so more of the lighter material could be washed out?
Can you elaborate to help me conceptualize how that would be oriented and how it would function. thanks much
I am going to shamelessly steal your idea and see how it works in more sandy areas. Got a few washes to hit here on some private property I gained access to.
 

Let me share some knowledge I gained today. Yesterday I had to do some tuning with the ball valves to get the right harmony. I forgot that later in the day, after breaking Minny down to show some people, I had spun one of the spray bars to demonstrate how they can be adjusted.
Today it seemed as if I was over feeding Minny as a couple of time I had to stop the spray bars and let the fluid bed run. The second time this happened, I noticed the material at the discharge hole was locked up. I reached in and gave a little adjustment to spray a little toward the front and wallah, the light material started moving out. Keep in mind, even though the material was loaded up to above the fluid bars, there was still fluidizing action taking place throughout the fluid bed. So it seems if the material near the drain hole get locked up, your material will back up. Once I made the adjustment, I didn't t have anymore backups.
As for the heavies, they tend to migrate to the sides of the fluid bed where there is no fluid action. At this time I don't see a need for a deflector.
 

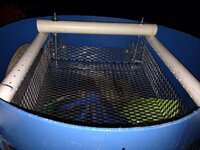
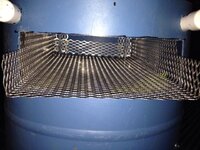
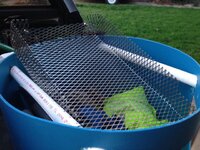
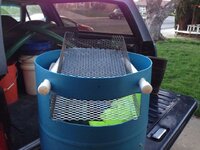
After running Minny these last few days, I decided to make an improvement. Removal and installation of the grill was a pain as well as cleaning it off during operation. The hardware cloth was getting beat up and my hands were getting tore up. So I built a basket out of 1/2" flat expanded metal. I made a handle out of a piece of scrap pvc I had laying around. The basket sits level below the spray bars. I should be able to load it up with 4 full shovels then use the handle to give it a couple of shakes then dump the larger material. Here are some pics for reference.

ImageUploadedByTreasureNet.com1425385078.062861.jpg
ImageUploadedByTreasureNet.com1425385095.496753.jpg
ImageUploadedByTreasureNet.com1425385133.130236.jpg
ImageUploadedByTreasureNet.com1425385166.600304.jpg
 

Top Member Reactions

Users who are viewing this thread

Latest Discussions

Back
Top