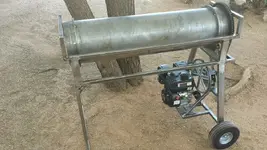
12 INCH TROMMEL BUILD

AZ, I picked up 2 thats right 2, 5-hp rototillers for $60 this weekend. Have you ever looked at the gearboxes on those? See where I am going with this.......

I have not but its a great idea. I had looked at gear reductions but did not want the added expense. The Honda motor is perfect as it has a 6 to 1 gear reduction with a clutch, but again I wanted to keep the cost down. Great find, wish I had thought of the rototillers as I would have check Craigslist or yard sales.
 

I am very happy with the Harbor Freight 6.5HP motor. From reading about it in the Kart forums its a quality motor and at $79.00 it was a purchase I could not refuse. At 50 percent RPM its to run 3 hours on 1 gallon of gas. Its quiet and I will never run it other than idle of which is 1800 RPM. It's an all ball bearing motor and with the extended warranty for two years of which cost me another $35.00. With the gear reduction I made and the idler pulley it works great. I am very much surprised that the engine starts on the first pull every time, cold weather may be a different issue but here in Arizona what's cold weather.
 

I'm going to tinker with the two 5-hp Briggs that came on the tillers. If I cant get them to run reliably I will go the same route as you AZ and purchase the predator motor from harbor freight. I already have one on my pump and even at full throttle I get 2.5 hrs of run time on a gallon. Starts first pull every time. Last weekend I had to till my garden spot to get it ready for next season and that was what sparked the search for tillers. I rented the one I used for $45 dollars for "2" hours. If you go in an hour before they close and you return it within an hour of opening the next day you only get charged 2 hours and you can use it overnight. The tiller already has the entire engagement/disengagement system and motor mount built right onto the dual 1/4 X 2 angle frame and All it looks Like I will have to do is cut the "tines" off far enough away from the gearbox to be able to mount the sprocket on there and mount the thing to the trommel frame. Also going to have to figure out how I want to mount the sprocket.

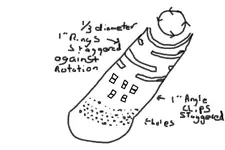
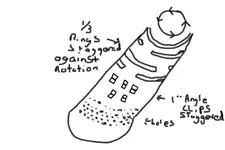
I found a 60" chunk of 12 ga tube with a 16" diameter at the local steel yard for $120 that I will be picking up fairly soon. Probably going to be plasma arcing all of my 1/2 inch holes. First I will layout all of the holes and centerpunch the locations in case I want to drill instead and then I am thinking it would take around a day with the plaz to burn all the holes with a circle burner. I will be using a removable grizzly directly under the holes in case I want to classify smaller. According to my math a 12" wide swath of holes will be more than sufficient to allow all of the water/slurry to flow out into the sluice. If I have to add more later I can. I also am going to have to buy a trailer to haul this thing on as this will be drastically increasing the amount of equipment I will be taking with me each time I go out. I am attaching a crude drawing that kinda gives you an idea of what I am going to do on the inside of the trommel to help bust up clay and clods.

inside trommel.jpg
 

Attachments

  • inside trommel.jpg
    inside trommel.jpg
    76.1 KB · Views: 176
Last edited:
I'm going to tinker with the two 5-hp Briggs that came on the tillers. If I cant get them to run reliably I will go the same route as you AZ and purchase the predator motor from harbor freight. I already have one on my pump and even at full throttle I get 2.5 hrs of run time on a gallon. Starts first pull every time. Last weekend I had to till my garden spot to get it ready for next season and that was what sparked the search for tillers. I rented the one I used for $45 dollars for "2" hours. If you go in an hour before they close and you return it within an hour of opening the next day you only get charged 2 hours and you can use it overnight. The tiller already has the entire engagement/disengagement system and motor mount built right onto the dual 1/4 X 2 angle frame and All it looks Like I will have to do is cut the "tines" off far enough away from the gearbox to be able to mount the sprocket on there and mount the thing to the trommel frame. Also going to have to figure out how I want to mount the sprocket.

I found a 60" chunk of 12 ga tube with a 16" diameter at the local steel yard for $120 that I will be picking up fairly soon. Probably going to be plasma arcing all of my 1/2 inch holes. First I will layout all of the holes and centerpunch the locations in case I want to drill instead and then I am thinking it would take around a day with the plaz to burn all the holes with a circle burner. I will be using a removable grizzly directly under the holes in case I want to classify smaller. According to my math a 12" wide swath of holes will be more than sufficient to allow all of the water/slurry to flow out into the sluice. If I have to add more later I can. I also am going to have to buy a trailer to haul this thing on as this will be drastically increasing the amount of equipment I will be taking with me each time I go out. I am attaching a crude drawing that kinda gives you an idea of what I am going to do on the inside of the trommel to help bust up clay and clods.

View attachment 881434

You may want to check what a sprocket will cost that will fit a 16" pipe. I tried locally to find a thin wall pipe that was a cut-off. No such luck...


On a side note. This looks really cool. I should just build a few of these to support my habits lol. New Gold Trommel

Do not understand the second photo with the welded ring on the inside just before the paydirt goes into the classifier. Over priced and terrible plumbing of the entire system. The builder had a great idea but then went south on finishing it up...
 

Last edited:
I'm going to tinker with the two 5-hp Briggs that came on the tillers. If I cant get them to run reliably I will go the same route as you AZ and purchase the predator motor from harbor freight. I already have one on my pump and even at full throttle I get 2.5 hrs of run time on a gallon. Starts first pull every time. Last weekend I had to till my garden spot to get it ready for next season and that was what sparked the search for tillers. I rented the one I used for $45 dollars for "2" hours. If you go in an hour before they close and you return it within an hour of opening the next day you only get charged 2 hours and you can use it overnight. The tiller already has the entire engagement/disengagement system and motor mount built right onto the dual 1/4 X 2 angle frame and All it looks Like I will have to do is cut the "tines" off far enough away from the gearbox to be able to mount the sprocket on there and mount the thing to the trommel frame. Also going to have to figure out how I want to mount the sprocket.

I found a 60" chunk of 12 ga tube with a 16" diameter at the local steel yard for $120 that I will be picking up fairly soon. Probably going to be plasma arcing all of my 1/2 inch holes. First I will layout all of the holes and centerpunch the locations in case I want to drill instead and then I am thinking it would take around a day with the plaz to burn all the holes with a circle burner. I will be using a removable grizzly directly under the holes in case I want to classify smaller. According to my math a 12" wide swath of holes will be more than sufficient to allow all of the water/slurry to flow out into the sluice. If I have to add more later I can. I also am going to have to buy a trailer to haul this thing on as this will be drastically increasing the amount of equipment I will be taking with me each time I go out. I am attaching a crude drawing that kinda gives you an idea of what I am going to do on the inside of the trommel to help bust up clay and clods.

View attachment 881434

Just a quick comment on the pieces welded inside the trommel barrel; be sure there is enough clearance between the pieces and the spray bar for an errant piece of rock to clear.
 

The guy over at Heckler Fabrications showed me photos of their small trommel cylinder and how the inside was designed. It was setup much like your drawing. The design caused the slurry mix to travel slowly from section to section while tumbling.
 

You may want to check what a sprocket will cost that will fit a 16" pipe.

I had thought about that too. If I cant manage it financially I will switch to a belt drive but I can cut the ring gear on the laser here at work. I was thinking 10ga should be sufficient and I'm planning on using bicycle chain. Easy to come by and plenty strong. Also I will leave enough room on the shaft of the gearbox so that I can double the chains if needed. I was thinking about making the motor/gearbox mount 4-way adjustable and adding different gears as needed to adjust the speed so I can keep the motor as close to idle as possible. On the outings I have noticed that the fuel costs are already pretty pricey with just the pump. Now I'm going to be running a trommel and my next build is a conveyor so we can shovel from the hole onto the belt which feeds the trommel and life gets easier. For the conveyor I will be using the worm drive rototiller gearbox but that is another 5hp motor running....
 

Last edited:
The pump and the spray bar has been eating at me to test. With 101 holes I started having second thoughts but the pump will be feeding the spray bar, hopper, and possibly the sluice if I am not getting enough water running down the sluice. Here is a quick video of my test using the pump and 50 of 1.5" fire hose. Had plenty of water and pressure as the water was shooting about 6 feet in the air. Forgot my Amp meter as I wanted to check the amps on the pump.

I may take a countersink bit and flare each hole to spread the water pattern out.


Last edited:
Wow that looks great, Did you test that flow from your 15 gallon tank? Looks like you will have PLENTY of water
 

Wow that looks great, Did you test that flow from your 15 gallon tank? Looks like you will have PLENTY of water


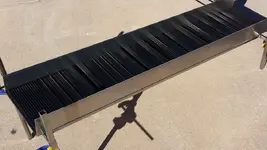
That test was from the pump of which was in the 15 gallon barrel. The water manifold will have four 1.5" ball valves mounted on the side of the trommel. Two ball valves controlling the flow of water to each end of the spray bar, one controlling water flow to the hopper, and another ball valve to control water to the top of the sluice box if it needs more water. The reason I am using 1.5" BV's is the ID of the ball valves is close to the ID of the 1" pipe I am using for the spray bar. The pump has a 2" NPT thread which I used an adapter to 1.5" on the fire hose.

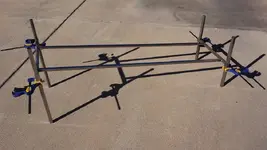
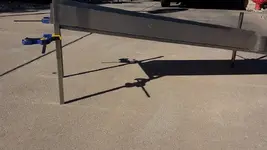
I made my sluice stand today and got that out of the way.

T103.jpg T104.jpg T106.jpg T105.jpg
 

Last edited:
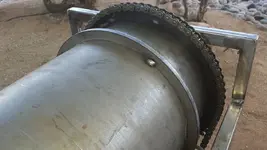
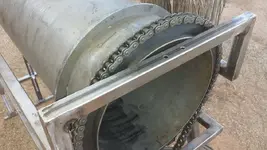
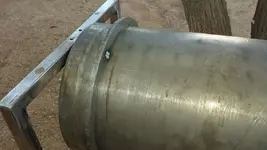
The cylinder is back with the newly mounted rings at each end to true up the cylinder. Did it work? yes it did. Is it perfect? No but these ring serves another purpose in that I can place my nylon blocks at the bottom to keep the cylinder from traveling front to back. Going to start drilling holes this week while I can still move my shoulder. Getting an MRI sometime soon and most likely having shoulder replacement surgery before years end. I also was able to lower the RPM's of the each of which lowered the RPM's of the cylinder to 29 RPM's. Still a little faster than I was after but I can live with the speed.

T107.jpg T108.jpg T109.jpg T110.jpg
 

Thanks for the update and photos. Best of luck with your shoulder. I had a knee replaced a two years ago and am stil having issues with it. Research, research, research, does not just apply to prospecting :-).
 

Thanks for the update and photos. Best of luck with your shoulder. I had a knee replaced a two years ago and am stil having issues with it. Research, research, research, does not just apply to prospecting :-).

I had knee replacement 3 years ago and glad I did. I have no issues and have about 130 degrees of movement. The key is rehab and making sure you get full extension and bending the joint to the max in early rehab to gain the most movement while breaking up scar tissue.
 

Yep Keith, I did all that and have full range of motion to go along with the constant pain. In addition I have about 10 degrees of toe out on that leg now and it seems to be increasing.
 

Yep Keith, I did all that and have full range of motion to go along with the constant pain. In addition I have about 10 degrees of toe out on that leg now and it seems to be increasing.

Wow... I saw my orthopedic surgeon today and he was amazed at my outcome. I have no issues, no pain, I can get into a catchers position and have my bottom nearly touching the ground. Says the joint is not to have that much movement. LOL
 

Last edited:
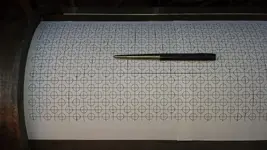
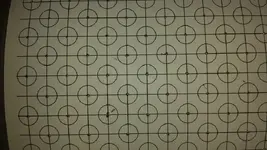
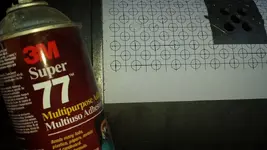
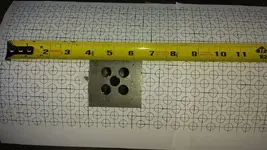
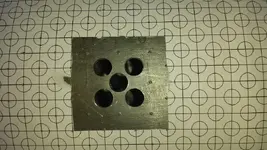
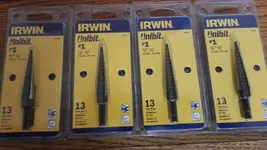
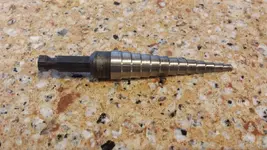
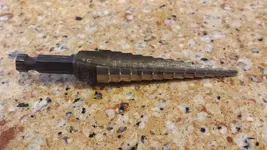
I was beginning to second guess this build as in using 1/8" plate for the cylinder but not now. When finish it will handle anything I can throw into the trommel. While others are made from 16 gauge punch plate or 1/2" rolled mesh this cylinder will be a beast. I made the drill guide in MS Paint and used 3M 77 adhesive spray to secure the guide to the cylinder. Using a center punch I have begun to mark the center of each hole. I could not resist and had to drill 5 holes just to see if I got the spacing right as the holes are 1/2". I used a pilot bit to make the first hole then used a step drill bit. Why the step drill bit? This type of bit will keep center from start to finish keeping the holes inline with each other.

T111.jpg T112.jpg T115.jpg T114.jpg T113.jpg T118.jpg T116.jpg T117.jpg
 

Last edited:

Top Member Reactions

Users who are viewing this thread

Back
Top