Tips on equipment

lokiie1984

Jr. Member
Jun 5, 2014
55
8
Primary Interest:
All Treasure Hunting
I will have some extra money coming in this month so i wanted to look into getting something that i could use around the house to help clean up cons and other material. I would like to find something for around 100 dollars (price that i would have to pay for a blue bowl kit if i were to buy one.) I thought about doing the blue bowl from my local store but figured i should check into other items before i settled on that one. There's just so many different things out there that i have no clue what i would actually be looking for.

I would like to have something that works like the blue bowl, where it takes the dirt and what not and leaves the gold behind. However it would be nice if it would work on more then just -30 and smaller material. The only other item that i came across that would do something similar was an underflow sluice system by these guys : Grumpy Prospector Home but those are a bit out of my reach.

So i was curious if anyone knows of anything else that works like either of those two? The only real requirements that i would need, is that it can be hooked to either a pump or a hose and work. And cost under 100 dollars.

I did look into a bazooka sluice, even with having to pan the material after running it, it would be nice to use but their smallest sluice was 80 bucks. Just seems like kind of a waste for that price since we hardly ever go out to the mountains. So I'm kind of leaning towards the blue bowl but again i don't know what else is out there.

Thanks
 

Upvote 0
Now I understand how ya do that process.

I typically cut the mat to be 1" long on all edges, then
once the adhesive's dried well I use a razor knife
to trim the edges, and then add the side pieces.

Next one I'll give your method a try..:icon_thumright:

I kinda figured that was how you were building the box. But using my method you will be able to seal the bottom and sides with urethane then apply the mat. What I did was cut a wood template to fit inside the box, then placed the template onto the mat and use the template to cut the mat to the correct size.
 

Last edited:
Here is a proven store bought miller table that costs $125 plus shipping.
Personally, I would recommend building your own and save the $$$

Gold Mining Equipment Black Magic Fine Gold Recovery

I saw that one, and i honestly thought about it. The video makes it seems pretty nice, but as AzViper mentioned, the mat is just the easy liner from walmart. I might as well just make my own. I'm sure with the help of the forum i can make something. And if i screw up, the mat has 8 feet on the roll, plenty to work with.
 

Quick question about wood choices. I can pick up a 1x3 and the 1x4 easy enough at a store here in town and i have ordered the glue/silicon/sealer plus the mat off amazon. So I'm down to the base wood. I checked around to see what the prices would be for the melamine. Pretty much no matter what i do, the price is going to be over 10 dollars for the board. Which isn't bad, however we are in the process of building a stable for one of our horses and my dad suggested buying the same stuff we use for the roof on that. That way the extra wood can go towards the barn.

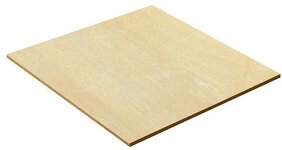
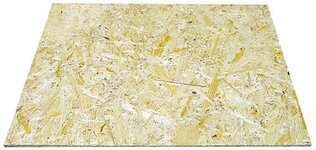
So i was curious if anyone has tried these. Sanded Plywood Sanded Plywood.jpg or particle/wafer board (i have heard it called a few different things.) Particle board.jpg If i went with those, i would get at least a half inch thick and aim for something large enough that the scraps can be used.

Which brings up another question, how long does the table really need to be? In the videos i saw, it really didn't look like the gold traveled very far down the table. Could you get away with making it more wide then long? Or just having it be square?
 

Although I've never made a miller table, I have made furniture for outdoor purposes. I would not recommend particle board for anything dealing with water.
 

Do not use particle board. This is why Mike said to use Melamine as it has a smooth water resistant surface. I understand that $$$ are an issues, but spend the $$$ and build it correctly. I am sure you saw my table and I took it to the extreme but I plan on using it until I can't dig any longer.
 

Although I've never made a miller table, I have made furniture for outdoor purposes. I would not recommend particle board for anything dealing with water.

I agree, the stuff is crap but for now we decided to use it as a test board. Not so much as something long term but as something that we can make it with to really get a hands on idea of how the miller table works and how to make one. Figure it cant hurt to build it out of crap first and then go for the good stuff when we make the real thing.

For this run we are going to paint the board with some out door paint, and then spray it up with some of the sealer Dizzy mentioned. Pretty much we plan to do everything in our power to seal the board so it doesn't come apart.

@AzViper Yea the one you made would be pretty awesome to have but there is no way we could get the metal to bend like you have it. Either way, though i think i will be happy with wood, its not like we will be taking it to the mountains either. It will pretty much be a lawn decoration when its not in use. We don't have a garage or anything, suppose once i have it made and I'm happy with it, i will have to look into getting some kind of cover for it so the mat doesn't sun rot.
 

Mike the only thing I can add to this process is to cut the mat to fit, lay the mat into the box as its going to be used. Next fold the mat in half but do not crease the mat where its folded. Spray the mat and then spray the surface. Wait a until the 77 becomes tacky then work the mat into place starting at the crease and working to the end. Repeat this process for the other end. Doing it this way you can not screw up in not getting the mat flat and square to the edges. Because your spraying the mat in place the the box needs to be taped off (Blue Masking Tape) on the inside walls and the top edge off the so that 77 is not sprayed onto these surfaces.

This is the method I use to lay foam and playing surfaces on poker tables that I build and the method I use to lay my rubber mat into my box. Works like a charm without the hassles of getting everything lined up and having the two surfaces come in contact with each other without the mat aligned up.
This is how I glue down my roofing membrane.
 

AzViper, I was watching some of your videos testing your table, and i was curious how you set up the water flow. It looks like you used gate (i think is what it would be called) Where there is a board (in my case it would be a board anyway) that's raised a small amount above the mat and then that's stuffed with scotch pads. Seems like it works well, do have the whole bottom of the "reservoir" covered in the pads or just at the bottom of the gate?

Also how large is the reservoir? Or does it not really matter?
 

The Scotch pad covers the entire bottom so that the water is released evenly onto the table. The holes are 1/2" between centers. The valve I used is a needle and seat valve from Lowes Home Improvement. The size of the reservoir does not matter as the water is spraying onto the pad. What you call the gate is a piece of cutting board from Walmart ($7.00). Once cut to size I clamped the plastic cutting board to a hard straight edge then took a blower dryer and heated the plastic and bent it downward. Then trimmed the edge where the water comes out to be about 1/2" off the mat.
 

Last edited:
Thanks, good to know. I plan to pick up some Tuesday along with some pvc pipe and fittings. For now I'm going to try the hose with a screw down brass valve that we have extra. If it seems that the water pressure will be a problem (it likes to fluctuate here) i will look into a pump. I looked into the one that you used in your thread, the price is nice, however i would like one that just plugs in, if i could find it. We do have a car battery charger that I'm pretty sure could handle charging a 12V battery but i find the hassle to be annoying. I do wonder if i could power the pump by just hooking it to the car charger though.

Do you think a pump weaker then 500 gph would be alright?

Also any tips on a cheap way to adjust the tilt of the table? Something i could bolt to the table so i don't have to mess with using wood blocks. I don't get into town very often so its normally best to buy everything i need in one go.

You can run the pump from a 12v battery charger, I do at home. Please remember when pumps say they will deliver 500GPH or 200GPH these are ideal conditions with no waterhead (rise). You can find fish tank pumps that are 120v but they are a lot more expensive and not the quality of the Atwood pump that's a lot less in dollars and most likely will not have the GPH's. Yes a pump in the 300 GPH will work.
 

Lokiie, I use a 250 gph pump and it's more than sufficient.
 

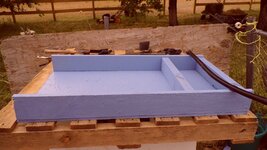
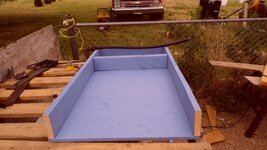
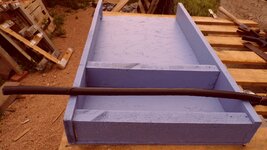
Here are a couple pictures of the miller table. Nothing has been glued, sealed or screwed into place yet. The mat and everything else will be here tomorrow. I used a section of heavy duty rubber hose for the spray bar, it has a 1/8 inch hole every half inch, give or take. I plan to have that facing the back wall with some cloth draped over it to help even out the water flow. If the hose idea doesnt work, i plan to pick up some pvc pipe with the scrub pads like AzViper did.

I also painted all the wood to help seal it and to keep the wood from giving me slivers every time i touch it (The wood was not sanded and pretty rough.) After that it will be sealed with a spray on wood sealer too.

2014-07-07 22.20.52.jpg2014-07-07 22.21.07.jpg2014-07-07 22.21.24.jpg
 

The guys that sell and demonstrate the Black Magic work several months with no charge on a garden tractor battery. You actually have to be careful. I set the flow just right on my Blcak Magic one day. The next day, I just hooked up the battery and let 'er rip wo checking the flow. The battery had rested overnight, and that, along with the cooler night temps increased te flow considerably. I had to re-run those cons.... Just an example of how little juice it takes to run a small pump.
 

I am very skeptical of your table. It shows a TON of texture. Too much texture. Without even enlarging your pic, I can see it. Honestly, with what you have, you would be better off running V-matting and panning what is left. Not trying to ruin your day, just being honest with what i see.
 

Top Member Reactions

Users who are viewing this thread

Back
Top