Summer Project

ToddsPoint

Gold Member
🥇 Charter Member
Joined
Mar 2, 2018
Messages
7,136
Reaction score
22,340
Golden Thread
0
Location
Todds Point, IL
Primary Interest:
Metal Detecting
A good friend has been after me for several years, wanting me to engrave his 38. He finally made me an offer I couldn’t refuse. I stripped and polished it first. He purchased a pr of mammoth ivory grips.
IMG_9443.webp
The engraving will be all gold inlays. I started by inlaying all the lettering. Letters are undercut, then gold wire is pounded in. Then the excess is filed off.
IMG_9374.webp
IMG_9375.webp
IMG_9376.webp
IMG_9378.webp
IMG_9361.webp
IMG_9442.webp


I’m starting to come up with scroll designs. It’s 90% inspiration and 10% perspiration. This job will likely keep me busy all summer. I only work an hour or two a day so I don’t get burned out. It’s very tedious work. I’m 71 and this is my 43rd yr of engraving. This may very well be my last big job. I purchased 21” of gold wire to start. $177 worth. It will probably take twice that before I’m finished.
IMG_9441.webp
 

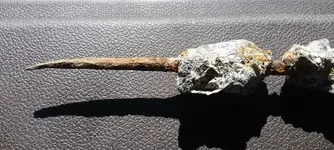
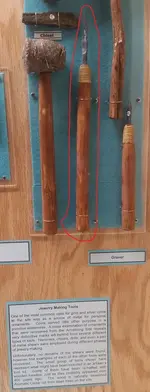
As an engraver you might like this find I made in the Ft Pierce area. The dune cut was nearly 8' high, and for some reason I decided to run my detector along the face. Bingo! My find is the rusty, crusty one of course. The other one is in a display at the McLarty Treasure Museum in Sebastian. They stated that they added the wooden handles to theirs, on mine you can see the remains of the encrusted handle.
20171126_115951-001.webp
20171126_120037-001.webp20171202_122820-001.webp20171126_085411.webp
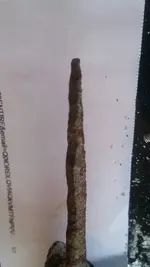
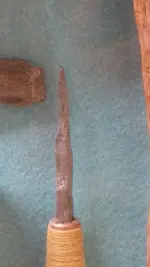
Here is a comparison of the two tips. Look like the same smithy made both.
20171126_165348.webp20171202_151818.webp
 

Wish I had that kind of skill! Can't wait to see how it turns out.

On a side note, I found the same make/model pistol in the woods about 2 months ago. Waiting to see what/if the sheriff's dept finds out anything about it. It was extremely rusted...I figure it's been outdoors for 15 years or more.
 

Really nice. Does the gold just adhere to the microgrooves in the engravings after hammering it? no heat?
The lettering is undercut slightly. Picture a punch that looks like a tiny screwdriver. It is sharp but has a slight bevel cut in the back. When you strike it, it goes into the steel and the bevel makes it jump forward. This raises the edge of the steel. After you put the gold in, it stays because the groove is wider at the bottom. Gold is malleable so forms to the shape of the groove. The raised steel edge is tapped back down and that holds it in better. I’ve never had any of my inlays come out.
 

I’m sitting around in my comfortable chair drawing different designs. The white powder is inert magnesium carbonate. Draw one, wipe it, draw another. I’m getting closer. Eventually I’ll draw one I like and I’ll cut it into the steel. Sometimes it takes longer to come up with a good design than it does to cut it.
IMG_9446.webp
 

This is the final design. I’ll scribe the pencil lines with a carbide point next and wipe off the white powder. Then I can start cutting.View attachment 2202367
Beautiful work. My grandfather was a master engraver of printing plates. I’ll find some plates he made and post them. First day covers, invitations for presidential dinners & events, etc.
 

I scribed the lines and cut the first flat. Before I start inlaying I’ll make an impression of the design so I can transfer it to the other 4 flats. That will save time without having to draw each flat separately.
IMG_9465.webp
IMG_9467.webp
 

I cut a piece of Manila folder and wet it. Then I laid it on the cylinder and tapped it with my hammer. I’ll use this to transfer the pattern to the other 4 flats. This is a 5 shot revolver and I’m glad it’s not 6!
IMG_9472.webp
 

Had no idea it could be done by hand.
It’s all done with hand tools. No machines. A gun engraver from 400 yrs ago would be comfortable using my shop and tools. These are the tools I’ve used so far. The BIC is to show the size. The hammer and chisel was used to cut the scrolls. The small silver punch was used to undercut the lettering. That punch is super hard and is made from a used up bit that cut rifling in barrels. The black tool sets the gold in place. Gold wire is on the right.
IMG_9473.webp
 

It’s all done with hand tools. No machines. A gun engraver from 400 yrs ago would be comfortable using my shop and tools. These are the tools I’ve used so far. The BIC is to show the size. The hammer and chisel was used to cut the scrolls. The small silver punch was used to undercut the lettering. That punch is super hard and is made from a used up bit that cut rifling in barrels. The black tool sets the gold in place. Gold wire is on the right. View attachment 2202529
How did you learn to do it?
 

How did you learn to do it?
I started in ‘82 and just started doing it by trial and error. It was difficult and there were no schools then. I couldn’t find any engravers that wanted an apprentice. There was one engraving “How To” book I used to get started. I needed a teacher and finally wrote to engraving centers in Europe. Austria, Belgium, Germany and Italy. Austria said I was too old to start an apprenticeship. I was 28. They wanted 18 yr olds. Germany and Belgium never replied. The Italians took me. I’m Italian and we have always been in contact with our Italian relatives. My great grandfather was a native of a town only 20 miles from Gardone Val Trompia, the gun engraving center in Italy. I used my Italian relatives to contact the engraving shop in Italy. I think that helped get me in. I went over there in ‘84 and stayed through ‘85. It was a shop that subcontracted work from Beretta. They had to train new employees anyway so they just slipped me in. I worked 10 hrs a day, five days a week. Monday through Friday I engraved and Saturday was art school for 4-5 hrs. It was an amazing experience.
 

Last edited:

Top Member Reactions

Users who are viewing this thread

Back
Top Bottom