School is back in... Time to work!!!!!

Glad to hear the outing was a success. Congrats on the nugget Jeff! It sounds like it was really busy out there. You need a guest book for everyone to sign. I think the guys in the fifth wheels should have been cooking for everyone. I am finally getting a gas blower in a week or two and will cobble together another vac and have my dry washer running again. I really miss being able to vacuum. Hey Garret how much dirt did you bring back to run at home? Don't forget you can always drop your tailings over here in the front yard.
 

Yeah... It was busy out there for sure. At least the 5th wheel guy had enough sense not to try bringing his rig out to the claim. I think he might have had some major problems getting turned around if he had.

We learned that there's gold pretty much everywhere on the claim but some of it is going to be a real bear to get to. It's either going to be haul the dirt out or the equipment and water in. Either way it's not going to be easy. A vac will make cleaning out the wash easier to do but it's still rough on the lower back and knees.

We did find one very promising area that we'll check out in depth on our next trip. It's close to the camp site and we can get water down there using gravity feed and a garden hose from the top of the hill. Chris, Robi and I also hit on an idea on how to set up a shower area with hot water! That would sure feel good after a day of digging out there. I'm also working up a portable lighting system so we don't have to have dinner cooked before it gets dark. If it works out as well as I'm thinking it will, I may expand it to light up the dig area. That way we could be digging after dark during the summer when it's a lot cooler. I'm NOT going to let a little thing like summer heat keep us from working the claim.
 

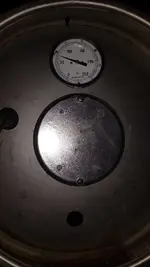
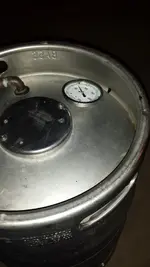
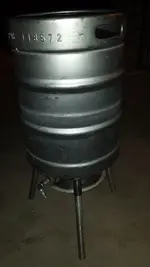
Jeff I will post a picture of the portable water heater I made for showers. Has a 12v pump and open boiler tank made of all stainless steel. Built a portable shower enclosure of PVC with a nylon tarp that bungie corded holding it in place on three sides and a sliding curtain to get into the enclosure. Also has a rubber mat for the floor. Has a temp. gauge so once the water hits 105 degrees we turn off the propane and shower, amazing what you can do with about 2 gallons of water per shower. The tank is from a 15 gallon beer keg that I put a burner in the bottom and stainless steel removable legs. It gets used all the time on Elk hunts. Even had hunters coming into camp wanting to pay to shower. LOL
 

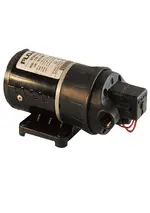
Here you go Jeff. Its a little dirty and I have removed the pump as I have been using the pump while mining. What I do is to recirculate the water as its heating to keep the water evenly heated. Then attach the shower head to the flexible shower nozzle. The pump has a pressure switch so it only pumps when the valve is open. When close the pump is off. The pump I use is a Flow-jet.

This hot water heat works great. The first time we used it the guy I use to hunt with the temps said 110 degrees but we were not recirculating the water so the water on the bottom was about 160 degrees. The water pick up tube was on the bottom and he about burnt the skin off of his body. We then learn to recirculate while heating. What's neat even in the dead of winter during the Coues Deer hunt in late December the stainless would retain its heat and keep the water a nice temp. even after the burner was shut off a good 45 minutes. Sure made getting up to hunt the next morning worth wild after spending 10 days on a hunt.

Boiler1.jpg Boiler2.jpg Boiler3.jpg Boiler4.jpg
 

Last edited:
Cool setup Keith! I was planning on following the K.I.S.S. method for ours. Solar all the way. I'm going to paint a pair of the barrels black, plumb them together with a manifold to a single black hose down the hill to the shower area, which will be near where Chris was setup. I like the idea of the PVC frame for the shower enclosure. That would make for easy setup and take down. We've got some large pallets here and I was thinking of adding some treated ply with rubber matting on it to stand on. I don't think Robi is going to go for a clear curtain so I guess it's going to have to be camo. I'll dig a drainage sump and fill it with 1/4 to 1/2 inch rock from the tailings pile to handle the used water.

Dan: I started clearing off the slab but it's going to be an ongoing project. That stuff is pretty thick and tough digging. When it's all cleared off there will be enough room for a couple of tents, a fire pit where the fireplace used to be and a kitchen area. L.E.D. lighting powered by solar so we can be cooking after dark without having to resort to a lantern. For future long trips out there, I might even mount up a frame with a white sheet on it to project movies from the laptop... ;) Talk about your big screen!
 

Could you reuse the shower runoff for sluicing or such?
 

Interesting thought Kevin but it would take a lot of extra plumbing to be able to recover the water. I'm trying to keep everything so it can be hauled back out after each trip. We don't have anyplace to secure equipment out there and I'm not going to leave things out there only to have them sprout legs and take off down the AZ trail if ya know what I mean......

The pallet could stay out there if hidden so we wouldn't have to haul it back and forth but tools, camping gear, barrels etc have to make a round trip. The more stuff we have to set up out there the less time I have to actually be working. Short trips when it's just Robi and I going I don't bring a sluice and all the required stuff for it. We dig and haul dirt back to the house for processing. Once I get my truck back on the road I'll be able to go out there a lot more often to work on improvements, dig etc. I just have to wait until that buy-out in San Diego is taken care of so I can afford the needed repairs and modifications. It's kind of sad that my little Toyota pickup has more hauling capacity than Robis' F-150.
 

Well since I was bored and it was something I've been wanting to get done anyway... I just built up a nice level pad here at the house to set up the sluice(s) on. I made up a frame out of 4x4s that's 5 ft wide and 8 ft long and sank it into the ground so it was level all the way around. I then filled the inside of the frame with a mix of 1/8th to 1/2 inch gravel from my tailings.

The reason I wanted to build this up was so that i could have a place to work after the monsoon rains start up. Around here the ground turns to a nice sticky mud when it gets wet and you have to clean it off your boots with a jack hammer!!! The gravel will allow water to drain through it and will keep me high and dry. By placing the buckets just off the pad but within reach I'll be able to run materials with no problems no matter how muddy it gets out there.

The next project I'm planing on doing is going to be a AC to DC converter that will be tailored to the bilge pumps I'm planning on getting to upgrade the water system. I've been finding that running the larger pumps off a battery is pretty rough on a std car battery. I'll be upgrading to marine deep cycle ones for out in the field but for here at the house I'd much rather use a converter as it won't loose power over time like a battery will. While my battery charger will run the smaller pumps I have now, it doesn't have the available amperage needed to allow the new pumps to work at full capacity. So...few parts from Radio Shack, and I can build up a converter that will be able to supply enough amps to run a pair of 12v - 4000 gph pumps. I'm considering building a new sluice stand that will be for use at the house only and mounting the converter to it in a waterproof enclosure. The enclosure will also hold waterproof toggle switches to control the pumps as well as fuses to protect the pumps from over amperage.

I'm also kicking around an idea on how to turn my trailer into a portable solar power station for supplying juice out at the claim. I'm thinking a pair of 435W panels along with a 225W one and a six-pack of batteries should do the trick. Charge controllers and inverter(s) mounted above the batteries will allow for both 12 volt and 110 volt items to be plugged in. Now if it turns out that my MiFi system can pick up signal in that area, I might not ever leave the claim again!!!!!
 

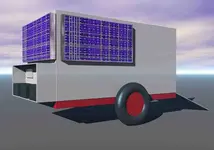
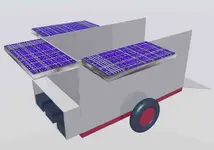
Here is the first rough on the power trailer design. There will of course be some modifications to it but this will give you the basics of what I have in mind.

trailer-1.jpg

Here is the travel configuration. Panels down and locked. Trailer tongue not shown but the batteries and charge controller and inverter(s) will sit right above it. Doors for enclosure also not shown. I will also be making up some travel covers to protect the panels while driving. The side panels will actually be almost the full length of the trailer. With all three panels wired together I'll be able to generate just over 1 Kilo Watt of power which should be more than enough to power everything at the claim off the power of the sun.

trailer-2.jpg

With panels deployed. Notice how the inside of the trailer is still open for hauling equipment to and from the claim. I will also be adding a drop tailgate to make loading and unloading gear much easier.

I'm considering making up enclosures on each side of the trailer in front of the wheels to hold power cords to get the juice where we want it on site. It's still a rough idea and there will be quite a few modifications to this design before it's where I want it to be.
 

Looks like a great design for the trailer and very savvy of you. I do sorta doubt you'll need travel covers as modern solar panels are built really tough! Mine are on the roof of the house and have been thru several years of weather, hail stones,etc including one hail storm that destroyed my next door neighbor's shingles...with nary a mark on my panels :)
 

Actually we'll have both AC and DC power available Dan. Robi and I are trying to develop the claim in such a way as to make as little impact on others using the area as possible. Running a generator 24/7 is not only noisy and obnoxious to the ears but also presents a fire hazard. The last thing we want it to have the area get torched! It went through that a few years ago due to another miner welding on some equipment.

The trailer will only be dragged out there when I/we are going to be out there for a week or more. On simple weekend trips we'll rough it. I want to get it so we can set EVERYTHING up in a half day or less. Kind of a tall order when you consider that we have to haul everything in from the parking/turn around area for the AZ trail that's at the south end of the claim. We're trying to make such improvements to the claim that it's comfy for us, but not too inviting to passer byes. Last thing we want to do is end up having to ask someone to remove themselves from our mine work area. It is a national forest after all and we have to share it with everyone. I really don't foresee any problem in this respect since most people on that section of the trail are just passing through on their way to other places.

We don't want to leave anything out there when we are not on site, but I figure that a few "lodge poles" that will be used to support lights and shade tarps should be safe as long as they're well hidden. I've found a place that is well off the AZ Trail that should work well for a stash spot. It's close to both the camping and working areas and out of sight. Lodge poles are not all that pricy so if they do happen to sprout legs and walk off it's not going to be that big a loss.
 

Well it's been awhile since I posted anything here but that doesn't mean I've been idle. We haven't had a chance to get back out to the claim since the last trip but I have been busy. Lately I've been spending a LOT of time learning more on mining law in an effort to protect our investment. I've also been running some experiments to figure out the best way to process the materials from our claim. Here is what I've learned so far and how I went about doing these experiments..... :blackbeard:

Using some of the black sands I had built up I weighed out 200 gram samples. Each of these samples had had all of the magnetic materials removed form them and had also been through the Shake & Bake process once already. Using my coffee grinder I worked the sands down to as fine as I could get them and then I crushed them even more using a large bearing I had found. I then ran the materials through a nylon stocking (don't have a really fine screen yet) and then went through them with a magnet once again. Even though I couldn't pick up any magnetic sands before grinding, I ended up pulling an average of 40 grams of magnetics out of each sample. :headbang: The grinding process also released a lot of what looks like rust powder. I carefully rinsed the materials to remove this powder and then put them on the heat. I brought the temperature of each sample up to 450 degrees and then quenched the sands in ice water. Even though they had been through the S&B process before, I found even more gold in each and every sample. :icon_thumleft: Some of the pieces were large enough to be seen with the naked eye while many of them I had to use a strong magnifying glass to be able to spot them. This stuff made "Flour Gold" look big it was so fine. There was actually quite a bit of this "Micro-flour" in each sample.

After tapping the fine gold to one edge of the pan as best as I could, I added a large drop of mercury and worked it carefully through the materials. After this I sucked the mercury out of the pan and put the amalgam into a separate container so it wasn't being mixed into my clean mercury supply. (still plenty of room left in the mercury to grab more gold out later) I then re-examined the materials with the magnifier and couldn't see any of the super fine gold in it any more so it seems that the mercury had done its job. (NOTE: As a trained lab tech I know how to handle dangerous materials like Mercury in a safe manner. :skullflag: This is not something that someone without proper training should attempt at home!!! :skullflag: )

So... What did I learn from these experiments?

1. Before doing a Shake & Bake the sands should be ground as fine as possible. To make this process easier and less time consuming in the future I will be picking up a small Ball Mill that has a 15 pound capacity. The grinding will not only help to remove any oxide clinging to the small gold but many of the pieces that I couldn't see before are flattened out which gives them more surface area so they can be spotted much easier. Particles of black sands will crush while gold will merely flatten out because of its malleability. The grinding will also help to break up any left over magnetic materials so they can be removed with ease.

2. Doing amalgamation in a pan is a slow process and you can only do a little bit at a time. To make this easier I'm also going to pick up a 6 pound capacity tumbler that has dual 3 pound drums. This will allow me to do this stage of the processing in larger batches than I can do in a pan with a much higher margin of safety. :thumbsup:

3. All quenching of the heated materials will be done using a mixture of vinegar and salt (sodium acetate) which will not only crack the oxide off the gold due to the rapid temperature change but will also help to shine up the gold making it easier to see. Vinegar and salt is not expensive and is easy to get. It can also be recycled and used several times as long as it's cooled back down.

I've been searching on-line for the required equipment for this change of processing the black sands and have found everything I need for this re-tooling will run me less than $500. With the amount of gold I found just in these experiments I feel that the purchase cost will be recovered after running only a dozen or so batches so it's well worth the investment in my mind.

My new method of processing materials will be as follows from now on:

1. Dig and classify the raw materials.
2. Sluice the materials down.
3. Pan the cons, remove what magnetic materials I can and get the visible gold out
4. Grind the remaining materials in the Ball Mill until they're down to 200 mesh.
5. Remove any magnetic sands and rinse out the "rust dust" that comes from the grinding process.
6. Shake & Bake using vinegar and salt for the quench.
7. Amalgamate the gold out of the sands and recover both gold and mercury using proper safety measures.
8. Repeat as often as possible.....

This process seems to me to be the least time consuming way to get as much of the gold out of our materials as possible. I know that most likely I'll still be missing some small amount of gold, but that little bit that gets away isn't going to be worth the cost of recovering it in my mind. This procedure should prove to be both quick as well as cost effective.

I’m sharing these results with everyone so they won’t have to reinvent the wheel to learn the same things. Keep in mind though that every area is different in its composition so there may or may not be recoverable amounts of micro fine gold in your materials.
 

For the most part if you are careful in how you clean out the magnetic sands there shouldn't be enough gold in them to worry about. By the time I put the magnetic sands into a storage container (I've got other plans for them) they've been cleaned an average of three times. Now I have found gold in the magnetic sands but its always been small stuff that got trapped between some magnetic materials as I was cleaning them out of the non-magnetic materials. I'd need to look at some samples under a microscope to see if there's anything worth the effort to recover.

When I clean my magnetic sands out, I always do it as a wet process. I never touch the magnet to the materials. I kind of tease them out of the materials from a distance. Even then some small stuff can be caught up in them and that's why I clean them several times before storing them away. What really amazed me was how much more magnetic material was removed after grinding the so called clean materials. Getting 40 grams out of a 200 gram sample means I was able to remove an extra 20% worth of the weight out. The only reasoning I can come up with for this "extra" magnetic material is that it was inside some non-magnetic sand that prevented it from attaching to the magnet as I was cleaning. The grinding broke it out of the material and allowed the magnet to pick it up. I did notice that it looked quite different than the magnetic materials I removed in the first panning. It was MUCH finer in texture.
 

I got the processing area all finished up at long last. I now have a shelf to hold the containers for magnetic sands an Jet-Dri. I've even got a place to put my coffee cup and ashtray. All of the pans have places to hang from as well as the classifiers. All in all I think it's going to work out well. If not... I'll do a redesign on it until I get it perfected. I've got enough room to put about a 1/4 yards worth of dirt in buckets where I can still reach it from the working area.

We are going to head out to the claim on Saturday for a quick overnighter to grab some materials. If I really bust my hump on Saturday afternoon and Sunday I should have enough materials to keep me going here at the house until the next planned extended trip out there in May.
 

I got the processing area all finished up at long last. I now have a shelf to hold the containers for magnetic sands an Jet-Dri. I've even got a place to put my coffee cup and ashtray. All of the pans have places to hang from as well as the classifiers. All in all I think it's going to work out well. If not... I'll do a redesign on it until I get it perfected. I've got enough room to put about a 1/4 yards worth of dirt in buckets where I can still reach it from the working area. We are going to head out to the claim on Saturday for a quick overnighter to grab some materials. If I really bust my hump on Saturday afternoon and Sunday I should have enough materials to keep me going here at the house until the next planned extended trip out there in May.

It helps sooo much to have a dedicated area for finish processing...congrats and I look forward to seeing more gold pics and maybe a pic or two of your work area.
 

Well no new gold pics but we are going out this weekend and I hope to do well. Here's the work area. I am thinking that I'm going to want to add a shade tarp over it so the sun doesn't fry what few working brain cells I have left. ;)

0424140938.jpg
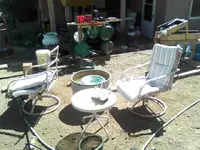
The panning area. Table is handy for small items like vials and tweezers. The chairs are about due for new cushions but that's low on the to-do list at this time.
0423141440.jpg
The shelf/pan rack. Holds my main pans on the front and 5 classifiers on the back side.

0424140937a.jpg
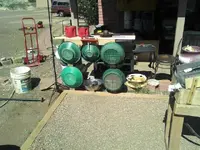
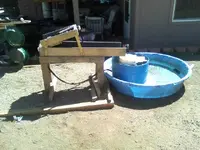
The sluice area. Recirc system will be upgrades soon as well as the sluice stand.
 

Last edited:

Top Member Reactions

Users who are viewing this thread

Back
Top