airscapes
Hero Member
- Nov 13, 2013
- 973
- 555
- Detector(s) used
- DFX 950, U13,6"Exc & 4x6 Coils, Coinmaster GT 4x6 & NEL Hunter coil, TRX Pin Pointer, CZE-T200 FM Transmitter, Sangean DT-400W and ER6i in-ears.
- Primary Interest:
- All Treasure Hunting
I had a 950 coil that came with a used XLT which falsed when bumped. You could narrow it down to the front of the coil, tapping it hard with the coil flat to the ground would produce a +95
So I did some searches on opening up the clam shell case that holds the windings and found only one post where the fella had cut the case open with a hack saw. I contacted him to see if he had any other pictures but he did not.
So, I took a close look at the coil and could see it was held together with some sort of adhesive (picture 1). Rather than cutting, I figured I would try some CA adhesive de-bonder called Cyanoacrylate De-bonder which can be purchased at any hobby shop.
You need to wear latex gloves or similar as this product can be absorbed and cause issues if in excess, also ventilation.
You want to hold the coil so the glue line is flat and level so the debonder will stay on the glue. Apply a small amount of Debonder to the glue in a 3" length, hold the coil so it sits on the glue as it can and will soften the plastic of the clam shell. Wait bout 40 seconds and scrape with a small pocket screw driver. Re-apply if needed. Once you get the glue removed you can use a xacto knife to get what remains out of the grove between the two shells. In the end the screwdriver was the best tool to do both operations (Scrape off the bead of glue and also clean out the between the to shells.
You must do this on the center hole and the outer edge. If you do it correctly the shell will pop apart with the screw driver and very little prying, you should not need to apply a lot of force.
Use your razor to make an arrow on the bottom pointing at the front center for re-installation alignment before you open them up.
As you can see in the photos, the coils are epoxied to a poly foam piece which is glued to the top half the shell. Fox has talked of a loose shield, I did not see a shield so hopefully it is not under the poly foam ..
What I found was that the Tx winding (big one) was no longer attached to the epoxy in the very front of the coil, right where you could bump the coil and cause the false signal. I used plastic 2 part epoxy and then silicon when I ran out of epoxy to anchor the winding to the cover and the existing epoxy. I probably should have waited and picked up some JB weld as it is thinner and flows better than the 2 part in the plunger style tubes.
There is a white wire you can see in the pictures next to the black piece of foam rubber. The wire is held in place with tape and epoxy, it is used to tune the coils null. DO NOT MOVE IT OR TOUCH IT.
The Null is the electrical balance between the TX and Rx coil which allows them to then see the disturbance caused by metal entering the field. If the NULL is off the coil will not work correctly so be careful as it take special gear to tune the coil.
Once whatever is loose has been repaired, sand the edges of both shells where they will meet with some 180-220 sand paper to smooth any damage you did taking them apart and provide a course surface for the adhesive to grab on to. Blow clean with compressed air and wipe all mating surfaces with denatured or rubbing alcohol and clean rag.
Put the shell together, plug in the coil and air test it to verify it is fixed. You could also tape the shell and field test it before making the repair permanent .
Then use NEW (not expired as it does not work if expired) Silicon adhesive sealer to seal the shells. Use your finger to press the silicone into the crack between the shells and smooth when packed.
Let set and field test.
Still have to field test but looks to be a 100% success from my tests before gluing.
Hope someone finds this helpful.
EDIT UPDATE
Do not glue the shell together until you have field tested it and not just in the basement, EMI will add to the issues. Use tape to hold the shells together until you are sure all is good.
After my first attempt above I still had reaction when bumped but in a different area this time. So cutting the silicone was simple to get back in, but removing it so the next batch will stick is a real pain in the butt.
This time found the white foam was loss from the shell on the side that reacted with a bump. Not sure if this is the issue but it is a last try. You must remove the top nut from the cable connector so the cable sill slide into/through the shell. Be careful not to break the foam as it may be well attached in some places. I was out of silicone so used RTV gasket maker which was purchased only a few months ago so nice and fresh. It requires 24 hours to fully cure but over night seems to be bounded and will test after 12 hours. This is the last try.. will live with it if it still works as well as it did before the second try..
Now I understand why whites gives away coils like candy, they are touchy and fragile..
Amazon Forum Fav 👍
Attachments
-
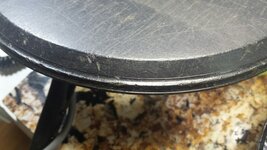 AAFactory Glue on Coil.jpg295.2 KB · Views: 147
 -
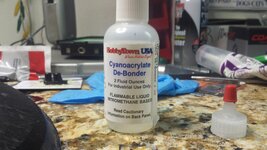 BBDebonding.jpg266.3 KB · Views: 120
 -
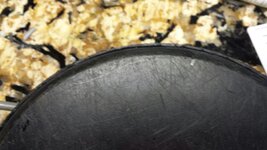 CCFactory Glue remove outside.jpg217.4 KB · Views: 124
 -
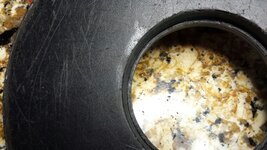 DDFactory glue remove inside.jpg344.6 KB · Views: 124
 -
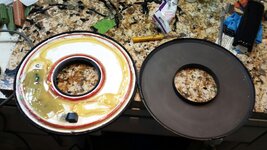 EEShells pulled apart.jpg339.7 KB · Views: 193
 -
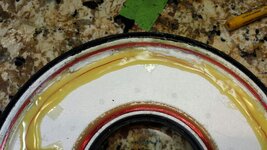 FFwinding after reglue.jpg363.8 KB · Views: 304
 -
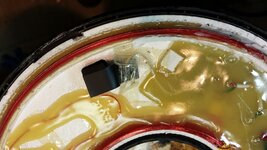 GGNull wire.jpg313.1 KB · Views: 185
 -
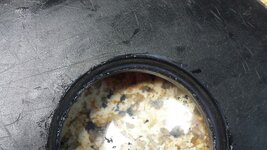 HHSilicone center.jpg499 KB · Views: 133
Last edited:


