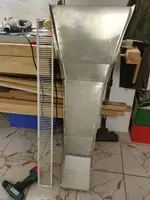
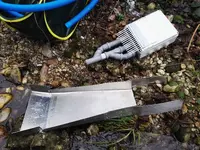
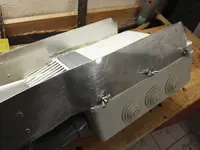
My Diy Fluid Bed Gold Trap Sluice

Looks to me like it'll work. The stratify upping would probably be fine even without that extra slick plate. You may find having the slick plate on there makes it hard to set up the sluice properly and may decide to remove it again so I'm glad it's just attached with duct tape!

Looking forward to the next part of your story and good luck finding gold-rich paydirt!
 

Back from stream

I prospected a gravel bar a few miles downwards my usual place. (shorter distance, easy to reach)
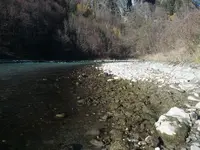
IMG_20151118_130107.jpg
I found some test holes from ancestors and decided to dig across the gravel bar (<1 foot deep)
The gold line is next to the control structures.
I did not find much gold, only veeeery tiny specs, uncommonly small for that area.
Perhaps I have to dig much deeper. On the picture you may recognize an old barrel buried in the gravel bar (right side of my bucket). Could be that the gold is down there.
But it was a sunny day and warm. I digged with my T-shirt in mid November :hello2:

Now my results:
I collected the material from all test holes in a big bucket and ran it through my box. Additionally digged a bigger hole without classifying the material.
First a note: the attached funnel suck during transport. I was hardly able to get it loaded in my car. But it did its job quite well.
So for the future: either leave it at home, or make it easily detachable.

The new design seems to work "better" in case of handling the material but I faced two major issues.
I removed the rubber after the first minute, not enough flow to clean it under the punch plate (minor because of the easy fix).
The thing I learned (again): Puch plate sucks :censored:
Why? As I changed the design the angle between punch plate and slick plate is so small that at the beginning the current is so slow that black sand blocks the first inches.
At the end the punch plate was clogged by gravel not passing the box. (which was much better than the old version, I was able to wash that stuff away with help of a bucket)
So there was not much space for the heavies to get into the trap.
I haven't made any pictures because I was pissed of ;)
So a real grizzly is a compelling feature.
The second problem I had was my own fault.
I did not recognize that the tubes did not fit properly, so I lost water before the trap resulting in less fluid bed action and clogging the end of the trap. One hole was completely outside the trap and cleaned the gravel bar :occasion14:
Behind the trap I put my pan and tested the tailings where I found a lot of the very fine stuff. Can't say whether it was due to the incomplete stratification or scouring inside the trap or a combination of both which I expect.

What I found:
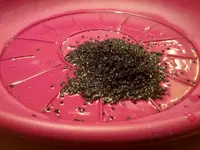
Tons of magnetite, a lot more than usual:
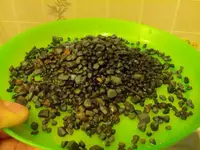
IMG_20151118_203401.jpg
>1/8
IMG_20151118_212724.jpg
<1/8

The huge amount of bigger magnetite hindered me testing the fluid bed with my fingers. I was not able to stick through the stones.
At least the cleanout was a no-brainer. Put it into a bucket, turn on the pump...woooosh, done.

Much appreciated for any comments,
Michael
 

Last edited:
I have constructed my fluid bed following Goodyguy's instructions. The first test went well except there was no boiling action in the tube box. I re-manufactured, adding the adjustable water scoop. Should that do the job or will I have to resort to a battery and pump?

Richard
 

I have constructed my fluid bed following Goodyguy's instructions. The first test went well except there was no boiling action in the tube box. I re-manufactured, adding the adjustable water scoop. Should that do the job or will I have to resort to a battery and pump?

Richard


Can't tell what you are doing without pics. Lots of designs and ideas have been put out in this thread.
 

I have constructed my fluid bed following Goodyguy's instructions. The first test went well except there was no boiling action in the tube box. I re-manufactured, adding the adjustable water scoop. Should that do the job or will I have to resort to a battery and pump?

Richard

Hole orientation and hole size are the main factors on whether or not proper "boiling" is taking place. They must be tuned so that all of the material in the box is moving around by that introduction of water so that displacement and specific gravity concentration can take place. Your problem may be because you have not properly drilled your holes to match what ever that potential water flow is.

Good luck.

Hole orientation and hole size are as prescribed, but I may have a volume problem. First warm day and I will try the adjustable water scoop. I am open to suggestion as to the holes. Making new tubes is no problem.

Richard
 

I have constructed my fluid bed following Goodyguy's instructions. The first test went well except there was no boiling action in the tube box. I re-manufactured, adding the adjustable water scoop. Should that do the job or will I have to resort to a battery and pump?

Richard

Do not expect to see a boiling action in the trap, only a fluidization of the material in the trap. It's subtle to the eye, in fact the only way to be sure is to see if your finger will penetrate down through the material in the trap. The material should feel like quicksand allowing your finger to slowly sink through it. If the material feels too tightly packed for your finger to penetrate through it then you most likely are not getting enough flow into the scoop to supply the tubes with enough pressure.

An easy test is to feed the sluice some material with 10 pieces of lead shot added to it and see if you recover all the pieces, if you do then it's working fine.

Hope this helps,
GG~
 

Last edited:
Short update:

I removed the punch plate, turned it by 180°, moved it and reattached it to the slick plate according to the point arizau made above.
Also changed the diverter baffle a bit (not that deep any more, but the old position)
As I forgot the part of the cover I cut out at the beginning I did a quick fix by using an old metal part and lots of duckt tape :headbang:
Also I repaired the sides using a small torch.

View attachment 1235908

I am still looking for a better grizzly, but time will come.

I keep my fingers crossed that it still works on the creek. At least I don't cut my fingers by brushing the inlet :hello2:

Best regards,
Michael

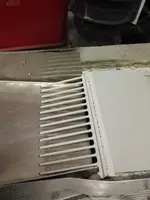
Actually your grizzly should be oriented 90 degrees from the way it is now in order for the holes to be staggered. The way it is now (and the way it was before) allows material to "ride the rails" between the rows of holes. I know it's nit picking but every advantage counts.


GG~
 

Other than two "pickers" that I found in a wall of a camper that I was recycling, nits are all the gold that I have unearthed.

Nit picking is a good thing.

#/;0) ())
 

Well seen Goodyguy! Thanks a lot, I would not have seen that (like the new color of my wife's hair ).
I have another piece of punch plate at home, but I am still hunting a “real“ grizzly. Perhaps I have to weld something. Somehow.... welding without a machine... :icon_scratch:

Michael

Actually your grizzly should be oriented 90 degrees from the way it is now in order for the holes to be staggered. The way it is now (and the way it was before) allows material to "ride the rails" between the rows of holes. I know it's nit picking but every advantage counts.


GG~

Ä
 

AUT, old bar b Que grills and refrigerator shelves work well and are an easy find if there is a recycling center, or a resale shop near you.
I have several sizes and types, from bars to baskets.

A bbq grill can be used by simply laying it over the feeding area and tipping it over the side when needed.

The folks at our recycling center know me by name and quite often will set things aside that they think would want. They are generally spot on.

#/;0) : -
 

Last edited:
AUT what i used for my grizzly was a piece of birdcage ...the spacing between the wires is just right (1/2")..

Sent from my GT-I9305 using Tapatalk
 

AUT what i used for my grizzly was a piece of birdcage ...the spacing between the wires is just right (1/2")..

Sent from my GT-I9305 using Tapatalk

Good idea.
But does no one face any issues with bigger chunks of magnetite clogging the trap?
As you can see on a picture above, tons of that stuff clogged at least the end of the trap.
Perhaps it was an illusion, meaning that the rest of the trap was fluidized properly...
Just wandering if using 2 cages or grills would be better by overlapping them.

Thanks again for your input.
Michael
 

I sweep my sluice with a magnet and save the magnetite to pan out separately.... I use a regular sluice box, so the heavier stuff fall out earlier.

#/;0)
 

Merry Christmas everyone.

Thanks to my father I was able to build my grizzly out of a radiator cover :headbang:

IMG_20151228_161812.jpg

The distance between the wires is 7,5mm
IMG_20151228_161827.jpg

I cut out everything I did not need and taped it on the box:
IMG_20151228_170836.jpg

At least it looks great. If it works as expected will be seen tomorrow in the creek.
Planning to set up my crappy sluice, moving unclassified material, and catch the tailings with my electrified fluid bed (1 pump for the chamber).
So I will see how much I loose in my sluice and also see if the new grizzly works.
So in the end I will atatch the big funnel (40cm) will feed my sluice, feeding the fluid bed via the smaller funnel.
I hope I can make a picture of that crazy setup ;-)

Best regards from Austria without snow,
Michael
 

That looks pretty good.
Recycling / repourpusing takes the stage.
It looks store bought.

Best of luck, with credit due for ingenuity with a little help from Dad.


#/;0)~
 

Last edited:
It looks store bought.
If this would happen to a store bought product I would never buy there again:
IMG_20160108_145350.jpg

During the setup I slipped over a stone and crashed into the "fluid" bed :weather_rain:. The fluid was quite cold but thanks to the wading trousers I soaked only my arms, hehe.

What do we learn? Do not glue things together with hot glue guns if the structur is
  1. sustaining
  2. meant to work in cold environment
because it simply breaks easily.
Get screwed!

Fortunately I managed to stick the parts together and feed it with material :binkybaby:.
Just a few buckets but I wanted to test the new grizzly.
First: the grizzly is awsome. Much better than the punch plate. :hello2:
IMG_20160108_150254.jpg
Using my fluid bed in the creek shows that it was not designed to run in a creek (obviously not for you, as the picture looks much better than it was in reality). As you can see, the most of the water flows below the slick plate. If it was a BGT all would be fine (the water would feed the fluid bed). The outlet is below the water line. I can't say if this is an issue or not. Unfortunately the grizzly did not clean itself because there is a low pressure zone at the inlet although the sides are more narrow than above :icon_scratch:.

I don't think you can see this on the vid.
[video]https://drive.google.com/file/d/0BwGi4wDZnJURN1FadWhiM3hfTGs/view?usp=sharing[/video]

So far
best regards,
Michael
 

Aut, sorry to hear that you fell with it.
It's hard to tell if it was a failure or a success from the video.

I haven't kept track of how many times I have gone back to the drawing board to get the basics figured out again.

Better nuts and bolts are just about 80% of a good plan, and imagination/trial and error, are just 10%.

The rest is... don't give up what you learn in the creek.

:0)
 

Top Member Reactions

Users who are viewing this thread

Back
Top