My Diy Fluid Bed Gold Trap Sluice

Ive been tinkering/thinking of building a Bazooka style sluice for my 2 inch dredge to try it out in addition to the other sluices ive built for it. THEN I came across (again) GoodGuys fluidbed for the end of the sluice. it brings back memories (15 years ago)of when I built my first fluidbed ( 16x 10 x 6 deep)for my 4 inch dredge (now Bill_Saf dredge) it hung on the end of my sluice. but it would tip the tailend because of the accumulated BS . it worked fine except for the BS build up . Im thinking of building another one for the newer 2 inch that I built. I hope Buddy don't mind if I copy his FB and give it a try. the top half of the sluice will be for the dredged material and the lower section that used the streams water flow to create the fluidizing of material in the FB will be done with a pressureline from my pump. and to adjust the flow/pressure ill put a valve and make a water column gauge to know what my water column is so I can redo the results next time I dredge. what else can I do when needing a set of knees? may as well do this since im stuck at home!
 

Hey russau! How does a guy make a water column gauge? I'm thinking of making the same fluid bed too and wondered how to get repeatable flow each time I run.
Beav
 

Hi Beav! its been a long time since I saw you posting over on Leonards (Goldenoptimist)siteA water column gauge is a gauge that sees how high your water is being raised over the water level while running.. I use a clear plastic tube on the outside of my FB to show where the water is up to while running. and 90 degree fittings to go into the FB for the clear tube. It sooooo ez that I did it! another good part to install is a valve and a PSI gauge to check your repeatability . I looked for 1 to 2 inchs of water column and 19 PSI for MY set up. each set up is different for different conditions / equipment so its hard to say what water column you should aim for to start your fluid bed. then fine tune it to your needs.
 

Last edited:
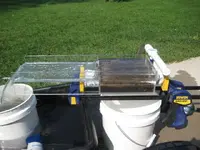
Just got done with building a good recirc fluid bed. Took 3 tries to get it right with the water pressure of the bilge pump. First 2 were long beds (8x18, 6x16) and I didn't have enough pressure to fluidize everything. Went to a 6x8" bed 2 1/4" deep running a 800 GPH bilge pump. The jets are angled at 120 degrees to stir the bottom a bit. I did that to get the black sand on the bottom instead of sitting 1/2" above a layer of blond sand that 180 degree jets left. After the box is a 12" tail to dump into the tailings bucket sitting in the float pan. I may add a section of mat on the tail just incase something jumps. (but I doubt it!) The box is now small enough to allow valving to throttle the tubes. Material for test is Superior beach sand.

Here's the rig. (still testing the tubes, clamps holding them together)
IMG_2814.JPG

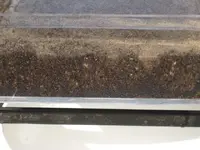
Here's a side view while running.
IMG_2823.JPG

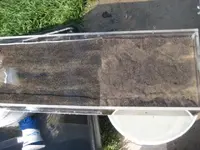
Top view while running.
IMG_2818.JPG

The long tail helps when cleaning out as it funnels everything into the concentrate bucket really nice.

This fluid bed will be really easy to pack if I don't run recirc. And even if I do, it makes a nice compact system.
 

I'd love to see a video of you feeding this thing sand at the beach. Looks like a winner!
 

Just got done with building a good recirc fluid bed. Took 3 tries to get it right with the water pressure of the bilge pump. First 2 were long beds (8x18, 6x16) and I didn't have enough pressure to fluidize everything. Went to a 6x8" bed 2 1/4" deep running a 800 GPH bilge pump. The jets are angled at 120 degrees to stir the bottom a bit. I did that to get the black sand on the bottom instead of sitting 1/2" above a layer of blond sand that 180 degree jets left. After the box is a 12" tail to dump into the tailings bucket sitting in the float pan. I may add a section of mat on the tail just incase something jumps. (but I doubt it!) The box is now small enough to allow valving to throttle the tubes. Material for test is Superior beach sand.

Here's the rig. (still testing the tubes, clamps holding them together)
View attachment 1206657

Here's a side view while running.
View attachment 1206658

Top view while running.
View attachment 1206659

The long tail helps when cleaning out as it funnels everything into the concentrate bucket really nice.

This fluid bed will be really easy to pack if I don't run recirc. And even if I do, it makes a nice compact system.


....Here are some thoughts for you and maybe they will work for you, as they do for me, if you are up for testing them....

Rather than depending on the water spewing down through the tube openings to try to penetrate and agitate the bed from above you could insert appropriately sized smaller tubes into the main tube and have them extend down close to the bottom. By so doing, the action would be to stir or agitate the settled or settling material from the bottom up much like the action of a natural spring (Fluid or air injection from below is how commercial fluid beds are configured). This would serve to keep most or all of the material at the bottom of the box active and exchanging while still leaving room between the tubes for gold and other heavies to find a home. Gold that may be lifted by the currents will ultimately resettle to the side of the major up currents and stay in the box just as it does in the more accepted/conventional configuration used by Bazooka, you and other DIY'ers.

These are the principles that I use in my homemade fluidbed zook and it works whether it be by science or by chance. By the way, I use friction fit (that allows for adjustability) sections of semi rigid drip irrigation riser tubes (1/8" ID I think) but you may find other suitable tubing.

Good luck.

PS: Just reread your post and I'm not sure you are after gold or just black sand. It will concentrate all heavies gold included if it is around.
 

Last edited:
Going for gold. Though I do have a market for my collected magnetite sand.

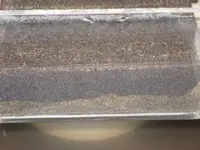
On my first build, the 180 degree jets would drop out black sand just below the action zone of the jet or roughly 1/2" above the bottom of the bed. There was solid blonde sand below the layer of black. I wanted the layer of black sand to form on the bottom, and not high up like it was. That's why I angled the jets downward.

The things you get to see with a clear bed!
 

Here's what I'm talking about with horizontal jets.

IMG_2827.JPG

You can see the blonde sand that didn't fluidize on the bottom of the bed, and black sand above. Your gold will be sitting in the black sand and not be on the bottom of the trap. That could cause a loss by being higher in the trap.


On a good note, I checked the cons from the Lake Superior material I was testing with, and did find a flake! (material was cons from 6 gal total of sand run) Now I need to check tailings.
 

This layering is one of my concerns about that AMP sluice. It has horizontal jets 1/2 way up the fluid bed.
 

If there was only 1/8" or less down there I wouldn't be worried. But in that pic you have almost 3/4" in a 2 1/4" deep bed.

That one is going to get replumbed and sectioned into a 2 stage bed. Faster jets at the head, and slower water at the tail. Worth an experiment.
 

Excellent thread I have learned a lot thanks gg awesome info, actually thanks to all this is why I love treasurenet!
 

Capt Nemo - The AMP Sluice uses horizontal holes (not jets) propelled by water that is accelerated through a plenum (vent) on each side of the machine. Fluidization is accomplished by water being forced into the machine equally at each hole by velocity. This ensures that there is even fluidization across the entire box. Material entering the box is what should be fluidizied not material that has already been captured. Captured material need only be liquified for heavy material (black sand and gold) to pass through it.

The issue with your black sands not passing through your lighter material is not directly related to where you put your jets - what you are lacking is vibration.

The reason the AMP does not layer is because the machine oscillates (vibrates) at a very high frequency - This is caused by a combination of water passing through the plenums (vents) and water passing through the perforated grizzly. When the machine is in the water you can put your fingers on the machine and actually feel the oscillation. Material entering the machine is subject to both fluidization and oscillation. That is how the heavies pass right through the lighter material. Black sand and gold layer (pack) from the bottom up and actually displace the lighter material. The only limitation is when the black sand and gold level reaches the bottom of the holes. Since the material no longer can be compressed or displaced gold has a more difficult time passing through. Finer gold (100 mesh and below) will have the hardest time.

Add some vibration to your machine and watch what happens! I guarantee your problem will be solved.

The only problem you'll experience is when you take it to the river - Your machine has no ability to impart vibration when underwater. if you could figure out a way to add it you will be in!! For now leave it as is and optimize it with vibration - once you figure out how much you need then find a way to impart it to the machine underwater.

BTW a 2/14" bed is way too much material to attempt to fluidize with small jets - The AMP Recon box is 5" x 5" x 1 1/2" but only about 1/2" is recovery box (below the holes). The Expedition is 6.25" x 6 3/4" x 1 3/4" recovery box is at 5/8".

for comparison 5 x 5 x .5 = 12.5 cubic inches or about a cup of black sand/gold. 26.4 cubic inches of black sand/gold or about a pint of black sand/gold. That is a very large amount of black sand. Your machine is capable of holding nearly 2 quarts of black sand!!
 

If your trap is totally fluidized you won't need any oscillation. there are multiple fluid bed designs that use water dynamics exclusively. If you could get the water to impact the entire bottom of the recovery area you will get great fluidization and exchange of material. I would avoid any design that allowed material to pack into layers. Why engineer in the need for clean out vs. longer run time? If you have a design that you know is working for your total run you will have piece of mind. If you have to gauge a systems clean outs on a factor you can't really see...you have more time checking and deciding when to clean out...and wondering if you waited to long.
 

This idea may have already been addressed but I have't gone through this thread to see, So if this is a duplicate idea..... well all I can say is great minds think alike.........:laughing7:

How about this.......
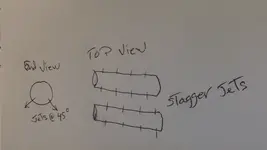
Aim jets downward @ 45 deg and stagger them on the opposing tubes.....
Heres a rough sketch.

Screen Shot 2015-10-21 at 9.21.11 AM.png
 

Last edited:
Capt Nemo -

The issue with your black sands not passing through your lighter material is not directly related to where you put your jets - what you are lacking is vibration.

The reason the AMP does not layer is because the machine oscillates (vibrates) at a very high frequency - This is caused by a combination of water passing through the plenums (vents) and water passing through the perforated grizzly. When the machine is in the water you can put your fingers on the machine and actually feel the oscillation. Material entering the machine is subject to both fluidization and oscillation. That is how the heavies pass right through the lighter material. Black sand and gold layer (pack) from the bottom up and actually displace the lighter material. The only limitation is when the black sand and gold level reaches the bottom of the holes. Since the material no longer can be compressed or displaced gold has a more difficult time passing through. Finer gold (100 mesh and below) will have the hardest time.

Add some vibration to your machine and watch what happens! I guarantee your problem will be solved.

Just curious here......Was the oscillation aspect an engineering concept that you knowingly incorporated into the design of your sluice or is it something that you discovered after the fact? Whatever, it seems to work according to reports.
 

Last edited:
This idea may have already been addressed but I have't gone through this thread to see, So if this is a duplicate idea..... well all I can say is great minds think alike.........:laughing7:

How about this.......
Aim jets downward @ 45 deg and stagger them on the opposing tubes.....
Heres a rough sketch.

View attachment 1225591

johnedoe, i set my homemade zook up like that and so far is working fairly well at catching fines and flakes it and i still need some fine tuning as the end of the trap is scouring out a little when i run steep but when level all is good
 

johnedoe, i set my homemade zook up like that and so far is working fairly well at catching fines and flakes it and i still need some fine tuning as the end of the trap is scouring out a little when i run steep but when level all is good
You might try what KevenInColorado suggested and put a little course aggregate in the bottom of the fluid bed.
 

Last edited:
i have a 1/4" overhang at the start of the trap slightly angled down and a baffle in the middle of the trap that maybe causing the scouring issues ..gonna remove the overhang first to see what changes
 

Top Member Reactions

Users who are viewing this thread

Back
Top