Capt Nemo
Bronze Member
Model 5 Fluid Bed...It's Alive!!!
My model 5 recirc fluid bed sluice is alive but with a few bugs to work out. It's kinda expected when engineering a new toy.
I started with a 27 gallon water trough. A neat feature is it has pockets on both sides at the ends for staking it down. I'm thinking of using those to build a future cart or wheelbarrow type contraption for hauling it to the dig site. This trough is USA made at Portage, WI by Freeland Industries.
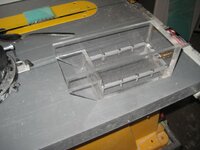
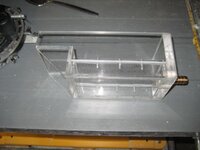
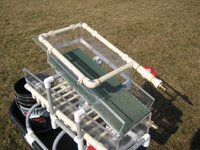
I then set about with building the fluid bed. I used 1/2" acrylic from a hockey dasher panel broken during a game. 1/4" was getting a little strained with the water/slurry weight on the model 4, so it needed to be thicker. I cut the bed 27 x 8" allowing for 45 degree mitered edges. The plumbing holes allow 1/4" above the bottom of the bed. I left a space at the head of 5" unplumbed as flow from the header box would help keep things fluid in that area. The biggest problem in plumbing is making 10 solvent welds at once! Before attaching the jet tubes to the manifolds, check the fit!!! The manifold with the most fit problems is the one that gets assembled first! Then the easy manifold will weld into place with few problems. I had to run 2 feed manifolds due to using bilge pumps for supply. Both are valved, so if you have a higher pressure pump, you can feed one side and shut off the other. All the jets are angled toward the head of the bed, so in theory, will push any heavies toward the head of the sluice and not the tail.
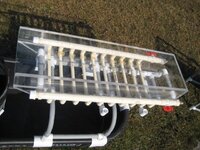
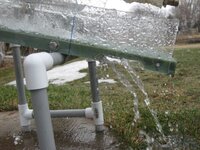
I then set to work on the frame. The frame holds the sluice about 2" above a 6 gal bucket, and works with the spout of the bed for cleanout. The bed just tips and pours once the header frame is removed. The only problem is that you can't adjust the header box angle without building another header frame. The feet are 1 1/4" x 1/2" tees that were slit and then bent open with a heat gun. I used 1/2" PVC electrical conduit for all the tubing and plumbing fittings for the joints. The electrical conduit seems to be a little tougher than pipe, and is also UV resistant. The pic is showing cleanout with the header removed. (the yellow is a broom handle to hold it up)
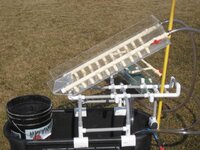
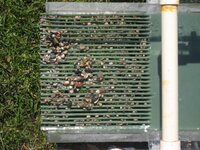
The header box is acrylic with a 3/4" UHMW PE floor. For a grizzly I made saw cuts like a featherboard. It does work fast at 15 degrees and should work good at 10 degrees. It has it's own 800 GPH bilge pump. While sawing the heat would warp the plastic, and I had to add a spreader bar and 1/8" silicone washers to keep them straight. When water testing today, I found a major problem. The water likes to flow along the cuts and not through them. I think I'll have to route a couple of slots across it to make the water drop before the end of the grizzly and not at it. Otherwise, it works well, just not where I want things to go.
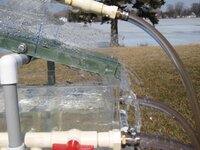
The only other thing I'm considering is a flow diverter for the buckets. The water going over the rim of 6 gal buckets can fall on the rim of the trough and cause water loss. It might be the height of the bucket that's the problem here, and 5 gal buckets might solve it. But all I really need to do is divert the flow so that it doesn't fall towards the walls of the trough. A cut bucket lid might work for this.
But other than that, we're ready to go get some gold!
My model 5 recirc fluid bed sluice is alive but with a few bugs to work out. It's kinda expected when engineering a new toy.
I started with a 27 gallon water trough. A neat feature is it has pockets on both sides at the ends for staking it down. I'm thinking of using those to build a future cart or wheelbarrow type contraption for hauling it to the dig site. This trough is USA made at Portage, WI by Freeland Industries.
I then set about with building the fluid bed. I used 1/2" acrylic from a hockey dasher panel broken during a game. 1/4" was getting a little strained with the water/slurry weight on the model 4, so it needed to be thicker. I cut the bed 27 x 8" allowing for 45 degree mitered edges. The plumbing holes allow 1/4" above the bottom of the bed. I left a space at the head of 5" unplumbed as flow from the header box would help keep things fluid in that area. The biggest problem in plumbing is making 10 solvent welds at once! Before attaching the jet tubes to the manifolds, check the fit!!! The manifold with the most fit problems is the one that gets assembled first! Then the easy manifold will weld into place with few problems. I had to run 2 feed manifolds due to using bilge pumps for supply. Both are valved, so if you have a higher pressure pump, you can feed one side and shut off the other. All the jets are angled toward the head of the bed, so in theory, will push any heavies toward the head of the sluice and not the tail.

I then set to work on the frame. The frame holds the sluice about 2" above a 6 gal bucket, and works with the spout of the bed for cleanout. The bed just tips and pours once the header frame is removed. The only problem is that you can't adjust the header box angle without building another header frame. The feet are 1 1/4" x 1/2" tees that were slit and then bent open with a heat gun. I used 1/2" PVC electrical conduit for all the tubing and plumbing fittings for the joints. The electrical conduit seems to be a little tougher than pipe, and is also UV resistant. The pic is showing cleanout with the header removed. (the yellow is a broom handle to hold it up)

The header box is acrylic with a 3/4" UHMW PE floor. For a grizzly I made saw cuts like a featherboard. It does work fast at 15 degrees and should work good at 10 degrees. It has it's own 800 GPH bilge pump. While sawing the heat would warp the plastic, and I had to add a spreader bar and 1/8" silicone washers to keep them straight. When water testing today, I found a major problem. The water likes to flow along the cuts and not through them. I think I'll have to route a couple of slots across it to make the water drop before the end of the grizzly and not at it. Otherwise, it works well, just not where I want things to go.


The only other thing I'm considering is a flow diverter for the buckets. The water going over the rim of 6 gal buckets can fall on the rim of the trough and cause water loss. It might be the height of the bucket that's the problem here, and 5 gal buckets might solve it. But all I really need to do is divert the flow so that it doesn't fall towards the walls of the trough. A cut bucket lid might work for this.
But other than that, we're ready to go get some gold!


