- Joined
- Mar 2, 2018
- Messages
- 6,625
- Reaction score
- 19,835
- Golden Thread
- 0
- Location
- Todds Point, IL
- Primary Interest:
- Metal Detecting
- #1
Thread Owner
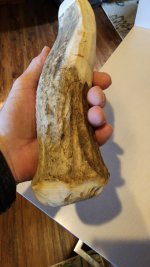
I’ve seen a lot of beginning knappers acquire a shed antler billet for knapping. They will work okay on glass or high quality flint. The problems with shreds are several. First, most sheds have their working end at a 45° angle to the main beam. Once you shape the end, you don’t have much material of use before you hit the spongy pith. A much better way to utilize whitetail antlers is to obtain an antler from a skull. The extra material between the antler and the skull plate is called the pedicle. It’s good and hard and gives you more meat on the business end. This is one that I cut off of a skull.

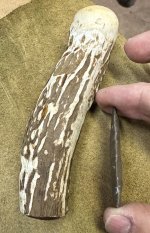
Next, you need a way to work it down. I use an angle grinder mounted in a Work Mate vise with a coarse sanding disc.

I ground down the burrs on the main beam first.

Next I shape the end.

The next two pics show how much “extra” you get on the business end of your billet by adding the pedicle.


Now I can stain it with potassium permanganate and sand the high spots. A nice billet for the tool kit, but what is it good for?

A small billet like this is good for taking the last set of flakes off of a big blade. Or, flaking a small spall or biface of high quality flint. What it’s not good for: You won’t be testing nodules in a creek with it. You won’t be making big bifaces with it, especially from raw tough flint. A small billet is for working small flint.
This is a spall of Harrison Co IN flint. It’s arguably the highest quality flint in the Midwest. I’ll try to make a dart point from it with the antler billet, a pressure flaker, and abrader.

Start by abrading sharp edges. Crush the edge back to get to thick material. Then, pick out the natural platforms, grind them, and remove flakes.


Each set of flake removals will leave a ridge between scars. Follow the ridges, grinding platforms above the ridge.


You have two edges and the base on each side. That’s 6 edges to remove flakes from. Go after the thickest areas first. Remove flakes, then use abrader to knock off the overhang left after flake removal.


I’ve only used the billet and abrader up to this point. I’ve now run out of natural platforms. To proceed, I need to use the pressure flaker to build platforms.


Make your platforms below the centerline and go after thick areas. Work all 6 areas, going after the worst first.


I’ve now got the thickness down and ready for pressure flaking to finish edge and notching.


If you look at the flake scars on the above pic, you can see they run from upper right to lower left. These are the flake scars of a left-handed knapper. Me! A right handed knappers scars would run upper left to lower right. I’ve only seen a very few points I could attribute to a left-handed Indian.

This is all the debitage from making one 2” point.

Next, you need a way to work it down. I use an angle grinder mounted in a Work Mate vise with a coarse sanding disc.
I ground down the burrs on the main beam first.
Next I shape the end.
The next two pics show how much “extra” you get on the business end of your billet by adding the pedicle.
Now I can stain it with potassium permanganate and sand the high spots. A nice billet for the tool kit, but what is it good for?
A small billet like this is good for taking the last set of flakes off of a big blade. Or, flaking a small spall or biface of high quality flint. What it’s not good for: You won’t be testing nodules in a creek with it. You won’t be making big bifaces with it, especially from raw tough flint. A small billet is for working small flint.
This is a spall of Harrison Co IN flint. It’s arguably the highest quality flint in the Midwest. I’ll try to make a dart point from it with the antler billet, a pressure flaker, and abrader.
Start by abrading sharp edges. Crush the edge back to get to thick material. Then, pick out the natural platforms, grind them, and remove flakes.
Each set of flake removals will leave a ridge between scars. Follow the ridges, grinding platforms above the ridge.
You have two edges and the base on each side. That’s 6 edges to remove flakes from. Go after the thickest areas first. Remove flakes, then use abrader to knock off the overhang left after flake removal.
I’ve only used the billet and abrader up to this point. I’ve now run out of natural platforms. To proceed, I need to use the pressure flaker to build platforms.
Make your platforms below the centerline and go after thick areas. Work all 6 areas, going after the worst first.
I’ve now got the thickness down and ready for pressure flaking to finish edge and notching.
If you look at the flake scars on the above pic, you can see they run from upper right to lower left. These are the flake scars of a left-handed knapper. Me! A right handed knappers scars would run upper left to lower right. I’ve only seen a very few points I could attribute to a left-handed Indian.
This is all the debitage from making one 2” point.
Amazon Forum Fav 👍
Attachments
Last edited:


