Home buillt spray booth / room

Brad if you get in a pinch and need some help pm me and we can work it out on the phone or somthing. If I was close by I would just spray them for you !!! Anyway we are all proud of what your doing so any assistance I can give makes me feel good too. When you lay a nice finish on those boxes youll feel a since of satisfaction that feels real good. Youll be proud of them for sure !!!
 

Cw0909 ' s link gives multiple options.
A wall of filters might work for you if you can turn your work once during spray process.
Blanket filters ,( example 4x8 rolls X 3 pieces) can be hung on bolts threads with ends ground to points. Pocket filters behind them are defended by the blankets.
That would require a frame with frames within to hold each desired pocket filter. A plenum/ box behind with air draw behind it ,going away/ out.
A pre- filter can defend your pleated intake filter media. Pink and white layered ones ,white towards " in" for intake ,or facing booth were last I installed.
Even in a non pressurized system ,being able to adjust air balance through increased or decreased air volume can help tweak any problems with the spraying of finish ( spray pattern falling or drifting too fast towards exhaust ,or steered wrong direction wasting material.)

A greater volume of production could use flash tunnels ,but you won' t be running that great a volume ...yet.

You should be able to get by with a single booth if your overspray clears rapidly. Getting in and out of the booth and dust or dirt outside might need controlled ,depending on environment.

Defend exhaust and intake fan ( s)from being able to inhale a filter.
Most filter changes seating confirmation ( only with know non body harming reasons not to) went better with system running. Not all though.
Those not done while running needed checking after start up
 

RelevantChair brings up some good points!

For your small-scale booth, you should consider making a manual turntable for your projects to rest on, have incoming air coming in from your backside, and always spray towards the back wall, where the exiting air/fumes go. You might also wanna have a small pre-entry to your booth if the area around the booth is likely to ever be unusually dusty. This could consist simply of a small entry that you go into, close the door behind you, then open the door to spray booth. But for your needs, I wouldn't see needing to go to this extreme.
 

Another member here and I talked for almost an hour the other day. He really gave me some great ideas and cleared up some things I was thinking about. I haven't made up my mind yet if I'm going to build a spray booth within my shop or just add onto the shop with one. I really hate to give up any of the 1800 sq. ft. within to a spray booth.

I think now I'm going to build some stands (5) that would hold an individual toy box. They would have wheels on base to move around easily. Each stand would have a "lazy susan" turn-style w/locking system on the top of each stand. Then I'll just roll each box into booth, unlock, rotate, spray, re-lock and move out... repeat.

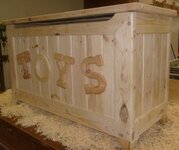
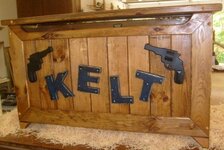
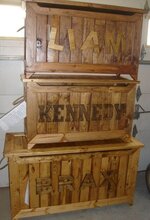
One of the good things about this product is that it doesn't have to have a "perfect" 100% super quality finish after the staining. The type of wood I'm using is not of the type that without a LOT of work would accept a super quality finish. I'm using construction grade 2 x 4 x 8's and machining them down to construct these toy boxes. After construction, minimal sanding and staining I apply a single coat of poly to seal the wood. But this single coat just raises the grain some so a real quality finish is not forthcoming on this product. Now I could lightly sand and do 2-3 more coats but for what I'm selling it's just not worth all the time it would take. I sell naked ones for $115.00 and finished ones for $145.00 now. Sometimes some real custom ones I get a lot more. So this spray booth just has to be safe and practical for me to use... and not for world class wood finishing. A few examples are below:
 

Attachments

  • S6300544.JPG
    S6300544.JPG
    71.2 KB · Views: 51
  • S6300590.JPG
    S6300590.JPG
    92.9 KB · Views: 52
  • S6300663.JPG
    S6300663.JPG
    83.9 KB · Views: 48
Looks like nice woodworking skills. :thumb_up:

I have a few projects around here to do this year. A built-in corner amoire/entertainment center, and two bed frames w/headboards. I also picked up an antique dresser cheap this summer with a couple split dovetails...need to strip that down and restore it for my youngest son.
 

There are so many talented people on this website. And when it comes to woodworking there are so many different styles and levels it's amazing. I'm in awe with a lot of folks and their woodworking skills here. I'm just a wanna-be compared to 90% of others around here. I chose the wood I'm using because that's what I had lying around one day. I just keep staring at the 5 2 x 4 x 8's lying there and thinking what can I make with them. So this design is what I came up with. Everything on this box (except bottom) is made from the 5 boards... including the letters. But it's hard to get a real quality finish because the wood is not dry and the grain raises easily.
 

There are so many talented people on this website. And when it comes to woodworking there are so many different styles and levels it's amazing. I'm in awe with a lot of folks and their woodworking skills here. I'm just a wanna-be compared to 90% of others around here. I chose the wood I'm using because that's what I had lying around one day. I just keep staring at the 5 2 x 4 x 8's lying there and thinking what can I make with them. So this design is what I came up with. Everything on this box (except bottom) is made from the 5 boards... including the letters. But it's hard to get a real quality finish because the wood is not dry and the grain raises easily.

If it were me, I'd sell them raw or painted white, then up-charge for the stains...or refuse to do them at all because I hate staining. I'm just an experienced carpenter who's a novice building fine furniture and challenging my skills.

I worked professionally in stone until I got bored with it. These days it's all pretty much counter tops and monuments...lame. Talk about a loud process. Ain't nothing quiet about that material. My neighbors probably secretly hate me, but hand working stone is my true love.
 

Another member here and I talked for almost an hour the other day. He really gave me some great ideas and cleared up some things I was thinking about. I haven't made up my mind yet if I'm going to build a spray booth within my shop or just add onto the shop with one. I really hate to give up any of the 1800 sq. ft. within to a spray booth.

I think now I'm going to build some stands (5) that would hold an individual toy box. They would have wheels on base to move around easily. Each stand would have a "lazy susan" turn-style w/locking system on the top of each stand. Then I'll just roll each box into booth, unlock, rotate, spray, re-lock and move out... repeat.

One of the good things about this product is that it doesn't have to have a "perfect" 100% super quality finish after the staining. The type of wood I'm using is not of the type that without a LOT of work would accept a super quality finish. I'm using construction grade 2 x 4 x 8's and machining them down to construct these toy boxes. After construction, minimal sanding and staining I apply a single coat of poly to seal the wood. But this single coat just raises the grain some so a real quality finish is not forthcoming on this product. Now I could lightly sand and do 2-3 more coats but for what I'm selling it's just not worth all the time it would take. I sell naked ones for $115.00 and finished ones for $145.00 now. Sometimes some real custom ones I get a lot more. So this spray booth just has to be safe and practical for me to use... and not for world class wood finishing. A few examples are below:

Do you use a sealer? On Pine, sealers help make for a more even stain, as well as helping to prevent the raising of the grain.

Prices sound pretty fair - actually, VERY fair! You might could even up the price a little if you needed. The quality seems worth it. Only problem is there is a limit to what people will pay for something, regardless of the labor that went into it.

No I don't use a sealer... I really do try and keep the cost low so people can afford these toy boxes. As far as pricing I too feel it is a very fair price. And I know it is when 90% of my customers TELL ME THAT! And I try to keep the labor at a minimum also. I never cut stock for a single box anymore. It's faster to make 10 at once. Once the saws and jigs are set just keep cutting stock for 10.
 

If it were me, I'd sell them raw or painted white, then up-charge for the stains...or refuse to do them at all because I hate staining. I'm just an experienced carpenter who's a novice building fine furniture and challenging my skills.

I worked professionally in stone until I got bored with it. These days it's all pretty much counter tops and monuments...lame. Talk about a loud process. Ain't nothing quiet about that material. My neighbors probably secretly hate me, but hand working stone is my true love.

D.T. Well now... I'm just the opposite of you now. Because of the wood I use it is very hard to get a good spray job of paint with one coat without sealing the wood first. ALSO... there are knots everywhere and they don't look good painted at all. (Ever try spraying the inside of a toy box?). It SUCKS! I found it is quicker to hand stain them one at a time then paint them. It's also cheaper. AND I HATE STAINING THEM ALSO!!!!! Hence my interest in a spray booth. And I absolutely would love to sell them raw or naked ANYDAY! Sold 2 yesterday naked and was so happy.
 

Same here - I hated finishing wood....with only one exception. Osage Orange wood. All you need there is fine sandpaper and a little water. Instant finish! Problem is, trying to find decent sized Osage Orange lumber to build something with.

As for Pine, I always had the best luck (20+ years ago) using a wipe-on poly. Was easier to get a more even finish. Of course, that's also using southern yellow pine - not the white pine that is also commonly available. Yellow pine has more pitch.
 

Yeah, I also was a painter for extra $. Kind of runs in the family. I've sprayed the inside of many cabinets, wine racks, coat closets, shoe closets, pantries, etc... finishing wood sucks....actually just the prep and sanding sucks. 8-)

If time were no issue I'd just do a tung oil wipe....you probably want to crank them out though.
 

Last edited:
Probably the cheapest stains out there are water based dyes. They also have them alcohol and oil based. They come as a powder so you can alter the strength by diluting more or less.
Woodworkers supply has them in a HUGE amount of choices. Maybe too many. I first read in Fine Homebuilding mag
How to make popular look like cherry. It was a mix of two water based dyes. If using pine the grain will raise some so maybe the alcohol base might be better.
I have done some experiments and so far I like them especially for easy application.
As far as pre-stain sealer, it's very cheap and goes a long way.
If you want to paint pine a pre-coat of a product like Klitz shellac based primer will seal knots.
Luck to you.
 

+10 on the shellac sealers. Top shelf sealers.

And the is no way to avoid sanding pine if you're concerned about grain rise. If you know of one, please tell. :icon_thumleft:
 

+10 on the shellac sealers. Top shelf sealers.

And the is no way to avoid sanding pine if you're concerned about grain rise. If you know of one, please tell. :icon_thumleft:

Avoid water. I don't avoid water. Especially machined pine like moldings. I find by wetting and sanding, color takes better (usually)
Then a cote of pre-stain sealer before color.
Moldings that have been put through a shaper or other tooling seem do develop a resistance to taking on color. So that's my motive in wetting and sanding.
Different kinds of pine are sold and they all have their own personalities and smells. Some harder than others and take color differently.
I bought some pine from a molding dealer and asked him where it was from as it was different.
I was going to machine some moldings.
He said New Zealand. I didn't like it. Machined poorly and took color poorly. My last time.
I luv the smell of sugar pine in the morning. Smells like fun.
 

I know I'm getting off topic from talking about a spray booth... but I'm learning a lot. Talked to another member today and again learned a lot.

I bought a HVLP sprayer to experiment with spraying on a water based poly to sped things up. IT REALLY DID... ALOT! But... I noticed the grain raising much more then an oil based poly. A hand applied oil based coat is MUCH better than a sprayed on water based coat (and cheaper). I haven't tried spraying an oil based poly yet... but thought I'd have to add additives first to do... right?

It seems a catch 22. Oil based is cheaper than water based by about $20 p/gallon. I can spray water based poly directly from can to sprayer but grain raises a lot on product. I can also spray an entire box in about 3 minutes and it a water clean-up also. Oil based is cheaper but if I do have to thin then that adds to the cost of the oil based and more expensive to clean sprayer also w/paint thinner.

What's a cheap Toy Box maker to do...? :dontknow: I guess build a spray booth first... right?
 

Probably the cheapest stains out there are water based dyes. They also have them alcohol and oil based. They come as a powder so you can alter the strength by diluting more or less.
Woodworkers supply has them in a HUGE amount of choices. Maybe too many. I first read in Fine Homebuilding mag
How to make popular look like cherry. It was a mix of two water based dyes. If using pine the grain will raise some so maybe the alcohol base might be better.
I have done some experiments and so far I like them especially for easy application.
As far as pre-stain sealer, it's very cheap and goes a long way.
If you want to paint pine a pre-coat of a product like Klitz shellac based primer will seal knots.
Luck to you.

Actually, there's a huge difference between stains and dyes. The short answer is, stains have solid particles that partially cover the wood grain, whereas dyes do not have solid particles, but rather they change the color of the wood fibers. As for dyes, there are water-based, oil-based and alcohol-based. I only used dyes once or twice, so that's the extent of my knowledge.


As for the raising of grain, if you want to go with a water-based finish, you will have more sanding. ANY TIME that you use a water-based finish (or water comes in contact) with wood, the water will be absorbed by the wood grain and it will swell, as well as loose fiber ends basically warping out of their straight alignment. As I wrote before...maybe in PM - can't remember - I worked mostly with Southern Yellow Pine growing up, and the amount of pitch in SYP would cause stains and finishes to turn out blotchy. So for SYP, you MUST use a sanding sealer for a decent finish. Even painting goes better after using a sealer. Also, sealers are not expensive. They also dry fairly quick. They raise the wood grain while they seal, which allows you to do most of your sanding prior to applying the stain/topcoat. If you choose to forego the sealer, that's ok - apparently you're not getting SYP there. It may be some other type of pine or, in certain areas, construction lumber might be made of fir or cedar. In California, they used to make construction lumber out of Redwood a lot - don't know if they still do. I think now you probably have to pay extra for Redwood lumber construction grade.
 

Last edited:
Actually, there's a huge difference between stains and dyes. The short answer is, stains have solid particles that partially cover the wood grain, whereas dyes do not have solid particles, but rather they change the color of the wood fibers. As for dyes, there are water-based, oil-based and alcohol-based. I only used dyes once or twice, so that's the extent of my knowledge.


As for the raising of grain, if you want to go with a water-based finish, you will have less sanding. ANY TIME that you use a water-based finish (or water comes in contact) with wood, the water will be absorbed by the wood grain and it will swell, as well as loose fiber ends basically warping out of their straight alignment. As I wrote before...maybe in PM - can't remember - I worked mostly with Southern Yellow Pine growing up, and the amount of pitch in SYP would cause stains and finishes to turn out blotchy. So for SYP, you MUST use a sanding sealer for a decent finish. Even painting goes better after using a sealer. Also, sealers are not expensive. They also dry fairly quick. They raise the wood grain while they seal, which allows you to do most of your sanding prior to applying the stain/topcoat. If you choose to forego the sealer, that's ok - apparently you're not getting SYP there. It may be some other type of pine or, in certain areas, construction lumber might be made of fir or cedar. In California, they used to make construction lumber out of Redwood a lot - don't know if they still do. I think now you probably have to pay extra for Redwood lumber construction grade.

KCM... did you mean more sanding?
 

Be careful with the paint fumes. They can give you brain damage or even kill you in an enclosed space. Don't bet your life on a vent fan.

I painted my '72 Road Runner in my back yard and was stoned for days! The base coat fumes weren't too bad, but the clear coat fumes were deadly! Working with paint fumes that are toxic and flammable shouldn't be taken lightly...

Agree.........I've been sick as can be....from paints,epoxies, coatings etc... and poor ventilation. It will fry your brain!! Just read some of my posts to see the long term effects of fumes.:laughing7: That wasn't from drugs, it was from epoxies and industrial coatings, when I was younger....:laughing7: Ameron, variprime, etc, etc... spraying heavy equipment in an enclosed building with nothing more than a paper mask.....Sanding fiber glass, and silica blasting with no masks didn't help either.

I skipped to the end of the thread and maybe this has already been covered.....
Limitool...That is a science, and can get pretty deep. I've seen everything from old blower motors mounted to the floor or wall with filters to....A machine you roll into a one bay garage. The last place I worked that is all we had. Our paint booth wasn't up to "code". And if we used it? It would suck all the dust and heat from the shop. So they just rolled in a "portable booth" to squeeze by laws and to recirculated warm air.

If you Look at some of the portable booths, or "prep stations" (I want to say 10 or 11 grand? if I remember right)They are expensive, but really wouldn't be hard to build, using some name brands filters. The fire suppression and all of that is what makes some of that stuff expensive, they also have bells and whistles to tell you when to change filters, air temp, a bunch of stuff you don't really need mounted to the machine. Strap some fire extinguishers around , hang a thermometer on the wall, and look at your filters once in a while........ Nothing to them actually. Your pre filter catches a lot of it.

Here is one....We painted full vehicles with only one of these as a filter. They actually work pretty well. We would get different filters to use depending on what we were doing/using. The prefilters come in a roll and are cut to size. If you see the drawing to one of these? There is really nothing to them.....You could build one on an angle iron frame just like they do. Find a sufficient blower, and make your duct or housing. Then roll it to storage when not in use. http://www.shop-pro.com/portable-prep-station/
 

Last edited:

Top Member Reactions

Users who are viewing this thread

Latest Discussions

Back
Top