AugustMoose87
Sr. Member
- Sep 10, 2014
- 443
- 264
- Detector(s) used
- Gold Pan, Sluice, Hand Dredge, X-Terra 30, X-Terra 705, Sand Shark
- Primary Interest:
- All Treasure Hunting
So I have been working on a homemade hand dredge, and have come up with a few little tricks I thought I'd share, and see if anyone else has any to share.
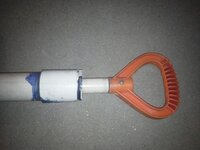
Tip/Trick 1 - The Pump Handle - So in looking online, I saw 3 designs: a straight shaft, a 90 degree turn, and a T. I played with the parts, and found I wasn't a fan of any of them. So I looked around the shop and saw a snow shovel handle... Turns out a 3/4" sprinkler riser can be glued inside that snow shovel handle, and also inside a 1" PVC pipe... Gives me a comfortable angle, directly over the shaft, and 0 chance of smashing my fingers.

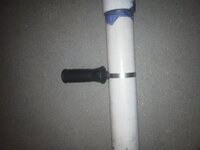
Tip/Trick 2 - The Dredge Handle - Again, I saw 2 options: just hold the main tube, or a fixed 90 degree handle. I just so happened to have been working with a drill earlier in the day, and thought wow, one of those adjustable, rotating handles off a drill would be great. I got lucky to find a "parts" drill whose handle fit PERFECTLY on my 2" PVC. Plus, you just rotate the handle to loosen/tighten it, and it can be moved up or down and rotated to any position. You can google "5101990-00" and it will come up if anyone else is interested in one.

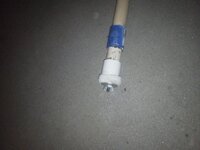
Tip/Trick 3 - The Seal - The initial build I saw used pipe insulation, so I gave that a shot - It was OK, but not great (difficult to replace, worked OK with just water, but grit fouled things up). Then I thought maybe a pool noodle would be better (same problems, though some improvement). So I started thinking about similar applications - moving water, high durability. inline style pumping... a windmill came to mind. So I looked that up and found that they typically use a "leather cup washer", the idea being that the force causes the cup to expand against the walls and form the seal. And being the cheap skate I am, I wondered if I could just make a leather cup washer - turns out I can. Basically you get something that is the diameter of your pipe (a piece of scrap 2" PVC in this case) and something that is right at or just under the diameter of your pipe minus the thickness of the leather x2 (a scrap PVC fitting for me). Then you soak the leather in water for a few hours, place it between the two halve and put it in a vice. I had a scrap hide piece just large enough to make one, and am planning to get more leather and make a second on so that there ill be a good seal in both strokes. However, I can tell you already that just with the single cup it is WAY better than any of the other stuff I've tried. Plus I was able to use a wing nut to secure it, so if/when the time comes to replace it, it will be SUPER easy.

Sorry the pictures aren't better quality
Tip/Trick 1 - The Pump Handle - So in looking online, I saw 3 designs: a straight shaft, a 90 degree turn, and a T. I played with the parts, and found I wasn't a fan of any of them. So I looked around the shop and saw a snow shovel handle... Turns out a 3/4" sprinkler riser can be glued inside that snow shovel handle, and also inside a 1" PVC pipe... Gives me a comfortable angle, directly over the shaft, and 0 chance of smashing my fingers.

Tip/Trick 2 - The Dredge Handle - Again, I saw 2 options: just hold the main tube, or a fixed 90 degree handle. I just so happened to have been working with a drill earlier in the day, and thought wow, one of those adjustable, rotating handles off a drill would be great. I got lucky to find a "parts" drill whose handle fit PERFECTLY on my 2" PVC. Plus, you just rotate the handle to loosen/tighten it, and it can be moved up or down and rotated to any position. You can google "5101990-00" and it will come up if anyone else is interested in one.

Tip/Trick 3 - The Seal - The initial build I saw used pipe insulation, so I gave that a shot - It was OK, but not great (difficult to replace, worked OK with just water, but grit fouled things up). Then I thought maybe a pool noodle would be better (same problems, though some improvement). So I started thinking about similar applications - moving water, high durability. inline style pumping... a windmill came to mind. So I looked that up and found that they typically use a "leather cup washer", the idea being that the force causes the cup to expand against the walls and form the seal. And being the cheap skate I am, I wondered if I could just make a leather cup washer - turns out I can. Basically you get something that is the diameter of your pipe (a piece of scrap 2" PVC in this case) and something that is right at or just under the diameter of your pipe minus the thickness of the leather x2 (a scrap PVC fitting for me). Then you soak the leather in water for a few hours, place it between the two halve and put it in a vice. I had a scrap hide piece just large enough to make one, and am planning to get more leather and make a second on so that there ill be a good seal in both strokes. However, I can tell you already that just with the single cup it is WAY better than any of the other stuff I've tried. Plus I was able to use a wing nut to secure it, so if/when the time comes to replace it, it will be SUPER easy.

Sorry the pictures aren't better quality
Amazon Forum Fav 👍
Upvote
0


