GrizzlyGoldTrap
Full Member
- Thread starter
- #81
What's different about the GGT sluices
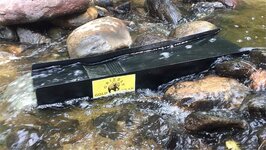
The difference in the angle of the transport deck to the capture chamber is 3.5 degrees. This provides two advantages. It requires about an inch less depth in water to operate compared to older style fluid be sluices, which is helpful in small streams. Second, you can be more aggressive in the angle of the transport deck in slower flows (say 7-8 degrees) while keeping the capture chamber between 3.5 - 4.5 degrees. Running the older model fluid bed sluices at 7-8 degrees tends to scour out the chamber some.
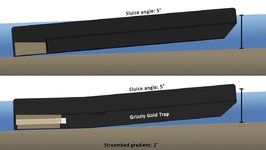
Explorer setup angle vs older fluid bed designs
Parallel Sidewalls at Grizzlies and Capture Chamber
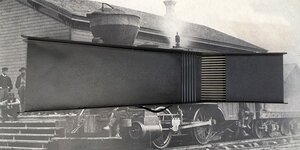
From the water entrance point, the transport deck narrows down to increase water velocity up to the grizzlies. At this point the sidewalls run parallel for two reasons. If the walls continued to narrow, this would cause a choke point at the chamber where gravels and larger rocks would tend to jam up, causing material to flow up and over the blockage, potentially loosing gold. The parallel wall design significantly decreases jam-ups at the grizzlies. Within the capture chamber, not having the sidewalls continue to narrow means that water velocity is not increasing, allowing gold and heavies to more easily settle out within the chamber and not be carried through it.
Grizzly Angle and Design
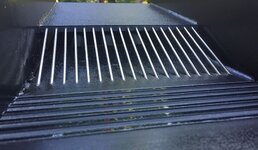
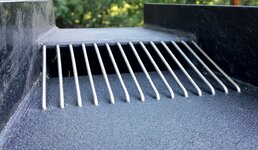
Another design element that improves clearing unclassified material is the design of the grizzlies. The grizzly rods (stainless steel) are set into the transport deck at an angle of 17 degrees without any bends. The lower angle and straight insertion point at the deck allows material to more easily transport up the grizzlies and out the end with fewer jam-ups.
GGT Grizzlies
Older Grizzly Design (Like Bazooka)
Sampling Riffles
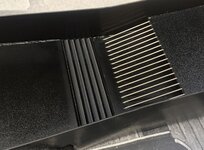
This is a feature we all wanted on our fluid bed sluices. The sampling riffles captures some of the gold in your material for a short period of time, allowing you to get a sense of the color where you are digging, staying on the paystreak. Typically, gold caught in the sampling riffles will hold for 3-4 more shovels, and eventually wash out into the capture chamber. You can also clear the riffles by waving your fingers in the water above them, and then seeing what is captured in the next shovelfuls of material.
Capture Chamber
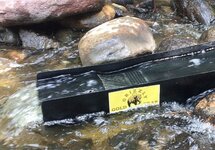
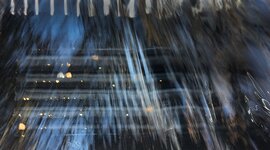
The design of the capture chamber took some time — finding the right combination of length, width, depth, vertical space above captured material, number of tubes, tube height, - and the list goes on. And of course the configuration and sizes of fluidizing holes. There were a lot of design configurations tested, so we have piles of old sections and parts of sluices, including about 30 different configurations of tubes. We learned a lot about fluid bed designs during our research, such as the wrong combination of chamber length and fluidizing design creates a higher degree of scouring. In all, there are about five design changes within the chamber area (over older style fluid beds) that improves capture and retention of gold. One important feature is that the fluidizing design is optimized to evenly stratify material throughout the chamber, while creating enough vertical capture space for new material entering the chamber. The images below represent captured material levels in the GGT vs older fluid bed designs. In the older fluid beds, the level of the material within the chamber stayed close to the level of the exit hole with very little capture space except for gold dropping down through the material. Our research indicates that some gold, especially finer sizes, just skipped over the top of the material and out. The GGT fluidizing design provides a slightly ramped capture space that enhances the exchange of heavies and lights and improves the capture of gold.
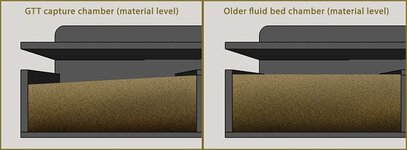
GGT capture chamber material levels vs older style fluid beds
A lot of time and research went into the GGT sluices, and we are continuing efforts to see what improvements we can make in the future improve our line of sluices.

The difference in the angle of the transport deck to the capture chamber is 3.5 degrees. This provides two advantages. It requires about an inch less depth in water to operate compared to older style fluid be sluices, which is helpful in small streams. Second, you can be more aggressive in the angle of the transport deck in slower flows (say 7-8 degrees) while keeping the capture chamber between 3.5 - 4.5 degrees. Running the older model fluid bed sluices at 7-8 degrees tends to scour out the chamber some.

Explorer setup angle vs older fluid bed designs
Parallel Sidewalls at Grizzlies and Capture Chamber

From the water entrance point, the transport deck narrows down to increase water velocity up to the grizzlies. At this point the sidewalls run parallel for two reasons. If the walls continued to narrow, this would cause a choke point at the chamber where gravels and larger rocks would tend to jam up, causing material to flow up and over the blockage, potentially loosing gold. The parallel wall design significantly decreases jam-ups at the grizzlies. Within the capture chamber, not having the sidewalls continue to narrow means that water velocity is not increasing, allowing gold and heavies to more easily settle out within the chamber and not be carried through it.
Grizzly Angle and Design
Another design element that improves clearing unclassified material is the design of the grizzlies. The grizzly rods (stainless steel) are set into the transport deck at an angle of 17 degrees without any bends. The lower angle and straight insertion point at the deck allows material to more easily transport up the grizzlies and out the end with fewer jam-ups.
GGT Grizzlies

Older Grizzly Design (Like Bazooka)

Sampling Riffles

This is a feature we all wanted on our fluid bed sluices. The sampling riffles captures some of the gold in your material for a short period of time, allowing you to get a sense of the color where you are digging, staying on the paystreak. Typically, gold caught in the sampling riffles will hold for 3-4 more shovels, and eventually wash out into the capture chamber. You can also clear the riffles by waving your fingers in the water above them, and then seeing what is captured in the next shovelfuls of material.

Capture Chamber

The design of the capture chamber took some time — finding the right combination of length, width, depth, vertical space above captured material, number of tubes, tube height, - and the list goes on. And of course the configuration and sizes of fluidizing holes. There were a lot of design configurations tested, so we have piles of old sections and parts of sluices, including about 30 different configurations of tubes. We learned a lot about fluid bed designs during our research, such as the wrong combination of chamber length and fluidizing design creates a higher degree of scouring. In all, there are about five design changes within the chamber area (over older style fluid beds) that improves capture and retention of gold. One important feature is that the fluidizing design is optimized to evenly stratify material throughout the chamber, while creating enough vertical capture space for new material entering the chamber. The images below represent captured material levels in the GGT vs older fluid bed designs. In the older fluid beds, the level of the material within the chamber stayed close to the level of the exit hole with very little capture space except for gold dropping down through the material. Our research indicates that some gold, especially finer sizes, just skipped over the top of the material and out. The GGT fluidizing design provides a slightly ramped capture space that enhances the exchange of heavies and lights and improves the capture of gold.

GGT capture chamber material levels vs older style fluid beds
A lot of time and research went into the GGT sluices, and we are continuing efforts to see what improvements we can make in the future improve our line of sluices.
Attachments
Last edited:


 Thanks for the report, that is indeed some nice gold for the amount of dirt you are moving! Shovel faster! LoL
