Found it! Miller table surface

jcazgoldchaser

Hero Member
May 8, 2012
899
515
Primary Interest:
All Treasure Hunting
Easy Liner Ultra Fresh was:Found it! Miller table surface

Walking through home depot on a clearance run I noticed an upside down holiday mat. What caught my eye was the rubber backing was little circle dimples like a gulf ball. I can't find Attila's post offhand, but here's his Utube video


I'll get the numbers off the mat in case anyone else state side is interested. I did try to peel the front off and it seems to come away pretty easily. Course, 5 inches in may be completely different.
 

Last edited:
Upvote 0
Why not find a product that works and move on and spend more time processing con? We can all discuss this product or that product, I would rather be running con and banking the gold. Just my two cents...
 

I thought that I would enclose a short clip of this Easy Liner material in action on my small miller table. This material really works well. So far I like it better than the chalkboard paint, truck liner paint or hobbico mat. This is the Lowes short roll. I'm going to try the Long roll and the Wally World roll and see if I can tell any difference.

Would like to see more about the cleanout hole that you swept the gold into......

GG~
 

Ditto this ^^^
 

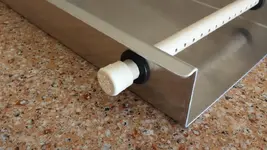
I would be happy to. I used to pan all my cons and suck up the gold with a snuffer bottle but I always ended up with a little sand in it and it was a pain to try to get good clean gold. I decided to add this feature on my first table when I built it and fell in love with it. No more dirty gold. I don't pan any more. Everything out of the sluice goes onto the miller table.

I have a couple of videos on YouTube on my large table and I will try to use
some clips from one of them to show you how I do it.

Here is a quick rundown:

IMG_1903.JPG

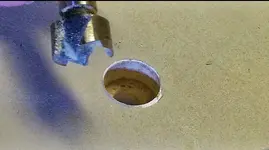
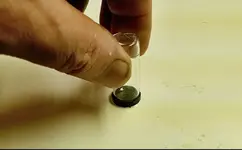
On the underside of the table, I take a forstner bit that is just a fraction
larger than the lid on a 1 dram gold bottle.

IMG_1902.JPG

And drill it just deep enough to where the rim around the lid still sticks above
the table.


IMG_1907.JPG

IMG_1905.JPG

IMG_1906.JPG


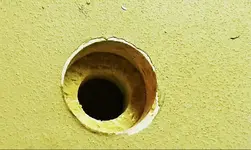
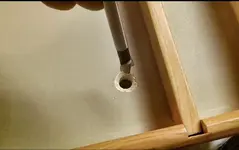
The Forstner bit has a sharp point on it and leaves a small hole
in the bottom of the larger hole. I use a smaller bit that is the size
of the hole that I drill in the top of the lid and by sticking the sharp point
into the hole left by the bigger bit I can stay in the center of the
large hole and I drill all the way through.


IMG_1904.JPG

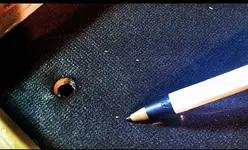
If all goes well the melamine board will blow out like this leaving a small crater
that you can smooth out like a funnel. If not then take a counter sink drill
or tapered grinding stone and make the funnel shape.

If you glue a mat on the top of the table, then just drill a hole in it the same size
as the small hole in the top.

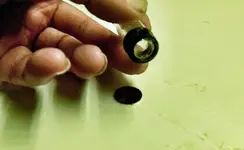
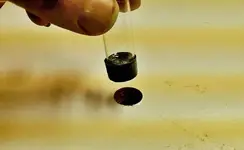
IMG_1908.JPG

As you can see in my video a couple of posts up, you can clean all the sand off
from the gold before you brush it into the bottle.

I hope this will help. If any questions, just let me know.
 

I see....
You just have to be careful not to dump any of the material you are running near the hole so the bottle stays clean.

Excellent :icon_thumleft:

GG~
 

You Got It...Toyota. :icon_thumright: Sometimes I get carried away and get some sand in there but then I just dump the bottle out on the table, clean it up and put it back in the bottle.
 

Martin Prospecting has a fine gold recovery table using this same gold recovery hole in the table. They too use a small vial on the bottom of the table. Great idea.


Yes, it really is a great idea and the more you use it on yours, the more you will really get to love it. Martin has what I think is one of the best tables out there. I would love to have one. There are several companies that make tables identical to this one. They are good for people who don't have a lot of cons to run and want something that is small and portable. When I am out camping I just pan down to the finer materials and save those to run on my table when I get back to camp. That way I don't have to worry about losing gold due to my poor panning.
 

Has anyone tried offset printing blankets for their tables or sluice boxes. When I purchased a the Keene KA52p (my first sluice) I notice how similar the rubber was to a printing blanket. I am a Printer(lithography) by trade and recognized the look and feel of the material to rubber printing blankets. These blanket have a specific coefficient of friction to print well and those that are used for newspaper printing are very close. Just thought I would throw out the idea. They are also very smooth. I think I am going to cut a piece and throw it in my sluice. When the snow melts.
 

Last edited:
Has anyone tried offset printing blankets for their tables or sluice boxes. When I purchased a the Keene KA52p (my first sluice) I notice how similar the rubber was to a printing blanket. I am a Printer(lithography) by trade and recognized the look and feel of the material to rubber printing blankets. These blanket have a specific coefficient of friction to print well and those that are used for newspaper printing are very close. Just thought I would through out the idea. They are also very smooth. I think I am going to cut a piece and throw it in my sluice. When the snow melts.
Do they wear out, or tear or what? A very small piece seems to be $30, so that's not going to compete with a $10 roll of shelf liner.
 

You should be able to go to most sheet feed or web printing facilities and ask for old blankets for FREE (do not pay for them they are thrown out after the presses are done with them). They do get damaged usually slight depressions that cause them to not print correctly but I cannot image gold would care much. The damage is almost alway localize in a small area unless they meet a tragic end. Also many of them are large enough to cut down. They handle being scrubbed with a 3M-Scotchbrite to rough up the surface to get the "nap" finish of when they were new.
 

Last edited:
I would certainly be game to try one. Unfortunately my sources in the printing world have all retired. I'll contact some of them to see if they can get me a piece so I can try it. I have tried a number of materials and they all act a little differently. If someone else tries this or any other materials I would be interested.
 

You should be able to go to most sheet feed or web printing facilities and ask for old blankets for FREE (do not pay for them they are thrown out after the presses are done with them). They do get damaged usually slight depressions that cause them to not print correctly but I cannot image gold would care much. The damage is almost alway localize in a small area unless they meet a tragic end. Also many of them are large enough to cut down. They handle being scrubbed with a 3M-Scotchbrite to rough up the surface to get the "nap" finish of when they were new.
What about a newish news printing business?

DV1.jpg
 

I believe once those that are planning on using the Easy Liner you will see right away its the perfect material to holding the really fine gold. The rubber has a slight grip to it when your drag your finger across it. I do not detect a difference from either side of the mat as it appears to be the same.

View attachment 941745

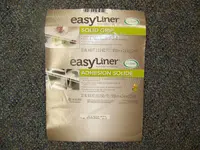
I found some after checking several Walmarts. The label has changed slightly. I will try to get a picture of the new label, but the Ultra Fresh is still there along with the rest of the information in AzViper's picture, just slight difference in colors and where the information is on the label. Mine had a bardcode label with 280211 and a barcode of
0 75353 22310 9

Also says Made in Taiwan on the barcode label. I am pretty sure the 280211 is the code for this Duck product. Using this number I found it at Amazon

Duck Brand 280211 Non-Adhesive Solid Easy Liner Shelf, 20-Inch X 8-Feet, Black - Shelving Hardware - Amazon.com

as well as Walmart, Sears (but over $30!!), and several other places. That is the key to finding the correct material. I am making two of them, one for a buddy who is doing the aluminum brakes for me.

Like AzViper, I cannot see any difference in the two sides of the mat--though I am looking further and maybe there is a slight difference, getting a magnifying glass to check closer. I have a Miller table made with Hobbico mat, so I will be able to compare. Someone did that already; I suspect my results will parallel his.
 

Last edited:
Here is a picture of the changed label. Sorry to be so late, we had finals to give and grade then make grade cuts, etc. The End of the Semester is always busy.100_3300.JPG.

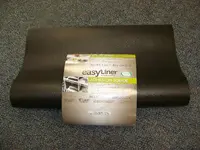
Here are the label and the mat together. 100_3303rotated.jpg

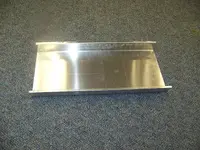
I am building a table and I had a friend with scrap aluminum and a brake so we are making two. The mat is 20" wide, so we made ours 10" wide; the scrap aluminum was 22" in length, so that fixed the other dimension. Like AzViper, we put a 2" vertical and a 1/2" lip on the sides. Picture of the aluminum and then the aluminum with the mat laying in it.100_3301.JPG
100_3302rotated.jpg
 

I built one out of an old plain glass casement window from the tip shop. Tried the plain glass but had to be almost flat and water flow so slow. Going to try one of those el cheapo yoga mats tomorrow. My thinking is for really fine stuff, you don't want any tooth but you do want friction. I am looking for some second hand conveyor belt. If I go fairly thick, it will sit dead flat under it's own weight. Also in the process of building a small finishing sluice that sits on top of the table.
 

Here is a picture of the changed label. Sorry to be so late, we had finals to give and grade then make grade cuts, etc. The End of the Semester is always busy.View attachment 1001115.

Here are the label and the mat together. View attachment 1001119

I am building a table and I had a friend with scrap aluminum and a brake so we are making two. The mat is 20" wide, so we made ours 10" wide; the scrap aluminum was 22" in length, so that fixed the other dimension. Like AzViper, we put a 2" vertical and a 1/2" lip on the sides. Picture of the aluminum and then the aluminum with the mat laying in it.View attachment 1001121
View attachment 1001122

Yep that will work. In my thread someone recently asked how I applied the mat. I went into detail using spray adhesive. Its post 89..

Detail of Miller Table.jpg
 

Top Member Reactions

Users who are viewing this thread

Back
Top