Bazooka seems the best but can it be improved?!

... I guess we may have to agree to disagree. ...

Yep ... but given that opportunity I disagree (for the moment). I got what you think and you might be absolutely right, but I think because the down draft feature does not extend over the grizzly it will not act as a inducer. It should just catch what comes down anyway and lead that on the tubes to be further processed there. I don't expect it to suck down anything for there should already be some kind of backpressure from the tubes.

But that's only me thinking and might proove right or wrong in some distant future.
 

3.) Additional drop down plate ... if the plate at the end of the grill would be bent and directed down into the whirlpool wouldn't that improve recovery by forcing all particles below waterline?
Peter

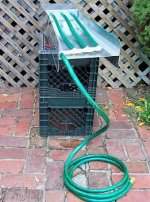
I have the mini-BGT, and it has what I called a baffle to force gravel/sand down into the trap. Here's a shot showing it. Probably have to blow up the pic to actually see it.

http://www.treasurenet.com/forums/attachment.php?attachmentid=1001530&d=1401236580
 

Last edited:
Hi folks,

coming from a country with nearly no gold anymore I was bitten by the gold bug some time ago. To start with I must admit I even never had a pan in hand before. I was raised and grew up in the Harz mountains and learned from my parents and grandparents there is no gold in the Harz. So I never gave it a thought or try. Nowadays the internet says (according to old documents) there is some and I'd like to go to the creeks and rivers of my childhood and give it a try. So I had a look for equipment that does the job, is affordable and does nit break the bank or back of a nearly 50 years old guy. It seems the Bazookas are state of the art.

Funny thing is I came across the original Schmidt patents when researching a method to uncover a long lost treasure ship in the phillipines for a friend of mine over there. But the time was not wasted for I'll be there in july knowing that theres gold in that hills...

But back to my thoughts on the Bazookas ...

1.) I'm wondering why they go narrower up to the end. For the top part I get the idea, because of rising pressure to get rid of the "waste". But for the fluid bed I'd expect to widen it would help heavies to settle down, because of fluid dynamics - what we all want. When I watch the pictures I cannot get the sense exept manufacturing cost.

2.) Grill clogging .... when the sluice gets narrower all the way down, the grill might as well. That might help clogging. If the grill would widen a bit from beginning it might prevent clogging.

3.) Additional drop down plate ... if the plate at the end of the grill would be bent and directed down into the whirlpool wouldn't that improve recovery by forcing all particles below waterline?

4.) makes it sense to bent the top slick plate some degrees down behind the grill to make even more goodies go down to be processed in the whirl pool?

Sidenote: If we made the whirlpool straight or expanding, a "tray" version could be made to ease cleanout for old men like me and over...

That's all my thoughts at the moment. I tried to make it as clear as a foreigner can do. In case you don't get it, feel free to blame my english.


Thanks for reading and hopefully considering...
Peter

Hi Peter,

I like the way you think. I've also learned over and over that sometimes what makes perfect sense and looks good on paper doesn't always pan out after testing in the field.

However a few years ago I had incorporated a couple of the modifications that you suggest into my own DIY model fluid bed sluice and have enjoyed great success with them.

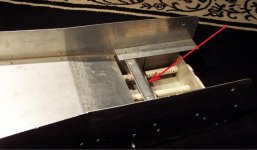
The baffle diverter works excellent for insuring that gold gets dunked and cant just surf straight across the surface of the trap and over the overflow port.

The angled down slick plate under the grizzly has allowed for me to eliminate the log jamb of larger rocks created by an elevated grizzly by allowing for my grizzly to be level.

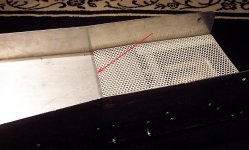
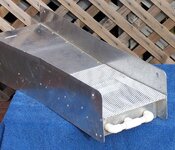
Here is a photo showing the baffle as well as the angled slick plate...........
Second photo has arrow pointing to the nugget trap.
baffle.jpg gt3.jpg

Another modification I made that allows me to increase the flow to the stratification tubes while maintaining a level sluice is the adjustable scoop.

scoop.jpgadjscoop.jpg


And a leaf guard to keep floating debris out of the scoop that could clog the tubes.

lg4.jpg


An example of a mod that DID NOT pan out in the field was the folding wing dam ........

bw1.jpg


However the removable hopper does come in handy to keep from spilling pay dirt off the end and sides when throwing shovel fulls at the sluice deck.

hopper7.jpg

And my favorite.... the highbanker mod that turns it into a great little fluidbed highbanker.....

gthb.jpg


GG~
 

Last edited:
Hi Peter,

I like the way you think. I've also learned over and over that sometimes what makes perfect sense and looks good on paper doesn't always pan out after testing in the field.

I hope to avoid this as far as I can. That's why I am wondering what worked for others or proved to be a misconzeption. So I'm really glad you and all others jump in with valuable ideas adn experience.

However a few years ago I had incorporated a couple of the modifications that you suggest into my own DIY model fluid bed sluice and have enjoyed great success with them.

The baffle diverter works excellent for insuring that gold gets dunked and cant just surf straight across the surface of the trap and over the overflow port.
The angled down slick plate under the grizzly has allowed for me to eliminate the log jamb of larger rocks created by an elevated grizzly by allowing for my grizzly to be level.

The long grizzly makes me wonder if not all water flows into the trap levaing the sefl cleaning function for gravel and rocks to gravity only. (?) Anyway ... what works works.


Here is a photo showing the baffle as well as the angled slick plate...........

View attachment 1151383

Just noticed ... you did reconnect the tubes behind the trap, like I do on my plan. Did you compare if this really helps?

Another modification I made that allows me to increase the flow to the stratification tubes while maintaining a level sluice is the adjustable scoop.

View attachment 1151386View attachment 1151387

I am wondering if that gains much effect. On the one hand pressure comes from weight/area or psi like you say. The area is given by the diameter of the tubes, so the watercolumn changes with length and angel of the whole sluice. The water velocity of the incoming stream adds and there might a bigger scoop be of benefit. On the other hand the sides of this adjustable scoop can not be sealed anymore so might loose some water/pressure there again.


And a leaf guard to keep floating debris out of the scoop that could clog the tubes.

View attachment 1151388

... love that one!

An example of a mod that DID NOT pan out in the field was the folding wing dam ........

View attachment 1151398

... does not add to the water column.

However the removable hopper does come in handy to keep from spilling pay dirt off the end and sides when throwing shovel fulls at the sluice deck.

View attachment 1151396

Thats really a good one in case the beerintake on the shovelside ever overcomes the aiming abilitys of the miner. :occasion14:

And my favorite.... the highbanker mod that turns it into a great little fluidbed highbanker.....

View attachment 1151397

GG~

Yep, love that one too ...

Thanks for sharing these details. Helps me a lot.
 

By the way, I think about building in ABS. Can anyone say if glueing or welding is more rigid? Or no need to worry?
 

Thanks for jumping in here, Goodyguy. I had hoped you would since you did some DIY and made several mods. Good info there.
 

Hi Benny, would you say it helps or hurts than? Did you witness any changes in behavior / recovery from adding the baffle?

In that pic, I'd just added a plate on the end to make the trap a tiny bit deeper. If you look in towards the grizzly, you'll see the baffle. That's the way my BGT came! I think it's important, otherwise, the gravel (and gold) will just blow right on through.
 

In that pic, I'd just added a plate on the end to make the trap a tiny bit deeper. If you look in towards the grizzly, you'll see the baffle. That's the way my BGT came! I think it's important, otherwise, the gravel (and gold) will just blow right on through.

Thanks Benny, I did not know that the original comes with that baffle. Never noticed that on all pictures and videos I watched. That keeps me thinking I'm on the right track with this.
 

@ Goodguy - when reviewing the pics I noticed that your trap runs straight, did you experiment with differences in making it smaller or wider?
 

@ Goodguy - when reviewing the pics I noticed that your trap runs straight, did you experiment with differences in making it smaller or wider?

I found that the most important aspect of any trap no matter it's size or shape is to achieve evenly distributed fluidization of the material throughout. One important factor to keep in mind is preventing an overload of dense material above the fluidizing tubes from overwhelming the ability of the jets to keep the material in a fluid state.

In other words do not allow more than 1" above the tubes to the discharge port. Also important is that the outside tubes should be close enough to the outside walls of the trap to allow the jets that point that direction to keep that area in a fluid state as well.

I've also found that having the tubes elevated 1/2" off the bottom of a trap is the sweet spot. The distance between tubes is governed by the jets ability to fluidize material which depends upon the amount of water pressure supplied to the tubes. The denser the material is in the trap the more water pressure is required for the jets to overcome the back pressure.

* connecting the tubes at the far ends was a mod that I found necessary to help equalize the pressure between them with the highbanker manifold attached.

manifold.jpg gt2.jpg

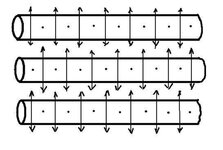
Here is a proven successful hole pattern to incorporate....
fluidtubeholes.jpg
The arrows indicate the direction of the jets from the side holes and the dots are the bottom holes.
This staggered configuration of holes helps to ensure even fluidization.


GG~
 

Last edited:
Goodguy, you said the wing dams did not help? can you elaborate on why?

Wing dams can be very helpful, just not the way I tried to accomplish the effect. The reason my design failed was because there was no bottom connected between the wings to contain the flow.

Also if the wing dam is physically attached to the sluice and you try to create more pressure to the tubes by increasing the sluice angle then the wings would be sticking up out of the water.

GG~
 

Last edited:
Wing dams can be very helpful, just not the way I tried to accomplish the effect. The reason my design failed was because there was no bottom connected between them to contain the flow.

Also if the wing dam is physically attached to the sluice and you try to create more pressure to the tubes by increasing the sluice angle then they would be sticking up out of the water.

GG~

i may have a solution for that... i'll draw it out and BRB.
 

theory.jpg

by using wing nuts you could move the bottom bolt to an angle to compensate for your drop. as far as the shape of the dams... well i've been debating that one in my head for a bit.
 

I found that the most important aspect of any trap no matter it's size or shape is to achieve evenly distributed fluidization of the material throughout. One important factor to keep in mind is preventing an overload of dense material above the fluidizing tubes from overwhelming the ability of the jets to keep the material in a fluid state.

In other words do not allow more than 1" above the tubes to the discharge port. Also important is that the outside tubes should be close enough to the outside walls of the trap to allow the jets that point that direction to keep that area in a fluid state as well.

I've also found that having the tubes elevated 1/2" off the bottom of a trap is the sweet spot. The distance between tubes is governed by the jets ability to fluidize material which depends upon the amount of water pressure supplied to the tubes. The denser the material is in the trap the more water pressure is required for the jets to overcome the back pressure.

* connecting the tubes at the far ends was a mod that I found necessary to help equalize the pressure between them with the highbanker manifold attached.

View attachment 1151782 View attachment 1151789

Here is a proven successful hole pattern to incorporate....
View attachment 1151790
The arrows indicate the direction of the jets from the side holes and the dots are the bottom holes.
This staggered configuration of holes helps to ensure even fluidization.


GG~

Thanks for that ... so if I use 1" tubes with 1/2" spacing below and 1" above the trap's max depth would be 2 1/2" ?
You recommend 1 opening perpendicular to the bottom, I read someone stating "it is not advised to direct straight to the bottom" ...
So my idea was a 4+7 and 5+8 o clock pattern and on the next tube 5+8 and 4+7 then.
On the other hand the 3 hole design would be easier to make. :icon_scratch:
 

Wing dams can be very helpful, just not the way I tried to accomplish the effect. The reason my design failed was because there was no bottom connected between them to contain the flow.

Also if the wing dam is physically attached to the sluice and you try to create more pressure to the tubes by increasing the sluice angle then they would be sticking up out of the water.

GG~

... and if we add a bottom ... then the invention is just a bigger sluice. :BangHead:
I'd glue a frame that fits snug on the sluice onto a tarp for that purpose. Versatile and easy to carry.
 

Last edited:
... and if we add a bottom ... then the invention is just a bigger sluice. :BangHead:
I'd glue a frame that fits flush on the sluice on a tarp for that purpose. Versatile and easy to carry.

that's a pretty good idea. a simple frame with a tarp to attach to it that can be folded. would be great for low flow areas to increase water flow. hit your head against the brick walls enough and a great idea usually comes around.
 

Rocks, sticks, moss and roots can be used to make a great dam. Less weight to carry, nothing to lose or break!
This is a miner. We had to plug some holes but, got it running very well. A prospector or anything smaller would have just needed held in place.IMG_0505 (768x1024).jpg HMMMM SORRY TOP PIC PROSPECTOR BOTTOM IS MINER
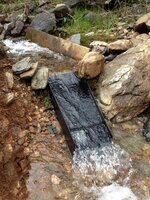
Heres a 36" prospector. Hard to tell from the pic but the grade of the creek was pretty flat and the flowing water was only about 3 " deep and making a pretty good turn. A few rocks and some muddy grass roots and moss and she was running about perfect! These are the biggest type boxes again with these flows any thing smaller would be running great with ample adjustment available.
 

Attachments

  • IMG_0483.JPG
    IMG_0483.JPG
    1.4 MB · Views: 162
Last edited:
Thanks for that ... so if I use 1" tubes with 1/2" spacing below and 1" above the trap's max depth would be 2 1/2" ?
You recommend 1 opening perpendicular to the bottom, I read someone stating "it is not advised to direct straight to the bottom" ...
So my idea was a 4+7 and 5+8 o clock pattern and on the next tube 5+8 and 4+7 then.
On the other hand the 3 hole design would be easier to make. :icon_scratch:

Yep 2 1/2" deep would be correct. I like your idea on the holes :icon_thumleft: The goal is to keep the trap fluidized by any means. Holes laid out in a spiral configuration may work as well. My example is only one way but it's a proven one. I'm sure other ways would work as well.

GG~
 

Top Member Reactions

Users who are viewing this thread

Back
Top