A desperate son and a father with no answers.....HELP!

A pic of the encrustation might help with cleaning advise if you can get one. I have heard of a nice long soak in olive oil or lemon juice or some other house hold stuff, but please dont do it cuz i said to, wait till someone like conservator or someone says what to really do ;) You could have some potentially rare coins there :) Are the coins themselves stable or are they very brittle? Also what are the sizes? Wish you and your son luck in cleaning them, should be fun to ID them and stuff later too, prolly keep you busy all winter :D
 

hang tight there gator untill floater or conservator can answer your question. those guys should be able to put you on the right path.
 

I have done a bunch of old roman coins like this.
First off do not us house hold cleaners they will more than likely make the coins loose 75% of there value. the different chemicals can discolor corrode and do all kinds of bad things along with the acid in the lemon juice. I know Jake mentioned the lemon juice to this could discolor them but is more gentle than chemicals but i would stay away from it on these very old coins you have. Jake is a great guy and nothing against him these coins are just so old don't want to see them get messed up (were talking thousand not hundred or 30 years like most coins we talk about)

I always start with a good soak in olive oil
I also use electrolysis and other methods with a microscope that has 2 eye pieces

You can check the posts here about the "shark pit cookie coins" and learn about doing electrolysis yourself.

I'll try to post some roman coin pics. of ones I've cleaned.
And I was wandering were you got these coins?
I used to but tons from a coin dealer that would get big hoards of few hundred to a thousand or so at a time but he has not gotten any in a long time. I would get big bags of dirty coins clean them really good than sell them.

HH
Uber
 

Things not to use: vinigar, lemon juice or anything that has acid in it like the lemon juice. I tried them and never again. I've seen electrossis and was not impressed with the results, but that could be due to the true condition of the coin before the start of the process. Soaking in olive oil is a long process. Wait for the conseravtor fellow to get back to you.
 

The coins vary in size and thickness. Id post some pics but my camera recently broke and I havent replaced it yet. As far a where they were purchased, we got them from ebay. There is someone called honeycat1007 who sells encrusted roman coins for $1.20 apiece. Thanks for all your help, I dreally appriciate it!

-gator6romeo
 

Hi Gator6romeo. I have not cleaned anything that old yet. Conservator has but I have not seen him post in a while. Uberlapis is on the right track here and I don't see a way around the Electrolysis. His method with the microscope and very carefully analyzing each step is critical. depending on what type of enviorment they have been in will also be a factor. Since I know you don't know this nor do I then we might assume they have been buried or in the earth somewhere. I dont know if these are Bronze or silver. If you can see a lot of calcium on them then they are probably from the water. This is tricky too. If they were buried in the sand they will come out cleaner and you may not see as much calciun or encrustation's on them. If they were originally exposed then I doubt they would be here at all if they are silver. Even coins as young as 300 to 400 years old solid silver have turned to sulfide in salt water. If you would like I will order one of these from this dealer or you could send me one and I would be happy to experiment on it. Making an electrolysis machine is actually very easy to do. Here is the link to the one I made and I recommend using only a unit of 6 volts and 200mA or less. http://forum.treasurenet.com/index.php/topic,10898.0.html Also I wouldn't mind hearing some more from Uberlapis on his experience and Techniques. Sound s Like a new Adventure to me kids ;D
PM me if you would like to send me one.
Regards
~Floater~
 

just like superman, he hears the pleas for help...is it a bird ? is it a plane ? no, its floaterman...........to the rescue of cookie owners everywhere................................go floaterman go...........
 

gldhntr said:
just like superman, he hears the pleas for help...is it a bird ? is it a plane ? no, its floaterman...........to the rescue of cookie owners everywhere................................go floaterman go...........
ROFL, Actually I just logged on to get Rob a PM and then I saw this. I checked Ebay but cant find that user. I did however find some coins but they do not look like the cookies from the Shark Pit. Just type in Old Roman coins or Roman coins and you can see what they have. Half of them would benifit from the Electrolysis but I also think the Tinfoil in the hot mix of distilled wter and Baking soda would work also. I am not sure the bronze would hold up well to that last one but it sure would come out new looking and then we could reverse the Electrrolsis and put a patina back on it. (Little trickl I learned about ) ;D
Later
 

This is the first time for me posting pics. so here it gos.
HH
Uber
 

Attachments

  • CLEAND ROMAN COINS.jpg
    CLEAND ROMAN COINS.jpg
    39.9 KB · Views: 951
  • CLEANED ROMAN COINS.jpg
    CLEANED ROMAN COINS.jpg
    46.2 KB · Views: 952
  • Roman Coins.jpg
    Roman Coins.jpg
    41.2 KB · Views: 945
Hey those are very nice Uber. Is the Patina on the picture at the bottom what they all looked like? Also does your camera have a macro setting? This will allow for closer pictures. They all look like they have good detail. Whats the oldest one you have so far? Thanks for posting those. ;D
 

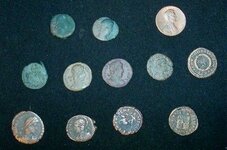
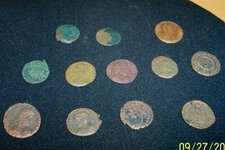
OK the pics. worked so here is the disciption of them.
The first 2 pics. are the same just different angle.
The far right top row is a rare 1900's coper (86 I believe) clad cent for size comparison.(J/K its not rare)
2nd pic. this is were you can best see it, top row the 2 coins left of the penny are half cleaned the left sides of them is crud and the right halves of them is cleaned. ?These cleaned sides are like a deep emerald green and not to sound to weird but this is a very beautiful patina I wish the pics. would show this (Floater or anyone if you know or figure out what minerals to add to the electrolysis water please let me know).
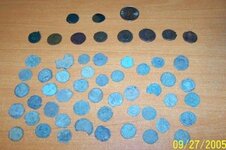
3rd pic. ?
Top row large coin on right is a clad quarter for size comparison
dark coins on top are cleaned ones but you can't see much of them
and the rest of the grey looking disks are uncleanded roman coins.

The cleaning method used for the cleaned coins in these pics. are as follows:
Good long soak in olive oil
I let the coins tell me how long they need to soak, I start with a week or two and when i have time to sit down and do some cleaning i get out the one that looks the easyest like a loose edge or flake looking spot on the crust. ?I work off any crust that wants to separate and leave it alone where the crust has a strong bond if you try to force it you'll rip the patina off along with the crust (not good) so just place the coin back into the olive oil and move on to the next.
That is how I determin how long to soak, I don't the coin dose!
As far as working of the crust I use a i guess you'd say "low" powered microscope that has 2 eye pieces, I barrow it from work. ?but something more coast effective if you can't barrow one of these where you work is a mounted magnifying glass (large) if you don't know where to get one i know radio shack sells them for working on circuit boards, but don't put the coin in the alligator clips!
The last tool is a big box of quality wooden tooth picks.
here are the rules that I've learned with the tooth picks
1: Put the tip at an edge of the crud and apply pressure towards the crud and away from the coin at the same time.
2: Don't try to jam it under the crud and pry this will put pressure towards the coin and can damage the patina.
3: If the tooth pick gets soggy from the olive oil or dirty flip it over and use the other end, when both ends are dirty throw it out and grab another new one from the box (I said big box right) the wood from the tooth pick should not scratch the coin but the little (and i mean little) pieces of crud that get lodged in the wood fibers will do a number on the coin surface like rough sand paper. ?Its the little fibers of the wood that grip the crud to help you flake it off.

Remember if the crud don't want to come off fairly easily it dose not want to come off ?Put it back in the soak and the olive oil will do the persuading for you, over a little bit of time. ?The olive oil seeps in bettween the crud (or crust) and the patina losing there bond and it breaks down the crust also.
I've never had any problems with olive oil breaking down the patina ?so I'm shore you should not have a problem with this. ?I don't know if it makes a difference but I always use a good band name olive oil I don't know if cheep or off brand one might add stuff to preserve the oil or alter the flavor of the lower quality oil.
I'll have to post later with the right spelling but the olive oil i use is "Berttulie" or something like that sound it out.

Also remember it took what a thousand two thousand years to form this crust to form so don't expect it just to fall off over night, unless you use electrolysis. ?I do electrolysis all of the time but I just like this manual method with these very old coins you really get to know the details on them and and how good they are for being so old and the lack of technology when they where made by had with a stamp and a hammer and left in the ground for that long.
If you follow Floater's post on doing electrolysis start with other things first till your good at it and when you move on to the roman coins pick out any damaged ones first and do them to get a feel for how they turn out.
I'm going to bed that was way too much typing for me
HH and cleaning
Uber
 

Hey guys, why do you have to practice electrolysis on junk coins, will they get messed up if you leave them in too long or what? Im eager! Thanks for all the awsome info on cleaning coins. Uber, Floater, you guys are awsome! Every post is greatly appriciated! Take care and God bless!

gator6romeo
 

I don't want to type to much more but follow Floater's posts and will be half an expert if you pay attention following along as he learned.
but yeah it is a very safe procedure once you work out a few kinks
Like how much power to pump into the water like amprage Wise
Your electrolyte solution
keeping an eye on things and so on
and a good rule of thumb I have and I haven't herd it said like this but this is how i say it
"Your Amps in electrolysis is like metal detecting, low and slow for best resalts"
but without practise you could take a nice coin with a little crud on it and turn it into a little junk slug if you fry it. so just put some junk in at fist until you good at making clean junk than go to the coins.
HH
Uber
 

UberLapis asked.

These cleaned sides are like a deep emerald green and not to sound to weird but this is a very beautiful patina I wish the pics. would show this (Floater or anyone if you know or figure out what minerals to add to the electrolysis water please let me know).

Uber I'm not quite sure I understand the question. Are we trying to not disturb the Patina that remains after you have cleaned the coins or are you wanting to introduce the patina back on them? In electrolysis you can reverse the polarity of the anode and cathode which will then set up the coin or object to attract the minerals again in the water which some say gives them a natural patina or more brown look like a older circulated coin that has a wax on it. As far as the tourquoise colr or green patina I dont have that answer. I am gettin a rectifier to use here on my experiments and coins and It would seem that we could introduce a copper or bronze solution to attract the minerals back to the coin but then you have to let the air actually form the color through oxidation.

Copper or bronze is initially bright reddish-brown in color, but when exposed
to the atmosphere, it acquires a protective patina that turns from
brown to black to green over an eight to ten year period. This
patina is a copper carbonate or copper sulfate formed on the
surface of the metal when hydrogen sulfide combines with oxygen or
sulfur dioxide. This naturally occurring corrosion resists further
corrosion. Though copper does corrode, this protective patina
makes copper a corrosion-resistant material.

You can buy oxidizers to use on the coins to produce the patina more quickly and I will do a little more research on this for you. I also know we used to use Lemon juice and water to etch galvanized objects like drip edges before we painted and if we didnt get back to it for a couple of days it would set up a white oxidation really quick on the edges.

gator6romeo said:
Hey guys, why do you have to practice electrolysis on junk coins, will they get messed up if you leave them in too long or what? Im eager! Thanks for all the awsome info on cleaning coins. Uber, Floater, you guys are awsome! Every post is greatly appriciated! Take care and God bless!

gator6romeo

Gator , Yes you can use some coins to experiment on and you do want to take the process slow. You can soak the coins like Uber said and also AF has combined this with electrolysis. I used a combination of the electrolysis with the wd forty and then the tooth pick method. I also use a aluminum pick along with the wood tooth picks. and also cotton swabs to gently lift off flakes that could scratch the surface. Hang around here long enough and between the lot of us we might actually get somewhere. LOL ;D HH
 

Yeah Floater where can I get my hands on this nice little machine called the rectifier.
I was going to ask the conservator but never did.

and as far as the copper thing gos you can copper plate stuff in your machine you mentioned copper sulfate.
here is what you can do with that it is not like a patina it is just electro plating a metal object with copper but here is how to do it if anyone wants to try it I've done it to old things mainly junk and old keys it make them look like a band new piece of copper. maybe someone would want to do this to crappy dug clad pennies.

here is what you'll need:

-distilled water
-copper sulfate (you can get this at most pharmacies)
-a 3 or 4 inch long piece of bare copper wire (no insulation) make the wire into a coil like a spring this will be your anode (I believe I'm not much for terms this is where you + positive gos)
-and the object to be plated

use the water and the copper sulfate to make a solution
put the + on the copper wire coil
put the - on the object of your desirer
add your current to the mix
the electrical current will split the copper sulfate into its components and the free copper will be drawn to the - charge on your object and the copper from the coil will keep it going.
and you'll have a nice layer of copper plated on your object.

And there are many other solutions for other stuff like gold plating, silver, chrome, and so on.

Floater let me know about that rectifier thank you.

HH
Uber
 

I've bought so much stuff off of ebay and I always forget to look there half of the time for stuff .

But anywhy thanks Floater your the man.

And did thoughs headphones come with a warning about neck injury or strain?


HH
Uber
 

Top Member Reactions

Users who are viewing this thread

Back
Top