Old Photos . . . I Like Restoring them

Chadeaux

Gold Member
Sep 13, 2011
5,512
6,408
Southeast Arkansas
Detector(s) used
Ace 250
Primary Interest:
Cache Hunting
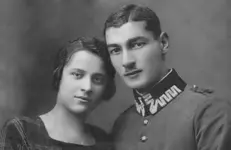
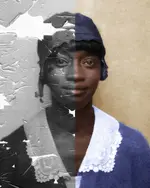
Original image:

restore_challenge_original.jpg

After I cleaned it up:
restore_challenge_bw.jpg

Learned a lot of tricks as I went along. I used Affinity Photo by Serif to remove the damage. I really like how the details of the dress were fixed.

Other parts that took a bit of thinking: Her left nostril (right side of her face in the picture) is a reflection of her right . Since it worked on her nose, her left eye is a reflection of her right. The hair on his left side (right side in the picture) was not present in the original. It was just one big blob.

All in all, lots of fun. I saw someone else's version of the original image and decided to try my hand at it.
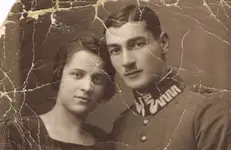
 

Looks really nice after the repair work.
 

So is this a computer restored photo or an actual photo that you restored to look new again? It does look very well done...
 

Chadeaux,
Wonderful work! I remember you sharing another photo that you restored/fixed. You really have a talent for this.
 

my niece did this to a old picture of my parents from 1939 that was pretty bad.it came out great,crazy what can be done now.
great job on your pictures.
brad
 

Good work Chadeaux. I sure have a few old photographs I'd like to repair some day. Have you ever thought about taking it a step further and attempt to colorize old photos? I like to veiw some of those you can on the web that are old actual photographs taken during the Civil War. Some of those I find really amazing.
 

So is this a computer restored photo or an actual photo that you restored to look new again? It does look very well done...

It is someone else's old photo. Actually "borrowed" it from a photography repair site.

Good work Chadeaux. I sure have a few old photographs I'd like to repair some day. Have you ever thought about taking it a step further and attempt to colorize old photos? I like to veiw some of those you can on the web that are old actual photographs taken during the Civil War. Some of those I find really amazing.

I've actually posted some that I recolored in another thread in this ("old photos") forum.

http://www.treasurenet.com/forums/old-photos/171885-saved-landfill.html#post6026595

http://www.treasurenet.com/forums/old-photos/171885-saved-landfill.html#post6029948

Recoloring old images is a lot of fun and relaxing.

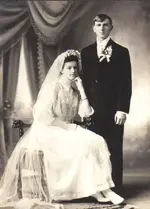
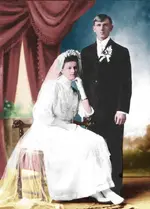
Here are some more recent ones I've done:

WitthuhnErnstAdelaOemichenwed.jpg WitthuhnErnstAdelaOemichenwed_after.jpg

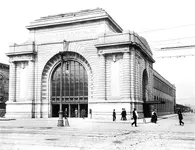
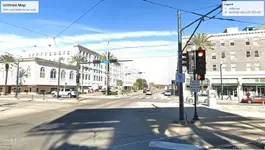
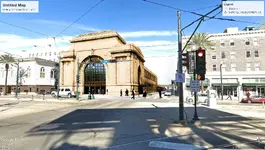
This one is actually a combination of a Google Earth Photo and a 1912 (I think) image of the Southern Railways station that was on Canal Street in New Orleans (my hometown) that was destroyed the year before my birth. I played with Google Earth until I was as close as possible to the angle of the original photo then replaced the park with the old station. It helped that both the building on the left and right of the station are still there so I was able to adjust the transparency of the station image, match up the lines on both buildings to make sure my scale and perspective were correct. Then masked the edges so that only what I wanted included was left.

terminal_bw.jpg + today_googleEarth.jpg = back_in_time.jpg
 

Very nice job. You have a good grasp of Affinity Photo. I use it but need a ton more practice.
 

That's neat. So does this colorizing technique able to detect a person's eye color and all, or do you need to know some info about what the colors are before a b&w was taken?
 

That's neat. So does this colorizing technique able to detect a person's eye color and all, or do you need to know some info about what the colors are before a b&w was taken?

No, it requires either a knowledge of those things, or a "best guess" at the colors. Sometimes a "gradient map" which assigns exact colors to exact grey values is the best way to go, as with lace or the blue and white patterned cloth visible. That process assigns the color, so it's almost like painting with a "magic" paintbrush. Other times it means using a standard brush like coloring pages in a coloring book.

In either case, you will need to use layers, stacking them one on another. In the image of the lady holding the book, her dress color is one layer, that being the only item on the layer. Her hair color is on another - but this time using a gradient map because I don't know many Scandinavian women with black hair, and the gradient map allowed the change.

All layers use blend modes other than normal. I mostly use "soft light" and "overlay" blend modes. This can sometimes give colors you don't expect, so it requires adjustment on occasion when the color reacts to the image and blend mode.

Hope this helps
 

Another restored image . . . before and after. Both sides were similarly damaged.

maid_buscard_4.jpg
 

A few years ago, I did some work repairing photos for the local culture director in my Mexican mountain village. I am pretty tight, so I use GIMP, a totally free editor for Linux or Windows.

I don't consider myself that good, but the (female) director was pleased.

Around the eyes is hardest. I expand the area many times, and more or less if possible repair pixel at a time.

Might look at affinity now . . . 1/2 price, or $24.99 for licensed version.
 

Top Member Reactions

Users who are viewing this thread

Latest Discussions

Back
Top