New AT Pro

Whiplash00

Full Member
Jan 21, 2016
232
27
Ohio
Primary Interest:
All Treasure Hunting
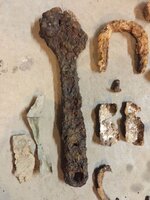
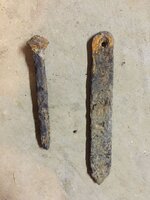
Having a hell of a time trying to pin point targets. I gave up on 3 targets thinking the machine was giving false signals 85-99 and 8"-10"+. I ended up finding a crescent wrench, a few square nails, a 4.5" spike, and a 6" iron pointed piece with 3 marks that look like rivet holes. I put them in the electrolysis bucket for awhile. The 6" piece was inside the dirt and roots of a large fallen tree. Any ideas what they are?
ImageUploadedByTreasureNet.com1458960050.307415.jpg
ImageUploadedByTreasureNet.com1458960092.380182.jpg
 

Upvote 0
The AT is a great machine and the pin point works like a charm!...you may have been in a very trashy area with multiple targets and this may have confused things....I learned my At in pro mode as you get to tell the different sounds between targets...try pinpointing on some targets lying on the surface if you battle with that your machine may be faulty
 

Check your coil connection. Make sure it is seated and tight. Also make sure you have four good batterys. One bad battery will make the my AT Pro go nuts.
 

Ah yes. I know those. I call them "Scrap iron" and put them in the trash can.

:)

In all seriousness, the second picture looks strikingly like a rusted crescent wrench... even down to the hole on the bottom. Oh wait..> just re-read your post. You already identified that one. DANG. And here I thought I was awesome. Ah well.

Someone more familiar with Relics might be able to help you out on the others.

Hang in there on the AT Pro. I love mine, but the first few weeks of learning curve were hurtful.

Oh, and if you' don't have an actual pinpointer, you might consider one. I use the "wiggle" method to find the target (wiggle back and forth over the target and back up until it stops, the target is under the top end of the coil). Saves time trying to "pin point" using the button. The DD coil is excellent at this. Once you've got the location vertically in the ground, it's just a matter of testing if the pinpointer can pick it up, and if you have a variable pointer (like the Garrett Pro Pointer AT), you can tell how deep the target is. If no beep, dig a deep plug. if a medium beep, dig a medium plug, if a rapid beep, dig a shallow plug, if a tone, pry it from the surface!

Cheers,

Skippy

Agreed. Use the wiggle method. I found I don't use the pointer on the machine. Just remember, when you use the front of the coil, when you first hear a signal, the object can still be ahead of the coil by a couple of inches. That's where hearing the subtle changes in tone and volume come into play with the AT. Keep at it!!:thumbsup: And keep it slow............
 

Sweep left to right and make a mental note of the center, rotate 90 degrees and do it again making an X over the target... dig.

One of those looks like a garden stake.
 

Thanks for the help. I'm going to check the connection and make another garden to practice. Still waiting for that first coin...
I have a pro pointer II, it's a time saver for sure.
 

Pinpointing takes practice with any new detector. It's worth spending an hour or two on it before you start really hunting with your new AT Pro.

One way to get good quickly: Take a piece of 1.5" Schedule 40 PVC pipe and cut one end at an angle so it's a sharp stake. Drive it straight down about 5" into some "clean" soft ground (no other targets). Pull the pipe out, and drop a quarter in the hole so it's lying flat at the bottom. Loosely drop some dirt over the quarter, then put a non-metal marker directly over the buried coin. A poker chip works well.

Now you know exactly where the coin is and you can scan over it with your detector, observing the relationship between the coil and the poker chip. Try different pinpointing methods and see which ones work best for you.

I personally use the "X" technique with the AT Pro DD coils: Left-right scan (Pro mode only!) to locate the target on a line, then step around the target 90 degrees and another left-right scan to locate exactly where on the first line the target is. Works superbly 95% of the time. I use "heel-and-toe" with the pinpoint button to get an idea of the size of targets I suspect are HOIs (Hunks of Iron).

Good luck and let us know how you get on!
 

Last edited:
Thanks for the tips. Pinpointing is getting easier, the only question I have is will iron false 85-99 at the edge of a target?
 

This thing chatters like the first coil on the ace 350 I had. Garrett sent me a new one and it calmed down, worked really well after that. I've had 90-99 clean tones and end up with a piece of barbed wire...
 

If your hunting with the AT in pro mode thicker bits of iron will give u higher vdi numbers but you will often get a null at the end of the high tone, small bits of rusted metal will also give you high numbers and can mess you around...you will find these small bits difficult to pin point whereas a good target will repeat the same numbers,tone and will pinpoint over a small distance

.
 

I made a practice area with a few buried coins, nails, cans, and placed a few on the surface as well. I noticed the right side of the coil doesn't pick up anything. The middle and left side on small targets will hit, but the right side is dead. Is this normal?
 

Did you do that test from every direction like stated above?
 

Ya, I noticed it when working around a target I placed on the surface. The right side is dead.
 

Go to youtube and watch garretts videos part one through four on the AT pro . This gives you all the info you will need to get started. Start in zero mode and dig everything . I watched these vids plus many more .I went from a mpx digital to the AT pro and it was like going from a rusted out 1973 pinto to a 2016 Cadillac .I pin pointed three dimes in my back yard with in five minutes and had went over that place 20 times with the mpx .
 

I would say the left is the problem. The double d coil works off the center.

As far as what you have pics of above. A coin is what coils are built to recognize. Large items will normally not be where you think they are and steel as it rusts and blisters will give signals in the high 80's. 98-99 is big and can be silver or steel. You'll learn the sound over time.
The first trick you should practice is pulling the coil away from the ground when it screams. If it doesn't go away fast. It's big and probably iron. If 80-81 screaming still after raising coil (tin can), 82 and screaming aluminum can, again sometimes they both can sound really good but after you left the coil 8-10" and its still screaming. It's junk.
 

Last edited:
Could it really have been the batteries?? I put new energizer's in a few days ago and after 5-8 hours I was down to half on the battery display. Today I replaced them with the energizer lithium and it works better than it ever has. The right side of the coil is working too. I wanted to throw this machine in the trash on Thursday and now I completely understand it and was hitting targets with ease. I guess I'll have to carry extra batteries with me.
 

Top Member Reactions

Users who are viewing this thread

Back
Top