Lets See That Shoe String

StoneWhisper

Hero Member
Apr 16, 2010
789
219
Annapolis Junction, Maryland
Primary Interest:
Other
Let's See That Shoe String

There seems to be a growing tread within the rock and mineral forum area.. many of us, not only hunt for them.. but tactfully attempt to facet cut them.. or technically termed "Shoe String Faceting" and I'm not talking about someone who actually have the equipment to "professionally" facet cut their own stones.. but one who just so happens to be creative and use what they have to cut, shape, tumble and polish their own stones.. "Ah La Natural"

I'll get the ball rolling:

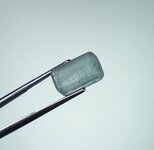
100_0723.jpg

This is one of my favorite facet cut Aquamarine stones/gems found in a seeded bucket at Gem Mountain, NC I was sort of attempting to cut the stone as an "emerald cut" Yet ended up with something different.

I call this faceted Aquamarine, one of my favorite, simply because my favorite and the one I spent the most time on developed a hairline fracture which broke two weeks after having it set/mounted into a ring.. So as one can see, I'm more into the rustic appearing stones/gems. Just means someone did this by hand without any special skills.
 

Last edited:
Nice going.
I'm in process of building a flat lap. It's more for tuning up slabs or creating a flat side for a slabbing vice so my wife can cut cabs.
Just finished a auto-feed for my modified 10" saw. Next is probably a grove cutter.
Like you said coming up with solutions is part of the fun as long as the results are good. Especially true with the price of equipment.
There is a well known jeweler in town where I bought a ring from. It was also a rough cut aquamarine and looks like no other.
 

Upvote 0
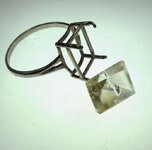
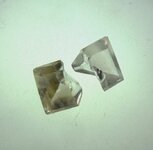
Here's one of my greatest attempts at faceting a stone.. Thou doomed to fail.. I gave it my best shot.

001.JPG 002.JPG

Doing this all by hand with no prior experience and not having the best of equipment.. I was able to get this Citrine fairly close to an emerald cut I ran into trouble when I wasn't aware that I needed a cooling source to protect the stone from cracking.. But it was to late.. and thou I knew the stone had a fracture.. I wanted to set it into this ring.. only to have it break two weeks later..
 

Last edited:
Upvote 0
I've had several interested forum members asking how it was that I faceted several of the stones I've showcased within the forum. Thou the stone are not perfect and my hands do shake, One of the best examples never survived.. Developing a hairline fracture, which later broke the stone.. For that moment on, I knew I have to find a way to keep the stones cool when shaping.

Here is what one will need to facet or even cut stones in their shop or basement.


  • Dremel
  • Diamond Blade (Dremel Approved)
  • Table Vise (Panavise)
  • 2 Plastic Shoe Boxes
  • Home made work bench or flat surface (I found a doll bench)
  • Pencils or angled dowels
  • Empty Soda Bottle (large the better)
  • Techni tool flux bottle
  • Oxygen hose tubing
  • Wooden Paint Brush (Remove the brush hairs)
  • Screen Door mesh retainer bracket (Used to hold the pencil in place)

Although this is a short list, One really needs to be creative and simply make things up as they go along.

First cut one of the plastic shoes boxes in half.. Width wise.. then tape or glue the half shoe box on top of the full size shoe box. This is going to be your access point and sling guard. Drill a small hole about the size of a quarter that the dremel can fit into Yet fit tight enough around the dremel's head to retain the shoe box or dremel from moving.

The flat surface or doll bench table had back rails on which I removed the rails leaving the dowel holes. This was the start of my angles thou I would only use the closet three holes towards the dremel bit. The dremel itself was mounted on it's side in the table vise.. An easy drip system is nothing more than an oxygen hose/tubing a soda bottle and a flux bottle.. Cut the bottom of the flux bottle (I used a hot needle to punch holes in the bottom and remove) One wants to start small.. because the open you create is suppose to fit onto the soda bottle spout/opening.

568x568.jpg

Image: Note the Dremel in the panavise with the diamond Bit in the back ground.​

A tight fit is suggested, Hence the needle holes allowed for that tight fit over the soda bottles spout Yet allowing air to circulate.. What you're creating is a home made IV set up and because of the flux bottle acting as a bladder.. the water in the soda bottle doesn't flow in one full stream.. Instead if "gulps" and drips when needed. I did have to place a metal screw in the end of the hose/tubing to control the flow even more. Tighten the screw, reduces the flow etc.

568x568.jpg

Image: Note the oxygen hose and the plastic shoe box in the back ground.

As seen here.. I placed dop wax on the end of the pencil.. then created a jig which held the pencil in place yet had a dowel rod placed into the hole with a screw as seen in the image.. Using the dowel holes from the doll bench, one could create an angle based on where the jig was placed in the dowel holds.. Yet incorporating the angle of the pencil.


ob_87ef9d_100-0737.jpg


The mesh screen door clip was used to hold the pencil down with two small nails were used to center the pencil on the jeep. The was a crude means to support the jig and have it so I could remove the pencil if needed. Witht eh shoes box over the dremel, and a small hole in the top of the half shoe baxe (on top) I feed the drip hose tubing into the shoe box and down to the diamond blade. When the dremel is on, release a hose/tubing clamp to start the flow of water. A steady drip (not flow) is needed when cutting.. If you had cut the shoe box correctly, it will help prevent any of the dirty cut water from slinging into your face, yet safey glasses would be suggested. Be mindful that the dremel is electric, so water must be maintained within the shoe box. Never allow more than 1/8 of water to collect in the bottom of the lower shoe box when cutting.​


Upvote 0

Top Member Reactions

Users who are viewing this thread

Back
Top