Finally got a USB Microscope/Camera...

Tejaas

Hero Member
Sep 8, 2012
826
1,019
TX Hill Country
Detector(s) used
Garrett AT PRO ~ Propointer ~ Modified Lesche ~ Predator Little Eagle ~ Royal Picks ~ Marshalltown Trowels ~ Sift Tables/Screens
Primary Interest:
Relic Hunting
I finally ordered one... I decided that picking one and possibly making a mistake is better than going back and forth between several options and never actually having one!

This is what i ended up with:
Plugable USB 2.0 Handheld Digital Microscope with stand for Windows, Mac, Linux (2MP, 10x-50x Optical Zoom, 200x Digital Magnification):Amazon:Camera & Photo

I use an iMac and a Macbook Pro, so my sub-$50 choices were somewhat limited due to compatibility.
This one had the highest reviews, so i pulled the trigger.

I did a test run tonight with the 3 Texas Buttons I posted about a while back. I am satisfied with my purchase because it provides a means to get a detailed and legible image of my small relics for cataloging purpose... But i found it extremely difficult to photograph these buttons. I don't know if it is because they are shiny brass or my skills suck, or both.

Harry Ridgeway requested photos of these three buttons for his reference library... I sent these 6 photos and I'm waiting for the verbal whiplash to follow... his photography of buttons is downright impressive!

Anyways, i just hope that the quality of the images this USB magnifying camera produces (when used for coins and buttons) is deemed good enough to be helpful here on the forums.

Feedback is welcomed!

Horstmann (23mm):
2d418f1ec6ee6695616ec34092770282.jpg

f20d259163dff308e995784effa9720a.jpg


Simmons (23mm):
11bd06bd62d4568c6b3487bfaba44eda.jpg

a36d91875fa42e266c73993685167a01.jpg


Waterbury (14.3mm):
414ba77a8f39ba1a77f84e7a4da0b6f7.jpg

c9416b46fafedaf30ea0df2a5b04cab3.jpg


~Tejaas~
 

Last edited:
Upvote 0
Those are awesome pics..> I've tried macros in the past, and found I struggled to get clean photos because of the depth of field that was in focus at any given time. It's find for flats, and slides and such, but the moment that I had something 3 dimensional, I lost some sort of clarity on part of the object, when I focused on another part.

You might check to see if you can open up the depth of focus a bit (I don't know the technical term for this), if you're struggling to get the parts in focus that you'd like.

Cheers,

Skippy
 

It seems like lighting is the difficult part to figure out, particularly with reflective surfaces.
 

I Have one- very enjoyable. Here's something you may not know.
Put a hair on the flat side of the plastic lens cover to make a slide. Put it directly under the microscope lens and Turn the magnification wheels to the opposite of
where it was for the coin, and the hair will come into focus in X200. not just 20x
They don't explain this in the instructions.
 

Those are awesome pics..> I've tried macros in the past, and found I struggled to get clean photos because of the depth of field that was in focus at any given time. It's find for flats, and slides and such, but the moment that I had something 3 dimensional, I lost some sort of clarity on part of the object, when I focused on another part.

You might check to see if you can open up the depth of focus a bit (I don't know the technical term for this), if you're struggling to get the parts in focus that you'd like.

Cheers,

Skippy

Thats what i am eager to figure out... The convex shape of the button causes the outside edge to wash out like you can see in my photos above...

I just don't know if it is my poor understanding of proper lighting, or maybe i am operating outside the quality/capability of my $30 chinese camera/magnifier.

Harry Ridgeway himself gave me the tips on photographing my buttons, and i followed them to the "T".... So i don't know what else i can do, haha.


~Tejaas~
 

It seems like lighting is the difficult part to figure out, particularly with reflective surfaces.

Heck yea!

I was told to use a flat white piece of paper as a backdrop... I suspect the LED lights in my camera, which seem to emit a slight blue tint, are not a great solution for high luster brass buttons.


When I try without the lights on, there is -way- to much shadowing. I don't know how much better i can do though, because the magnifier/camera has to operate directly over the buttons at about a 2" distance...

Maybe I should try making a easel of some sort and photographing the buttons standing vertical, with the camera on a horizontal plane...


~Tejaas~
 

I Have one- very enjoyable. Here's something you may not know.
Put a hair on the flat side of the plastic lens cover to make a slide. Put it directly under the microscope lens and Turn the magnification wheels to the opposite of
where it was for the coin, and the hair will come into focus in X200. not just 20x
They don't explain this in the instructions.

Does this adjust the focal point to the hair, allowing an even field of view on what is beyond the hair itself?

Pardon my misunderstanding... Im a complete amateur at closeup photography!


~Tejaas~
 

Hi -

Your Microscope operates with two completely Different Zooms- The photos you took are at 20x. There was some distance, perhaps an inch or two, between the lens and the button! Great for what you want, ie photos of coins etc- 20 x is fine

But if you put a slide right up to the lens, rotate the wheel in completely the opposite direction, it will focus in as a proper microscope! x200 for tiny stuff invisible to the eye. Use a hair or the wing off a fly to experiment!

I can't believe that they didn't put this in the instructions- I stumbled across it on a youtube video after I had the unit a couple of weeks. Other people were commenting on the same thing.

Enjoy.

Ps if your one has video function in the software, you can get it to do time lapse photography, and get photos of a seed sprouting etc. Another thing they keep a secret in the instructions!

If you can't get it from the above , message me and I can take photos of my set up when I home from work tonight

Good Luck
 

Last edited:
Hi -

Your Microscope operates with two completely Different Zooms- The photos you took are at 20x. There was some distance, perhaps an inch or two, between the lens and the button! Great for what you want, ie photos of coins etc- 20 x is fine

But if you put a slide right up to the lens, rotate the wheel in completely the opposite direction, it will focus in as a proper microscope! x200 for tiny stuff invisible to the eye. Use a hair or the wing off a fly to experiment!

I can't believe that they didn't put this in the instructions- I stumbled across it on a youtube video after I had the unit a couple of weeks. Other people were commenting on the same thing.

Enjoy.

Ps if your one has video function in the software, you can get it to do time lapse photography, and get photos of a seed sprouting etc. Another thing they keep a secret in the instructions!

If you can't get it from the above , message me and I can take photos of my set up when I home from work tonight

Good Luck

Ah! I think i catch your drift now.
Great info!

Heres a question... Are you just stacking up books or the like to gain distance on larger items? I had to stack 3 boxes of .30-30 cartridges just to be able to get the entire button into the field of view...

I was thinking of trying to find a flexible boom or the like to mount the camera on... I don't foresee looking at anything smaller than a coin. Any guidance?


~Tejaas~
 

Hi-

I have it taped down on top a two inch harddrive cos it needs only about that distance in 20 x mode. The Arm is fine to adjust every way once its stuck down.
This is for coins etc. Seems to do most stuff at that distance.
The photos you got look as good as any I have taken. If you want better
I think you need to experiment with extra light from different angles
Also- focus an object and go into (on the Pc) OPTIONS- PREFERENCES-VIDEO PROC
start making changes to contrast, Pan -etc and you can watch them in real time.

Another thing- don't bother with the button on the unit to take shots, use the software on pc- no shake then.

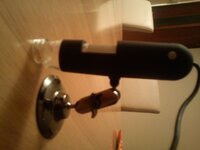
Here's a sideways pic of how you set up for proper microscope.
DSC00839.JPG
Then turn the focus wheel completely in the opposite direction to normal. Do it on a banknote - more fun than you might think. Takes
a bit of practice. Worth trying. Good one for kids!

Hope this is someway clear, its hard to explain, maybe that's why they didn't bother mentioning it in the instructions!

Enjoy!
 

Last edited:

Top Member Reactions

Users who are viewing this thread

Back
Top