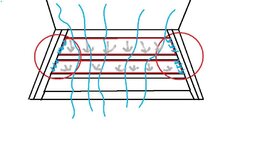
DIY Double flared fluid bed sluice, with 3 chambers.

Astrobouncer

Hero Member
Jun 21, 2009
823
344


I built this sluice out of some scrap wood in my garage.

This idea is similar in concept to to the New Zealand Hydraulic riffles, however instead of supplying the water from above like on those, I use the sides. 6 water holes per chamber, 3 on each side about 1/8 inch in diameter each. The first two chambers have a 45 degree back slope which serves two purposes. First, it lessens the material buildup in the riffle by keeping it shallower (and thus easier to keep fluidized), and second it allows the heavies to sink into the deeper part of the chambers. Most of the gold will not make it past the first chamber, but if it does, with this design it has 2 more chambers to settle in.

The purpose of the double flare is to speed up the material at first to push the lighter tailings out, then to slow it down again where it widens to drop the fine gold.

I built it to self classifies to about 6 mesh, but I can change it to any size by switching grizzly if needed. The exit port for tailings under the grizzly is 1/2 inch high.

I tested it a couple times now, but only took video the one time, and so far it seems to work great, catching down to sub 100 mesh easily. More tests and video showing it in action coming soon.
 

Upvote 0
And yet another DIY marvel that I would need to see in action to understand how it works. You've gone way past my abilities in designing new gadgets. As always the construction and the ideas keep coming up with new and interesing washing/separteing/classifying ideas......63bkpkr
 

Another great fluid bed design :thumbsup:

On a side note, I've found that punch plate works best at preventing a buildup of material on the grizzly. Gravel wants to catch and hang up more so on mesh.
Problem is, finding a cheap source for punch plate.
 

Hi Astro, your sluice looks great.

Got inspired by your Sluices and trying to build my own now. May i ask you what type of wood do you use and do you coat it in any way, and with what type of coating?
I myself have only access to some scrap wood from the garage but i think it will not last long in the water without coating.

greets from europe(austria)
refo
 

First I stain the wood, then I use several coats of polyurethane. The wood type was just some scrap I had laying around in the garage, not sure but it wasnt hardwood, probably pine. I am still using this thing too works great, the only thing it needs is a leaf guard on the bottom so floating leaves dont get in there and block the pipes.
 

just a suggestion....maybe on your next video/test, invite all of us out to witness this filmining/test for some verified testimonials for unbiased veiwers like us.:) we promise not to disclose where we see this at.............:)
 

Anyone is welcome to come try it when I am up at Thermal City, in fact treasure net member 'Dipstick' seen it in use when I was filming this episode not long ago (and Dr Phil has used it several times):


The thing is, I dont always know when I am gonna head out there, but I always have this with me when I do. I might even go tomorrow or Sunday but that depends on if we are working creek 5 sunday or not. Plus its cheap to build, maybe 20 bucks, so people are welcome to build one and try it yourselves. Just make sure you get the tapered front 2 chambers like I have, that design is critical to keeping the chambers small and fluidized.
 

Nice sluice product design you've developed--it looks like it works great! I enjoyed your videos as well.

Thanks for taking the time to make your videos and post them.

All the best,

Lanny
 

Hey Astro,

That sluice is beautiful, and I've watched both videos, but I can't seem to figure out the dimensions even with the saw ruler, might be because I'm new to carpentry, but what are the dimensions? And with the 2 tapered sections, do you mean cutting them slightly shorter then the grate for the material to go over, or does it go over the grate? any help would be very appreciated.
 

Lets see (from my memory) the sluice starts out at 14 inches wide then tapers to 6 1/2 inch wide at the grizzly, then it tapers back up to 10 1/4 inches wide at the end to fit in a 5 gallon bucket. If I had it to do over again, I would probably taper it slightly less, rather more like 7 1/2 inches wide at the grizzly.

The wire grizzly is flush with the wood it sits against, so the lighter material falls down through the mesh into the chambers and is washed away. There is about 1/2 inch clearance inside the top of the chambers for tailings to exit. Each little fluid bed chamber is about an inch and a half or so deep.
 

Hey Astro! Silly me... When I first saw the sluice I thought the water flow was going to go the other way! Duh!!! Guess it shows how little sluice work I've done. Cool idea and it looks like it works very well. BTW Nice country out your way. I was in Asheville for a while and loved it there. Would have liked to had more chances to do some gold hunting but at the time it was work, work and then more work.

Jeff
 

Thank you kindly! I have to draw plans out first or I screw myself into a corner, thank you for the dimensions, but as I watch the video over and over again. I can't figure out how you have the grizzly on there, is it screwed to those 1x2s and ten wedged under that steel plate? and I can't see correctly but is that 1/2 pvc? thank you again man, this is some cool stuff you do. and I'm happy to find another enjoyable hobby
 

Nice and very functional! A lot can be done for little expense if one puts their mind to it. Thanks for sharing as it shows people that prospecting can be fun on a small budget.
 

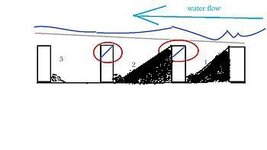
Thank you again Astro, I think ive watched the build video about 100 times now, staring at the chambers. I Dont really know how to ask the question so, I drew a picture lol Fluid bed sluice.jpg is the part I circled in red, the part that needs the 45 degree backslope? I cant really tell from the videos
 

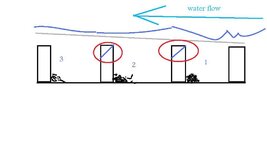
No the riffles are just straight up. What has the 45 degree back slope is the actual chamber floors on the first two chambers. The black area I added shows the floor of the chambers. The reason for the slope there is to keep the chambers shallow and fluidized and allow the heavies to sink into the lowest part.

Hope this pic clears it up for you, if not I will do a video of the sluice with the grizzly taken off so you can see it better.
 

Attachments

  • Fluid bed sluice.jpg
    Fluid bed sluice.jpg
    8.6 KB · Views: 523
Thank you Astro, I believe it did, Your refering to the whole second flair, least I hope so Grizzly45.jpg
is that what you mean? because the chamber widens it forces the material into the widest part? would that mean the drilled holes are pointed down towards the chamber floor to keep it fluidized, or are they pointed straight?
Another video wouldn't hurt, You could even do a video of the grizzly too, I'm pretty their are others like me, who'll stare at endlessly lol
 

Last edited:

Top Member Reactions

Users who are viewing this thread

Back
Top