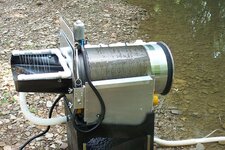
My Trommel Build for Gold Cube

Goodyguy

Gold Member
Mar 10, 2007
6,489
6,900
Arizona
Detector(s) used
Whites TM 808, Whites GMT, Tesoro Lobo Super Traq, Fisher Gold Bug 2, Suction Dredges, Trommels, Gold Vacs, High Bankers, Fluid bed Gold Traps, Rock Crushers, Sluices, Dry Washers, Miller Tables, Rp4
Primary Interest:
All Treasure Hunting
Bought a Gold Cube off Craigslist and decided to build a trommel for it that I could also use on a regular highbanker or over a sluice.

I have plenty of scrap material leftover from other projects so my out of pocket costs will be pretty low.
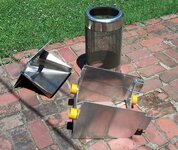
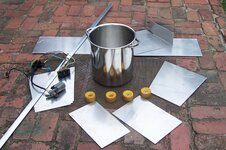
Here are some of the materials I started the project with.......

31" square sheet of 1/8" punchplate for the drum.
1/8" thick aluminum scraps and a large 1/8" piece of aluminum sheet.
(1) 12V motor I had saved from an electric seat off my old car.
(4) wheels from an old pair of skates.
(1) 10" diameter stainless steel stock pot that we never used.
(1) length of 3/4" angle aluminum.

I have plenty more scraps that will go into the trommel but this is what I'm starting out with for the first part of the build.
100_5903.jpg

GG~
 

Last edited:
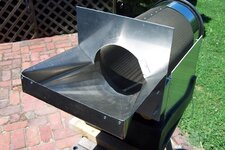
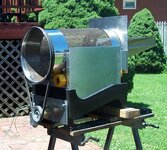
Ok so here is what I have made so far with those parts...............

The basic drum. (cleats will be added to the inside later)
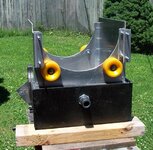
The trommel frame.
The hopper.

100_5915.jpg


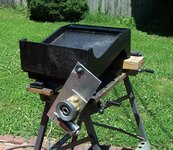
The motor mounting and an old pulley I had.
100_5917.jpg

The reason the motor is hanging down is because I will use the weight of the motor assembly to keep tension on the drive belt.
I have a few assorted belts laying around and I'm sure I can find a size that will work.

GG~
 

Last edited:
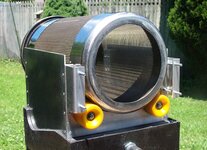
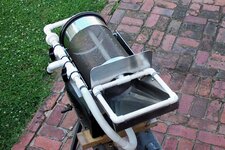
It's starting to shape up ................

100_5914.jpg

100_5912.jpg

The hopper is held on by wing nuts for easy disassembly.
100_5909.jpg

I used some anti slip tape that I had and placed it on the drum underneath the belt so the belt wouldn't slip against the stainless steel.
100_5905.jpg

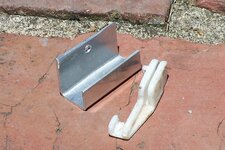
In order to keep the drum from walking I used an old nylon guide off a sliding shower door that I had kept after installing new ones.
I had to fabricate a bracket to hold it in place.
100_5918.jpg

100_5919.jpg


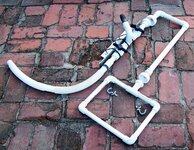
Next I need to go through my pvc scraps and see what all I may need to buy to build the spray bar assembly.......

GG~
 

Last edited:
I had plenty of 3/4" pvc pipe and assorted fittings but had to buy......
(2) 3/4" ball valves
four feet of 1/2" pvc pipe
(1) 1/2" tee
(4) 1/2" elbows
(1) 1/2" union joint
(1) 3/4" union joint
(1) 3/4" tee
(1) 1/2" to 3/4" adapter
The rest I already had as leftovers from other projects.

100_5925.jpg
Not liking my use of zip ties to hold down the ball valve assembly so that will have to be changed.

100_5930.jpg


Anyway all I have left to do now is install the drum cleats and then wire and install the control center on/off switch for the pump and the on/off forward/reverse switch for the drum motor. And figure out how to do away with those ugly zip ties :tongue3:

Go for the Gold
GG~
 

Last edited:
Now THAT'S what I call using the ol' noggin!! :thumbsup:

I probably would have needed a larger hopper - but then, my aim was better when young and healthy. :tongue3:

Can't wait to hear how it works for ya.
 

Thanks Utah Mason :angel3:

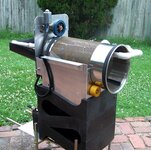
Finished the wiring, on/off/forward and reverse for the drum. On/off switch for the pump.
Installed cleats in the drum. Modified the spray bar for the hopper.

I'm ready for the creek now :hello2:..........................

100_5935.jpg


Going to the creek this Sunday to give her a workout and try to find enough gold to help pay the $40 I have in out of pocket expenses :tongue3:
Most likely will build another drum with 1/4" punchplate or 1/2" expanded for when I'm using it over my highbanker.
Also thinking about moving the motor to the back of the drum topside of the hopper backplate to eliminate the motor assembly being attached to the top tray of the Gold Cube, that way it will be a completely self contained unit.


GG~
 

Last edited:
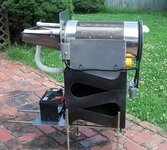
I went ahead and modified the drive.
Got rid of the belt and the motor mount attached to the top tray.

Not sure why I didn't think of this first when designing the drive apparatus :icon_scratch:
A lot easier and not in the area of tailings exiting the drum and no drilling into the cube for attachment.
Plus now it's a stand alone unit making it much easier to use with a highbanker or sluice.

100_5949.jpg


Still anxious to try it out on the creek this Sunday :tongue3:
I did test it out in the back yard as a recirc unit to make sure I had the drum angle set right. Good thing I had added a manual angle adjustment, as I found out that the 1/2" to the foot of drop that I built in was not quite enough even with the angle of the cleats. Turns out that 1" to the foot was perfect for the material I had on hand.

Go for the Gold
GG~
 

Last edited:
Your design looks truly inspired! I'm sure it'll work as good as you hope! :thumbsup:
 

Great looking build! I would be happy to put that on top of my cube. It's a beauty and I'd bet it works like a champ too!
 

The field test was a success, :hello2:
other than two minor details that I had to address.

#1 I forgot to take a 1 quart paint filter (works better than panty hose) to put the bilge pump into, so right off the bat I clogged the spray bar. :BangHead:
Easy fix in the field just had to put the pump into a bucket and submerge into the creek. Used a paper clip to unclog the holes in the spraybar.

#2 needed a spring to add more pressure to the drive wheel, as the weight of the motor alone was not sufficient to drive the drum under heavy load.
A bungee cord solved that problem for the day.

Other than those issues I am impressed with it's performance and happy and satisfied with the build overall. :icon_thumleft:

* Note to Do it yourselfers
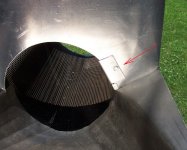
Make sure that the tumbling cleats end before the grizzly to prevent gold from riding a cleat out of the drum.
Something I failed to catch on my build until after a few outings.


GG~
 

Last edited:
Do you have a short video of this working in the field, that would be great to see in action, thanks - Dale
 

Do you have a short video of this working in the field, that would be great to see in action, thanks - Dale

Next time out I will record a video and post it here.
In the meantime here is a photo of the spring tensioner modification......
The spring is a leftover from our dry cleaning business, used to hold a steam press cover in place.
100_5979_00.jpg
*note spring adjustment holes.
 

Last edited:
Really nice, GG....looking forward to the video!
Jim
 

Went out today to shoot a video, first time using my camera and I didn't know that each time I let off the button it would start a separate video. I thought it would just pick up where I left off so I ended up shooting 7 videos instead of just one. ???

So rather than post all of them I will just post three so you get the Idea. The first is just showing it running with no material added.
The second one shows me feeding it a shovelful ( hard to do while holding a camera in one hand) :tongue3:
The third shows material being processed in the drum.


The drum runs a little fast so I had to back off the angle a little bit but it did a good job of washing the rocks clean so I'm happy.
Haven't done a clean up for today's run but if it is anything like the last time it will just be typical Hoosier fines, specks, and fly poop.


GG~
 

Last edited:
The videos are marked private.
 

They work now. Looks like it works really good. Excellent job!
 

Top Member Reactions

Users who are viewing this thread

Back
Top