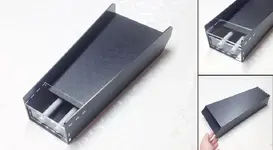
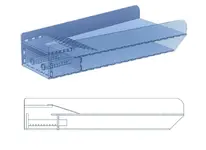
made diy bazooka mini trap sluice plans for laser cutter

daniel2015

Jr. Member
Sep 28, 2015
31
57
Primary Interest:
All Treasure Hunting
Since tax, customs and shipping to europe is ridiculously expensive I've made a simple design based on the Bazooka Mini Trap Sluice. Everyone with access to a small table top CNC or Laser Cutter could make it. Had to guess the dimensions based on pics and some info from various forums. Here's the preview for the Mini. Would love to do that for the bazooka prospector to build my own but need someone who can give me some details, dimensions and pics.
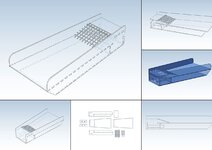
mini_gold_sluice_trap_small.jpg

Btw. here is the PDF tutorial and the proper DXF file in case you want to build your own mini fluid bed sluice:
diy_mini_fluid_bed_sluice.pdf
diy_mini_fluid_bed_sluice.dxf
 

Last edited:
Don't just look for your answers in posts about bazooka sluice. Google fluid bed sluices and you may find answers to what you seek. Many have made them and they seem to work for them so you can incorporate some of their ideas into your device and do some testing until you are satisfied. Modular construction or replaceable pieces will help you there. Though the bazooka is well designed other different designs work well too.

Good luck.
 

Thanks very much will do!
I also want to integrate a removable tray. The only thing I don't know is the dimension and shape (a picture would be great) of this diverter baffle in the bazooka prospector. I've read many posts and if done wrong it has a scouring effect. This mini bazooka is only a first try of mine to see if it works.
 

Look up Goodguy's posts on this forum. I think he uses one on his fluid bed design and he may have a description of what he uses. I think I saw a picture of a bazooka diverter somewhere on some forum and it looked to be just a piece of the same thickness abs that the sluice body is and was attached to the roof of the box with it's edge directly above the edge of the fluid chamber. When I first saw it I thought it was mainly for securing the upper grizzly attachment but others post that it is actually purposed as a diverter. Not sure if it had much width other than enough to get a strong bond to the ceiling. That could also be a screwed on replaceable piece for testing purposes. In my mind I see it as a restrictor of water flow, if its edge is where I think it is directly above the chamber, and thus it actually speeds water through the opening eg. it should act as a rectangular nozzle. Still a puzzle to me but maybe it first slows the material feed some allowing heavies a split second to settle before they enter the nozzle section and then speed up through the opening with heavies low and lighter material high in the flow.

Good luck.
 

Last edited:
Ha ha ha.....yep its just a pointless piece of plastic.....lol.....
 

Ha ha ha.....yep its just a pointless piece of plastic.....lol.....

Snide comments aside, care to explain it without giving away any trade secrets? By the way, if you re-read my post, I didn't infer it was pointless and accept that it is part of the system. I speculated on the science of how it works though. I happen to like, no, love the overall concept though I personally have no need for one other than the small one I made to play with on the rare occasion when I and a gold bearing creek with sufficient flow happen to meet. Since I live in the desert it ain't going to happen here.

Have a good day.
 

Last edited:
I'm just messin' around. it Is there to create a pressure curtain and drive fine gold out of the laminar flow and get it into the low pressure area of the trap. it has no affect on "heavies " they take care of them selves. it definitely doesn't speed any water up. It slows and diverts the top layer of flow...the " fastest" flow. and also creates a pressure variance that helps other material drop into the trap..... It also helps with gold retention when adding dry material.
 

Thanks for the info arizau!
Just build the mini sluice today on my small table top cnc. I've used abs plastic for the corpus and clear plexiglas for top grizzly plate and front plate. Need to attach the grizzly mesh and Im done.

bazooka_mini_sluice_web.jpg
 

Nice build! I'm sure your making alot of people who build there own equipment jealous of your cnc mill.
 

Since tax, customs and shipping to europe is ridiculously expensive I've made a simple design based on the Bazooka Mini Trap Sluice. Everyone with access to a small table top CNC or Laser Cutter could make it. Had to guess the dimensions based on pics and some info from various forums. Here's the preview for the Mini. Would love to do that for the bazooka prospector to build my own but need someone who can give me some details, dimensions and pics.

View attachment 1219259

But of course! In the land of milk and honey who doesn't access to a small table top CNC or Laser Cutter? BTW, do you have any grey pooopon?
 

I'm just messin' around. it Is there to create a pressure curtain and drive fine gold out of the laminar flow and get it into the low pressure area of the trap. it has no affect on "heavies " they take care of them selves. it definitely doesn't speed any water up. It slows and diverts the top layer of flow...the " fastest" flow. and also creates a pressure variance that helps other material drop into the trap..... It also helps with gold retention when adding dry material.

Thanks for your explanation. Having only seen pictures of a bazooka and with little info on the actual orientation of the innards I could only speculate on how it effects the flow etc. The popularity of the product is testament enough that it works no matter the science of how it works (my main interest since I have little opportunity to actually use one).
It could have been a different story and it makes me wish the war didn't force the shutdown of the gold mines and the resulting move of my parents and brother from Nevada City to New Mexico ( I was born and raised there) where my Dad continued his mining career in a Potash mine. No gold in Southeastern NM but his and other relatives and family friends experiences in underground gold mining is what put me on track for my longtime placering interest.

Heavy pans.
 

Last edited:
But of course! In the land of milk and honey who doesn't access to a small table top CNC or Laser Cutter? BTW, do you have any grey pooopon?

Wheres the problem? You can also do it by hand. Just use other material. Like hard foam core and you can cut it with a knife in minutes. Or use wood and cut it with a saw like in school. I was using my cnc because I was a machinist years ago.

b_0.jpg
 

How long did it take to cut those parts? How big is your machine? Can you send me a link to it?
cutting abs with a coping saw will get real old quick... We use normal wood working tools... a cnc would be nice but, we have a lot of models available so tooling for them all could get pricey...Ya'll are just gonna have to buy a hand made 100% in America product for the foreseeable future...hope you don't mind...Ill try to keep up:thumbsup:
 

Hey Goldwasher,
it took about 45 minutes with programming the toolpath etc. Its a little machine about 1 meter in length but it can only cnc parts up to 500 x 400 mm. I've bought it used from ebay for 3000,- years ago but it's not produced anymore. You can get comparable cnc routers nowadays for as low as 2300,-

Here is a link to comparable machines made in Germany: CNC Router Machines for 2D and 3D machining
Im sure you can buy cnc routers made in the US for the same prices. Doesn't have to be huge, a small one is superb for prototyping models etc.
 

You can cut matching holes in the end of the box and cut the tubes over length and cap them so that they can be removed and new ones reinserted. This could help you evaluate what hole pattern, etc. works best for you. Great idea for hole drilling pattern.:thumbsup:
 

Last edited:
the picture/diagram does have way too many holes in the tubes...and a note removable tubes could be bad if you lose your seal anywhere that they meet the box
 

Agree but just suggested for evaluation.
 

@Goldwasher

The total area of the 3mm holes is exactly the cross section area of the 15 mm tubes.
Inner tube diameter = 13.4mm = area = 141
3mm hole area = 7
141 / 7 = 20 holes (for each tube)

I've read that a couple of times in the forums and saw it on youtube videos too, that the area of all holes should match the area of the tubes.
 

Idk if you've caught it yet......I build bazookas for a living....I will admit that I don't know the diameter of your holes.....but I must say a lot of testing was done and you have A Lot of holes in those tubes.....you don't want too much water into the trap via the tubes...a mini has 6 per....If I ever come to your town your putting me up for the night for sharing that ;l
 

Top Member Reactions

Users who are viewing this thread

Back
Top