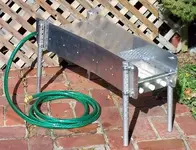
My Diy Fluid Bed Gold Trap Sluice

Goodyguy

Gold Member
Mar 10, 2007
6,489
6,903
Arizona
Detector(s) used
Whites TM 808, Whites GMT, Tesoro Lobo Super Traq, Fisher Gold Bug 2, Suction Dredges, Trommels, Gold Vacs, High Bankers, Fluid bed Gold Traps, Rock Crushers, Sluices, Dry Washers, Miller Tables, Rp4
Primary Interest:
All Treasure Hunting
Tired of losing the flour and fine Gold off the end of your highbanker or sluice ?
Then build a combination sluice/fluid bed trap to end the lost gold blues!
No Riffles, No need to classify, No lost gold.

My version does not load up with rocks that have to constantly be cleared off the grizzly as on the commercial models.
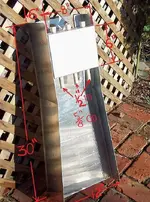
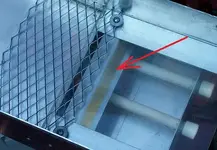
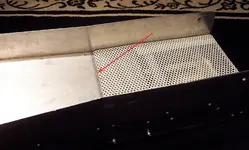
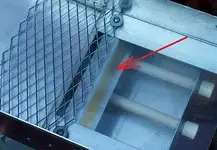
The reason is .....I designed mine to be flat and level with the sluice by dropping the bed of the sluice just in front of the trap instead of building an uphill grizzly, that way there is nothing for the larger gravel to get hung up on. The red arrow is pointing to the nugget trap area in front of the grizzly.
gt3.jpg


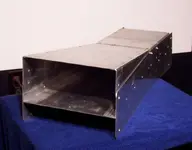
On the test version I had installed a plexiglass cover over the trap so I could monitor the operation.
diverter.jpg


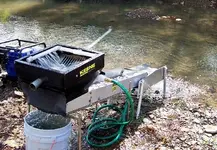
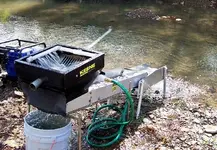
Placed at the end of a high banker sluice for a final gold catcher you will be assured of capturing any missed gold.
gt1.jpg

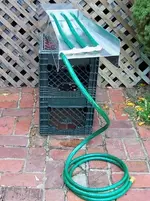
Of course you have to supply water to the stratification tubes but since you already are using a pump for your highbanker just run a separate line to them with a control/shut off valve and only allow about 9 gallons (plus or minus) per minute into them. (adjust as needed)

Or just use it all by itself as a stand alone fluid bed hand sluice...either way you trap the gold :icon_thumleft:
Total cost of materials to build it $35 Peace of mind knowing that you wont lose any gold.......Priceless
trap1.jpg


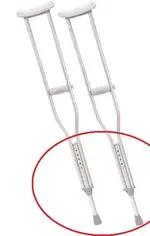
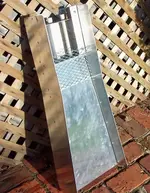
Legs are from crutches.
trap6.jpg


trap3.jpg
The trap is 2-1/2" inches deep. The holes in the stratification tubes are 1/8" dia. and are spaced 1/2" apart and go through both sides. The 5/8" OD 1/2" ID CPVC tubes are centered 1" off the bottom of the trap and are spaced 2-1/2" apart on centers from center tube.
The trap over flow is a 3/4" opening while the trap intake is a 1/2" opening. The 1/2" expanded metal is fastened underneath the 1/4" plexiglass.

trap4.jpg
Manifold and hose set up for use with a high banker. (Adj. bottom cover off for photo)

Adjustable scoop for slow flow conditions....
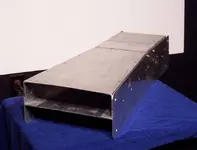
scoop.jpg adjscoop.jpg


When the water velocity through the stratification tubes is adjusted properly all the material in the trap stays in suspension except for the heavier gold, it stays on the very bottom while the lighter material continually keeps running out the overflow end of the trap.

* added a self clearing leaf guard.
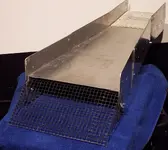
lg4.jpg
Made from 1/2" heavy duty hardware cloth.


Go for the gold :icon_thumleft:
GG~
 

Last edited:
If we all keep building fluid bed traps, the company's with all of their great looking logos and brand identification programs are going to start to feel a nasty bite for their underperforming, overpriced products(sluices). Congrats on your new sluice/fluid bed. It looks great.
 

Brilliant GG. Are you using it yet?

Where did you find the best place to get materials? sheet metal shop?

thanks-
C-dad
 

calisdad said:
Brilliant GG. Are you using it yet?

Where did you find the best place to get materials? sheet metal shop?

thanks-
C-dad

I found a place that does fabrication and they sell me their scrap aluminum sheet metal cheap.
I'll be using it at the last GPAA outing this season in central Indiana next weekend.

Will post photos of it in action after that.

GG~
 

you did a nice job on construction of this! Lexan would have been my choice rather than plexiglass, but it my be harder to find. Lexan wont scratch like plexiglass.
 

russau said:
you did a nice job on construction of this! Lexan would have been my choice rather than plexiglass, but it may be harder to find. Lexan wont scratch like plexiglass.

You know now that I think about it this may be Lexan.
I went to the local glass company and asked for some scrap plexiglass and they said this was all they had and gave me several odd pieces of 1/4"
When I was cutting it to size I noticed it wasn't brittle and would not crack, also It was easy to drill into. But at the same time it wasn't getting scratched as I expected from all the handling. Good thing is, I have plenty extra for replacements if needed :icon_thumleft:

GG~
 

yep that does sound like Lexan. another way to ID it is look at the edge of it. plexiglass is clear/white and lexan is dark or greeenish. but from your description it sounds like lexan.i dont think window replacement/repair shops are allowed to use plexiglass for door replacements anymore becuase of it cracking and cutting kids.
 

Used it this weekend............Worked like a charm!
I recommend anyone who worries about losing gold off the end of their highbanker either make, buy, or borrow, one.

The peace of mind knowing that if you are running material too fast, or have too steep of drop, or water speed too fast, or riffles too loaded up or whatever the case may be.........having a gold trap that catches any gold your sluice may have missed is great!

And yes I did find micro gold in my trap that would have discharged back into the creek, not a large amount mind you, but enough to see the value of adding the safety trap.

Here is a photo of it placed at the end of my highbanker sluice.

gt1.jpg


GG~
 

GG,
IF IT WORKS HALF AS GOOD AS IT LOOKS LIKE IT WORKS, IT'S WELL WORTH HAVING!
BY THE WAY WHERE DID YOU GET THE LEGS?

GOOD CRAFTMANSHIP. :thumbsup:
:coffee2: :coffee2:
MIKEL
 

PROSPECTORMIKEL said:
GG,
IF IT WORKS HALF AS GOOD AS IT LOOKS LIKE IT WORKS, IT'S WELL WORTH HAVING!
BY THE WAY WHERE DID YOU GET THE LEGS?

GOOD CRAFTMANSHIP. :thumbsup:
:coffee2: :coffee2:
MIKEL

Found a couple sets of old crutches while dumpster diving treasure hunting :tongue3:

Underarm Crutches.jpg
 

GG.
GREAT IDEA. I STARTED TO BUY AN OLD WALKER A FEW WEEKS AGO, BUT THEY WERE OVERKILL. BESIDES THAT MY WIFE WOULD THINK I WAS GETTING THEM FOR ME!
THE SMALLER SIZE OF YOURS LOOKS MUCH BETTER.
LOOKS LIKE YOU HAD A GOOD TREASURE HUNTING SPOT.
HH :thumbsup:
:coffee2: :coffee2:
MIKEL
 

PROSPECTORMIKEL said:
GG.
GREAT IDEA. I STARTED TO BUY AN OLD WALKER A FEW WEEKS AGO, BUT THEY WERE OVERKILL. BESIDES THAT MY WIFE WOULD THINK I WAS GETTING THEM FOR ME!
THE SMALLER SIZE OF YOURS LOOKS MUCH BETTER.
LOOKS LIKE YOU HAD A GOOD TREASURE HUNTING SPOT.
HH :thumbsup:
:coffee2: :coffee2:
MIKEL

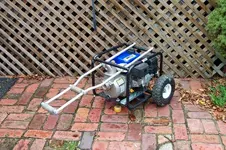
I also used some of the left over crutch parts to make a detachable light weight rust proof handle for my pump.

crutch handle.jpg
 

YEP,
LIGHT WEIGHT, RUST PROOF AND KEEPS THAT METAL FRAME FROM BITIN' YOUR ANKLES. :thumbsup:
OUTSTANDING... LITERALLY!

:coffee2: :coffee2:
MIKEL
 

Awsome work my friend with everything you have done I guess you have the bug as much as I do so the important question now Did it capture the flour gold like you was hoping, I hope all that glittered in your sluice was golden HH freddy
 

freddy williams said:
Awsome work my friend with everything you have done I guess you have the bug as much as I do so the important question now Did it capture the flour gold like you was hoping, I hope all that glittered in your sluice was golden HH freddy

Yes I did find micro gold in my trap that would have discharged back into the creek, not a large amount mind you, but enough to see the value of adding the safety trap. :icon_thumleft:

One improvement I made after that outing was the addition of a diverter baffle placed just inside the intake opening to insure that any floating gold would be diverted downward into the trap and not be allowed to just float straight across and over the discharge vent.

diverter.jpg


GG~


*Note I've found that the diverter baffle can cause a scouring effect in the trap if the water flow down the sluice is too great. My solution was to replace the hard baffle with a length of soft clear vinyl. It keeps the gold from washing out while eliminating any scouring effect.
 

Last edited:
Your fluid bed is interesting at what position as in clock hands did you position the holes in the tubes, how many rows, how many per row, and what size holes??
PS very nice job.
 

TS wizbang said:
Your fluid bed is interesting at what position as in clock hands did you position the holes in the tubes, how many rows, how many per row, and what size holes??
PS very nice job.

Good question!
I did a lot of trial and error to come up with my design.

The holes are straight across the diameter of the 1/2" inside diameter tubes, the holes are 1/8" diameter, spaced 1/2" apart the length of the CPVC tube. There are three tubes. The holes in the end tubes started 1/2" from the end of the tubes then spaced at 1/2" intervals while the holes from the center tube started 1" from the end of the tube then spaced at 1/2" intervals. That way the water jets coming out from the holes in the outside tubes do not strike the water jets coming out from the holes in the center tube, thus preventing unwanted turbulence.

The reason why you do not want the jets aimed straight down is to reduce unwanted movement of the heavy material that settles to the bottom of the trap. The object is to keep all the material in the trap in liquid suspension in order for gravity to allow the heavies to settle to the bottom while the lighter material is constantly being expelled over the overflow.

The CPVC tubes are positioned into the trap 1" off the bottom on centers. The trap itself is 6" long by 8" wide by 2-1/2" deep
The outside tubes are 2-1/2" on centers from the center tube leaving 1-1/2" from outside tube to outside wall of trap on center.

When mounting the trap insure that there is a 1/2" x 8" intake opening and a 3/4" x 8" discharge vent. In order to achieve that, your trap cover must be positioned at a sleight incline allowing the 1/4" difference from intake end to discharge end.

I used silicone aquarium sealer to seal off any leaks.
Hope this helps :icon_thumleft:

GG~
 

Last edited:

Top Member Reactions

Users who are viewing this thread

Back
Top