Tom´s Restorations

Tom_Restorer

Gold Member
Oct 5, 2009
9,793
48,787
Primary Interest:
Other
Hi Folks,

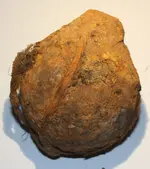
I thought to open this thread and show the process step by step because it is in my opinion a rare complete find in nearly perfect condition.
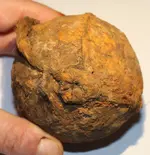
The piece has all original ropes, resin or bitumen on it and the fuse is covert with canvas.

A question to the specialists here: Was this canvas cover to protect the fuse or was it put on to avoid that only the wood fuse blows out when it goes off?

The ropes at the bottom are simply formed as a loop and this loop was fixed there with a kind of resin or bitumen (Tar), wich is also to find on some spots of the canvas and under the ropes.

Lets begin with the pics in original condition. The second pic shows the bottom with the loop and the black resin on some spots
 

Attachments

  • IMG_6498.JPG
    IMG_6498.JPG
    415 KB · Views: 293
  • IMG_6497.JPG
    IMG_6497.JPG
    341.2 KB · Views: 263
Last edited by a moderator:
Day two.

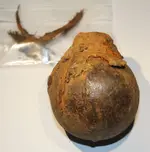
To avoid any damage to the organic material, the iron surface between the fragile ropes was cleaned manualy and than the loose ropes was taken apart to treat them seperatly. The next step is to clean the canvas on the upper side to take it off from the wooden fuse without damaging the canvas. In this encrusted condition it would simply break into parts while taking it off.
The next steps will be the final air abraison cleaning of the iron grenade before it goes into a controled electrolysis and the cleaning and preservation of the organic parts to put them later back on the original documented positions. At the end I will make archaeological sketches in original size with cuts etc. from the grenade, grenade with wood fuse and the the complete piece with ropes and canvas on it to post them here.
 

Attachments

  • IMG_6499.JPG
    IMG_6499.JPG
    557.9 KB · Views: 271
Last edited:
PS: To see the original size of the images, simply right click on the preview image and chose "show picture" and you get the original resolutions.

Any comments and questions are welcome !
 

That relic is in great condition! Where did you find it? And I haven't heard you mention if it has a charge in it. Seems like an intact package?

I restore it for a friend who is diver.
As you can see in the thread description, it comes from the Princess Maria wich sunk 1686, so it was for more than 300 years in sea water. It just looks like a land find because it was pre cleaned and was in fresh water for approx 8 years. The charge is dead like a rabbit now. But anyway, the remaining coal from the blackpowder will be cleaned complete off! After such long time in sea water it will not work anymore!
 

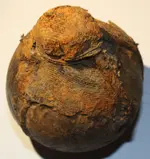
Cleaning of the canvas in progress.
I found under the rust layer also very fine ropes wich goes around the wood fuse.
All of the rust color can´t be cleaned off and the dark spots with the remainings of resin or tar has to stay there as evidence how it was build.
Unfortunly the rust has damaged some areas of the canvas completly but it is still luck that so much is remaining!
On one open part it is to see, that the wooden fuse is in very good condition and not collapsed.
 

Attachments

  • IMG_6500.JPG
    IMG_6500.JPG
    417.2 KB · Views: 257
Last edited:
Is the iron shell made in two halves and then joined? There looks to be a seam going round it.

Correct! It is made of two halfs of cast iron and welded together. You have on this way also a weaker breaking point if this thing goes off. The piece is quite light for iron.
To make propper sketches later, I will exaclty figure out the tickness of the iron and check it also inside with an endoskope.

I try at the moment to take down the canvas from the corrosion. This is the hardest part without damaging something and may I have to protect the canvas first with a thicker layer of paraloid to avoid any breaks on the fibers. This will be later completly removed in different acetone baths untill all Paraloid is gone. After this process I clean the other side of the canvas from all rust.
This is quite easy. I figured out two different (secret!) ways to clean heavy encrusted and dry organic material without any harm on the surfaces. The only way to loose may some tiny parts is while taken them down from the rust... but this is not to avoid at all. Even when the upper side is cleaned, the downside sits still on rust and when it is removed from it, it is still hard like a surf board and can easy crack.

The weight at the moment is 486,2 Gram
 

Last edited:
Nice work tom !! Looks great so far. Thanks for taking us through the process. What a cool piece !!

It is real a cool piece and I would love to have this one in my own collection !!
I would like to know if an other one in this condition with the canvas and ropes exists or if I am the first one who has the honor to restore such an complete piece?!
I just have found so far pieces with or without the wooden fuse but nothing like this.
It has to be shown to maritime museums for sure if they don´t have any datas of such an intact piece!

I found only an old pic wich shows a grenade made out of half-moon shaped bars and wich was holded together by the fuse itself. I guess it was also fixed with tar.

If someone finds half moon shaped iron bars of approx 8 cm diamerter and half circled cuts on the outside to set in a rope.... it comes from one like this :-)
 

Attachments

  • grenade.jpg
    grenade.jpg
    39.7 KB · Views: 1,081
Last edited:
Once again the various kinds of skills of the people who post on this site like Tom make this site my first stop when I turn my Mac on. Enjoyed the post Tom

Welded together- weaker breaking point?

I have always found that the welded spot is stronger than either piece that is welded together. Also if you try to mill a weld it is extremely hard material. Just my experience.
 

Enrada after reading your post I just had to comment. You are right again. I am a machinist and it is common knowledge among machinists that the weld is harder than the outlying pieces. That is because the heat of welding will "heat treat" the the weld making it harder.
 

Once again the various kinds of skills of the people who post on this site like Tom make this site my first stop when I turn my Mac on. Enjoyed the post Tom

Welded together- weaker breaking point?

I have always found that the welded spot is stronger than either piece that is welded together. Also if you try to mill a weld it is extremely hard material. Just my experience.

Thank you enrada!
You can´t compare this with a modern welding wich is real hard in fact. This is cast iron and I don´t know yet how good the contact between cast iron and the welding material is. If you break casted iron, you can see how weak this material is. Also I have to check the inside if the weldings goes over complete area and ends inside. We will see this later but I guess that the two parts are still open on the inside. If there is no seam inside but a line filled with red rust, we only got an out side welding here wich makes it indeed easyier to "pop off".
While cleaning I recognised also that the material of the seam is a little bit softer. Ok, it is not iron but Oxyde, but the differense was to see.
 

Enrada after reading your post I just had to comment. You are right again. I am a machinist and it is common knowledge among machinists that the weld is harder than the outlying pieces. That is because the heat of welding will "heat treat" the the weld making it harder.

Even if the welding is harder and if it is just put on the outside of the two parts, it makes it anyway easier to break left or right from the welding lines because cast iron is weak and if you are right, much weaker as the welding itself. We call this in german "Sollbruchstelle" in englsih I think its called breaking point. The weakness of this antique cast iron is a reason why the casted canons have such a big diameter at the end to avoid a beaking of the canon. Just compare this black powder canons to modern artillery wich uses much higer explosives.
 

Last edited:
It is real a cool piece and I would love to have this one in my own collection !!
I would like to know if an other one in this condition with the canvas and ropes exists or if I am the first one who has the honor to restore such an complete piece?!
I just have found so far pieces with or without the wooden fuse but nothing like this.
It has to be shown to maritime museums for sure if they don´t have any datas of such an intact piece!

I found only an old pic wich shows a grenade made out of half-moon shaped bars and wich was holded together by the fuse itself. I guess it was also fixed with tar.

If someone finds half moon shaped iron bars of approx 8 cm diamerter and half circled cuts on the outside to set in a rope.... it comes from one like this :-)

I myself have never seen one that complete !! Very interesting to see how they were made. I have seen photos of ones that have the plug intact with only remnants of canvas and bitumen around the plug. I still dont understand how the ropes were utilized but I can see the benefits of the canvas for waterproofing and for keeping the bung and fuse secured. Little more technical construction than most would have thought. Wouldnt want to be below decks when 3 or four of those get thrown down the hatch !! BOOM !!
 

I myself have never seen one that complete !! Very interesting to see how they were made. I have seen photos of ones that have the plug intact with only remnants of canvas and bitumen around the plug. I still dont understand how the ropes were utilized but I can see the benefits of the canvas for waterproofing and for keeping the bung and fuse secured. Little more technical construction than most would have thought. Wouldnt want to be below decks when 3 or four of those get thrown down the hatch !! BOOM !!

Thank you Blak Bart!
So far I can see now, the fuse don´t go on top in the wood plug but from the side. The top is complete flat under the canvas. I also found remainings of a light brown resin around the plug but the canvas is not complete covert with it. At the moment is seems the 3 ropes was the fuse. I don´t know yet if every single piece goes into the plug but I will find out. But it could be possible to make sure minimum one of the fuses will start the explosion.
It is very exciting and I can´t wait to see all details and what is under the canvas.

The next pics will come in a few days. The removing of the canvas needs a lot of time.
 

For those who are may interested, I uploaded some pics of my other work to my albums.

And here is some advertisment :laughing7: :laughing7: :laughing7:
 

Attachments

  • Kanne1.jpg
    Kanne1.jpg
    150.3 KB · Views: 248
Last edited:
Hi Tom

Is it a hand grenade or an explosive cannonball?

mvh
Rüdiger
 

Top Member Reactions

Users who are viewing this thread

Back
Top