Cheap, Down and Dirty Mailbox

garren

Hero Member
Mar 15, 2008
507
1,216
Fort Worth, TX
🥇 Banner finds
1
🏆 Honorable Mentions:
8
Detector(s) used
Minelab Manticore
Primary Interest:
All Treasure Hunting
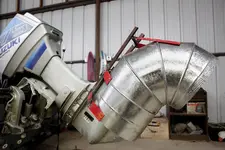
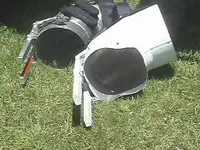
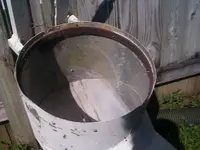
I put this mailbox together tonight using a 16" elbow and short piece of A/C duct. I used photos from others on this forum as a guide. I know it's light and wouldn't hold up for coastal usage but I'm inland in the middle of Texas and we'll only be using this for one project. I figured it's practically disposable and we only have $38.00 in it.

I've never used a mailbox and assume that prop washing is fairly straight forward. However, I'm also aware that assumption is the mother of all "eff ups" ;) So I thought I better come over here and ask some questions.

The project is a 1920's era stern wheel steamer. I found it about 10 years ago but never gave it much thought. Recently and by chance I came across information that identified the boat. Having a name, I did little research and found out it had a little history to it. It sank in 1928. Its not that old and there wouldn't be anything of value down there but now that I know some history about it I want to recover something from it. Its local history for me so anything will do...a plate, a cup, a window latch... I don't care what we find.

It was 130 feet long and 32 feet wide and had an upper and lower deck. Also listed was a bar and restaurant. On some excursions an orchestra played and there was supposedly a dance floor on the roof of the upper deck.
Its no Florida shipwreck but it may be the closest I ever get to one.. :)

Here's some questions:
Its in about 4' of water...given the size of my engine (75hp) and the light gauge of my mailbox, what RPM should we run?
There's about 3' of silt over the wreck...how long does it take to blow a 3' hole?
We can see part of a tank and some of the framework. Where should we blow the first hole? stern, middle or bow?
Looking at my pics, do you see anything I did wrong?
Are there any tricks or techniques we should use on this kind of project?
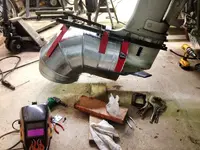
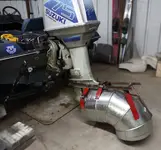
mailbox3.JPG mailbox f3.jpg Mailbox f2.jpg
 

Last edited:
As a builder of mailboxes I must say you did a good job Garren. The problem I see is that your tube covers the prop. This will cause a vaccuum in front of the prop that will collapse the light gauge tube.10.jpg
 

As a builder of mailboxes I must say you did a good job Garren. The problem I see is that your tube covers the prop. This will cause a vaccuum in front of the prop that will collapse the light gauge tube.

Thanks Salvor6. Another Tnet member had sent me a msg on this issue... I'm so glad I asked questions before I attempted to use this...

So this brings about a new question. Since its already built, can I cut away some of the tube near the prop? If so how much should I remove? How much of the prop should be exposed?
 

Looks good, prop is to close but in 4ft of water it'll move a lot of silt. With a bit of tilt on the motor u can change size of hole, move spillage etc. I like it, what do they say about necessity ?
 

I put a 1/4" steel ring on the inside to reinforce the tube.

DCP01623.JPG
 

Could garren take a 3/4" hole saw around the front sides of the mail box to reduce the vacuum effect or would that just weaken the area even more?
 

Thanks everyone! I just realized I used one of Slavor6's pictures for my inspiration...

Not knowing about the prop and cavitation I didn't pay attention to that part. ??? Looking at the pic again it looks like a little less than half of the prop should be showing? Like dennco2000 suggested, If I were to remove some of tube near the second rib from the back, would that work good enough to get us through this project? Maybe take a nibbler and cut two "ports" on each side of the prop but leave enough tube so that its still a "hoop"?
I read a horror story about sand and debri going into the water intake and stopping up the impeller...How about wrapping panty hose around that part of the motor to reduce the size of debri that can get in there.
necessity is mother of invention?
 

You have a great idea don't over think it, I built a portable mailbox/ blower using a 18 inch plastic cement shut 4 ft length , the prop was attached to a hydronic / air drill e ncased in fiberglass , run off a air compressor 175 psi 25 cfm with a 100 ft length of 1 inch hose, much better than hand fanning . Moved a lot of overburden, portable and inconspicuous .
 

The "tank" you saw may be a boiler. If you want engine parts, blow in that area. If you want cups, plates, etc., blow just forward of it or aft. I'm assuming you can tell where the wheel frame is in reference to the boiler, so you should be able to tell what direction she's lying in. Great project. Have fun.
 

Always inconspicuous , if u go in the water with a metal detector they want to send u away for life. Meanwhile I found what could be the oldest man made structure in the new world. NOAA wants me to show them where it is an will allow dredging, hand fanning and moving, disturbing ell grass because it suits them, go figure!
 

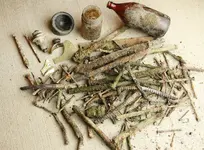
Thanks Darren. I think we are about 90% sure we know which direction she's laying...and what you said makes sense. When we were poking around there a few weeks ago I came across a nice jumble of timbers about 10' to 15' forward (or what we believe to be forward) of the tank. I groped around in this area and pulled out an older bottle and a mason jar. Not sure if these are from the wreck though. I have a hard time dating machine made bottles...and I'm guessing that in the mid 20's that had become the norm? Maybe I'll clean up the jar and bottle this evening and post some pics and you guys can give me your best guess.

I think for our trial run we'll start in this area...
 

It sounds like a great place to start. Forgive me if you already know this, but are you familiar with a three point mooring system for stabilizing the boat while blowing?
 

It sounds like a great place to start. Forgive me if you already know this, but are you familiar with a three point mooring system for stabilizing the boat while blowing?

Ooops... another thing I didn't consider.. I didnt even think about that. How does it work?
 

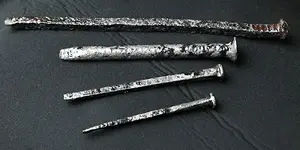
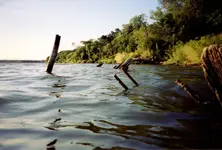
I forgot I had taken some pics in the late 90's before I knew the identity of the wreck. The axle is no longer there...I think the agency that manages this water body pulled it when they got on a "clean-up" kick a few years ago.
Incidentally, without the axle sticking up it took me a week to find the wreckage again...even with the photos!

Also I had a pic of the bottle and jar with some iron we picked up in the shallow water. Do you think jar and bottle are from the wreck?

wreckage.jpg axle.jpg iron.jpg spikes.JPG
 

Ooops... another thing I didn't consider.. I didnt even think about that. How does it work?


If you don't do that, your boat will be all over the place! You need to anchor straight forward off the bow, and off each after corner. Make sure the anchors are set firm and your lines are taught before you start blowing.

Considering the shallow depths, I would start with your drive in idle speed and watch the results before increasing speed. If you go too hard, too fast, you could easily blow artifacts away.
 

Last edited:
Thanks Jason! Got it! It sounds like these blowers are potent and work well when they are built and setup properly... I'm getting excited now!
 

Garren, I have heard of an old paddle wheeler in a swamp by Jefferson, where is this? I am not asking for your exact location, just curious which river or lake. I am in Austin. Keep the photos coming.
 

Last edited:
You need to anchor straight forward off the bow, and off each after corner. Make sure the anchors are set firm and your lines are taught before you start blowing.

Well said, Jason. Garren, once you blow a hole in 4' of water, you'll need move the blower slightly one way or the other to make room for inspecting the hole. Just pull in one after corner rope and loosen the other side and re-tie them. Position the blower to where your next hole will be, then go inspect the hole you just blew. Once you're satisfied with exploring that hole, you're already positioned to blow your next hole. I recommend that you plan a grid of blowing holes rather than blowing randomly. Keep track of your holes and artifacts found from each blow. Use markers and/or GPS to help with on site. Otherwise, you'll end up blowing areas you did before and miss spots you could have planned for. Keep us posted.
 

Top Member Reactions

Users who are viewing this thread

Back
Top