Tom´s Restorations

The finished Augustus Denarius from earlier post

Aug1.jpg
Aug2.jpg
_MG_8053.JPG
_MG_8054.JPG
 

Next Project :hello2:

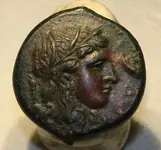
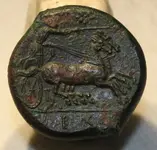
A very rare (R2) Syracuse Litra from King Hiketas (287-278 B.C.)
Heavy and bad encrusted but on some areas a nice black Tenorit Patina is showing up.
Arrives in approx a week and than comes step by step photos.
Can´t wait to get started.
Could may be one of the best of this type when finished.
Wish me luck friends!!


Syra.jpg
 

Next Project :hello2:

A very rare (R2) Syracuse Litra from King Hiketas (287-278 B.C.)
Heavy and bad encrusted but on some areas a nice black Tenorit Patina is showing up.
Arrives in approx a week and than comes step by step photos.
Can´t wait to get started.
Could may be one of the best of this type when finished.
Wish me luck friends!!


View attachment 2072203
How is it going? Any updates?
 

How is it going? Any updates?
Not yet Sis. Have to make photos.
I cleaned it with a very soft air abrasion with mikro glass beads and it look good so far.
But I cleaned meanwhile an other silver coin - see below this posting!
 

Last edited:
Turned out great Tom.
To be Honest, better than I expected!
With such a thick layer of Silver oxyde you get mostly crude surfaces because many of the Silver surface is gone with the corrosion.
But on this one it was to see on some parts that it has quite good Silver under it.
Unfortunately way too bad for my collection but lucky me, I made out of 80 Euros more than a K, maybe 2 K :laughing7:
I tell you the auction result later in a few month :headbang:
 

How is it going? Any updates?
Just made some quick pics.
This is how it looks after the air abrasion.
As you can see on the face, there is a very hard wonderful noble cuprit patina under it!
I have to clean the front first with a scalpel to this layer and than lets hope it is also on the backside.
The Photo of the backside is strange. There is dirt on it from the plasticie I used to mount it for the photo which makes the surcae looking rough. In real the green layer is flat and shiny.
If I am able to clean the entire coin like the face - BINGO! Than it will stay in my collection :laughing7:
So wish me luck Friends!!!

Syra.jpg
IMG_8098.JPGIMG_8099.JPG
 

Last edited:
Just made some quick pics.
This is how it looks after the air abrasion.
As you can see on the face, there is a very hard wonderful noble cuprit patina under it!
I have to clean the front first with a scalpel to this layer and than lets hope it is also on the backside.
The Photo of the backside is strange. There is dirt on it from the plasticie I used to mount it for the photo which makes the surcae looking rough. In real the green layer is flat and shiny.
If I am able to clean the entire coin like the face - BINGO! Than it will stay in my collection :laughing7:
So wish me luck Friends!!!

View attachment 2076145View attachment 2076146View attachment 2076147
Quite a difference.
 

Quite a difference.
Not done yet! :laughing7:
I work on it at the moment with cutted toothpicks and glued very fine sand paper on top of it.
Works very well do flatten the fine details. It is more work to prepair the hundrets of toothpicks than work on the coin becasue this tiny pieces of sandpaper are quickly gone. The corrodet parts on the Horse are gone now!
Gosh... No client or collector would be able to pay for such a lot of work unless it is a coin for 10K or more :laughing7:
 

Not done yet! :laughing7:
I work on it at the moment with cutted toothpicks and glued very fine sand paper on top of it.
Works very well do flatten the fine details. ....
Egyptian pot is another exceptional restoration.
Is that your before and after images or what it will look like once it is completed?

I have a friend that uses rose bush thorns to clean the nooks and tight areas of coins. I've made some and tried it as well. I leave multiple thorns on the end of the branch but remove them where my hand will be. It does work fairly well and the thorns are pretty durable.
Different size thorns for different size crevices.
It is always before and after the restoration.
I know this thorns but we use it only to remove dirt from some kind of objects.
On Coins I use special small blades that don´t vibrate. Long scalpell blades can cause heavy damages.
 

What a great thread, thanks for sharing. Any tips for relic hunters on how to best preserve finds?
I have no idea what Tom uses, but I have seen this posted a few times on the website and I got some for myself.

1683629318620.jpeg


However, I have found that it eats up latex gloves, so you might invest in rubber gloves. I have not tried those yet.
 

Top Member Reactions

Users who are viewing this thread

Latest Discussions

Back
Top