OutdoorAdv
Bronze Member
- Apr 16, 2013
- 2,457
- 3,350
- 🥇 Banner finds
- 1
- Detector(s) used
- XP Deus,
GPX 4500,
Equinox 800,
AT Max
- Primary Interest:
- Metal Detecting
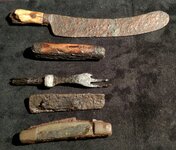
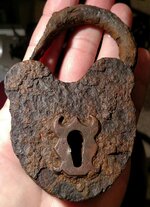
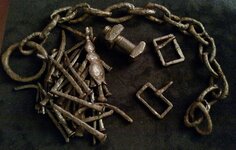
I have been meaning to do a write up on this for some time now to share the modifications I have made as my electrolysis setup has evolved throughout the years. As my electrolysis setup evolved, the iron got more fun to process and some of my most favorite artifacts (bayonet, stirrups, horse bits, cauldrons fragments, hand forged hooks, ax heads, hoe blades, etc, etc.) have turned out to be iron. Actually, some of my hunts have been dominated by some keeper iron relics.
I process a lot of iron and the two things that have been the most frustrating are 1) attaching the iron with a solid contact, quickly and 2) anodes getting dirty and requiring cleaning. I have addressed both of these issues and can move a lot of iron through my setup very efficiently and quickly.
1) First my modifications for attaching the iron.
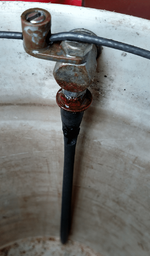
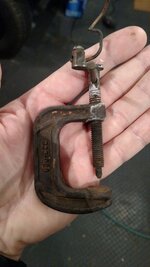
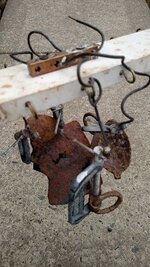
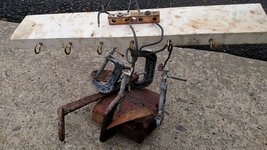
Modified c-clamps! I picked a few up (harbor freight, lowes, home depot) and I pried the foot off with some channel locks. I then took an angle grinder and sharpened the tip of the threaded rod into a point. On the other end I soldered some electrical copper lugs (hardware store electric dept) onto the clamps. I then use regular 12awg or 14awg solid copper wire to attach them.
When you put a piece of iron in there, the point on the c-clamp will poke through the oxidation on the iron and make contact. The point will dull over time and I have to resharpen it, but its super easy to attach a piece of iron to my electrolysis bucket now... most pieces take seconds to attach.
2) Graphite Anodes
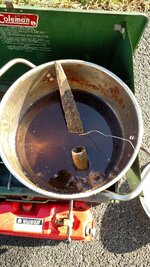
This is by far the best modification I have made. Using graphite for electrolysis anodes is nothing new. I've used regular iron (constantly have to clean) and Stainless steel (creates toxic electrolyte) as anodes. I decided to give graphite a shot... Its carbon, so there is nothing bad released into the electrolyte and NOTHING sticks to them... the rust just drops to the bottom of the tank. Even on the lowest 2 amp setting of my car battery charger, the electrolyte heats up like bath water. The connection through the electrolyte to the anodes is so efficient now, that some of the iron that used to take me days, now just takes hours.
The anodes SLOWLY dissolve... its very slow. I am still on my first set of anodes and I've processed 100 or more pieces of iron with them. They were 1/2" at the beginning and now they are probably 1/4". Since they thread on like bolts, they are very easily replaced.
These are the anodes I got Amazon.com: Fine Extruded Graphite Rod, 0.5"OD x 12"L, Pack of 2: Industrial & Scientific The price fluctuates, and recently they dropped down to $8 for two and I stocked up. McMaster-Carr and Grainger also have similar products.
The idea is simple, figure out a way to attach the graphite rods to a bucket and then to each other with wire. This is how I did it, but you can come up with any other attachment way.
I picked up some 1/4" nuts, bolts and washers at a hardware store. I also got some more of the copper electrical lugs from a hardware store electrical dept. I had some threaded "sammy pipe hangers" from my old anode setup, so I just reused them.
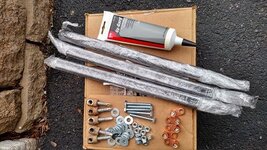
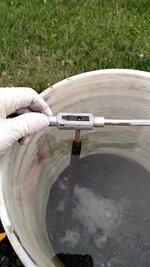
First step was to drill and tap the graphite rods to 1/4". This is very easy even if you havent drilled\tapped anything before. The Graphite rods are basically large pencil leads, so they are very soft. I even drilled one off center by mistake and flipped the rod around and drilled it again from the other end... so really you have two tries per rod!
Drill and tap them under water in a bucket. The dust gets everywhere and will leave marks just like pencil lead.
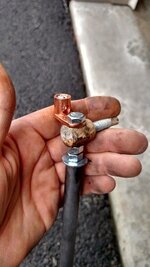
After drilling them it was time to attach the lugs and "sammy hangers" to the anodes. Basically 1/4" bolt with some washers and nuts. Gently tightened the anode with the bottom nut so the graphite didn't break, and then use the other nut to more snugly tighten the lug. The bolt acts as the contact point between lug and the graphite. The threads in the graphite ensure a great contact on the bolt.
If you cant find the "sammy hangers" just make some other way to attach them to a bucket... it could even be with wood blocks screwed into the lip of the bucket.
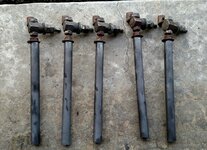
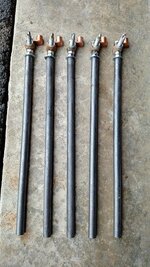
All 5 of my anodes put together.
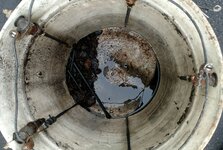
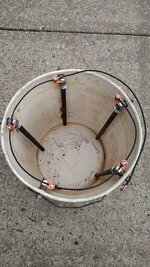
Next I just drilled some holes in the rim of my bucket and stuck the hanger bolts through, then with some more washers and nuts, I bolted the anodes to the bucket. Finally I took some 14awg solid copper electric wire and attached all the anodes together with the copper lugs. Just strip a piece of the wire and tighten the copper lug screw down onto the wire.
That's basically it! Time to cook some iron.
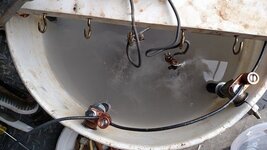
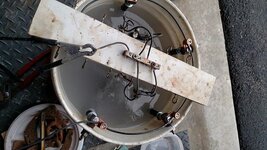
I hope the anode project doesn't seem too complicated. It took me about an hour to make all those graphite anodes. When the graphite wears down, all I have to do is drill\tap some new rods and thread them onto the bolts. So they are easy to replace. I was very hesitant to try to make these anodes because 1) it was going to cost me $$ and 2) was going to take some time and I didnt know if it would work. Now that I've used them for 6 months and cooked 100's of pieces of iron with them, I can honestly say this is the best thing I've ever invested in for any relic preservation. These anodes preserve the iron better than any other anode type I have tried. I ordered my first set of anodes and after I realized how amazing they were, I bought 14 more rods when I saw the price was down at $8 for two rods on amazon... that's how much I like these anodes!
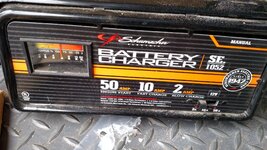
I didn't put the electrolysis basics in here since it was just about my modifications, but I use Washing Soda as my electrolyte and a manual 2/10/50 amp car battery charger. Always set on 2 amps!
Feel free to post or PM me if anyone has any questions or wants clarification.
I process a lot of iron and the two things that have been the most frustrating are 1) attaching the iron with a solid contact, quickly and 2) anodes getting dirty and requiring cleaning. I have addressed both of these issues and can move a lot of iron through my setup very efficiently and quickly.
1) First my modifications for attaching the iron.
Modified c-clamps! I picked a few up (harbor freight, lowes, home depot) and I pried the foot off with some channel locks. I then took an angle grinder and sharpened the tip of the threaded rod into a point. On the other end I soldered some electrical copper lugs (hardware store electric dept) onto the clamps. I then use regular 12awg or 14awg solid copper wire to attach them.
When you put a piece of iron in there, the point on the c-clamp will poke through the oxidation on the iron and make contact. The point will dull over time and I have to resharpen it, but its super easy to attach a piece of iron to my electrolysis bucket now... most pieces take seconds to attach.


2) Graphite Anodes
This is by far the best modification I have made. Using graphite for electrolysis anodes is nothing new. I've used regular iron (constantly have to clean) and Stainless steel (creates toxic electrolyte) as anodes. I decided to give graphite a shot... Its carbon, so there is nothing bad released into the electrolyte and NOTHING sticks to them... the rust just drops to the bottom of the tank. Even on the lowest 2 amp setting of my car battery charger, the electrolyte heats up like bath water. The connection through the electrolyte to the anodes is so efficient now, that some of the iron that used to take me days, now just takes hours.
The anodes SLOWLY dissolve... its very slow. I am still on my first set of anodes and I've processed 100 or more pieces of iron with them. They were 1/2" at the beginning and now they are probably 1/4". Since they thread on like bolts, they are very easily replaced.
These are the anodes I got Amazon.com: Fine Extruded Graphite Rod, 0.5"OD x 12"L, Pack of 2: Industrial & Scientific The price fluctuates, and recently they dropped down to $8 for two and I stocked up. McMaster-Carr and Grainger also have similar products.
The idea is simple, figure out a way to attach the graphite rods to a bucket and then to each other with wire. This is how I did it, but you can come up with any other attachment way.
I picked up some 1/4" nuts, bolts and washers at a hardware store. I also got some more of the copper electrical lugs from a hardware store electrical dept. I had some threaded "sammy pipe hangers" from my old anode setup, so I just reused them.

First step was to drill and tap the graphite rods to 1/4". This is very easy even if you havent drilled\tapped anything before. The Graphite rods are basically large pencil leads, so they are very soft. I even drilled one off center by mistake and flipped the rod around and drilled it again from the other end... so really you have two tries per rod!
Drill and tap them under water in a bucket. The dust gets everywhere and will leave marks just like pencil lead.

After drilling them it was time to attach the lugs and "sammy hangers" to the anodes. Basically 1/4" bolt with some washers and nuts. Gently tightened the anode with the bottom nut so the graphite didn't break, and then use the other nut to more snugly tighten the lug. The bolt acts as the contact point between lug and the graphite. The threads in the graphite ensure a great contact on the bolt.
If you cant find the "sammy hangers" just make some other way to attach them to a bucket... it could even be with wood blocks screwed into the lip of the bucket.

All 5 of my anodes put together.

Next I just drilled some holes in the rim of my bucket and stuck the hanger bolts through, then with some more washers and nuts, I bolted the anodes to the bucket. Finally I took some 14awg solid copper electric wire and attached all the anodes together with the copper lugs. Just strip a piece of the wire and tighten the copper lug screw down onto the wire.

That's basically it! Time to cook some iron.


I hope the anode project doesn't seem too complicated. It took me about an hour to make all those graphite anodes. When the graphite wears down, all I have to do is drill\tap some new rods and thread them onto the bolts. So they are easy to replace. I was very hesitant to try to make these anodes because 1) it was going to cost me $$ and 2) was going to take some time and I didnt know if it would work. Now that I've used them for 6 months and cooked 100's of pieces of iron with them, I can honestly say this is the best thing I've ever invested in for any relic preservation. These anodes preserve the iron better than any other anode type I have tried. I ordered my first set of anodes and after I realized how amazing they were, I bought 14 more rods when I saw the price was down at $8 for two rods on amazon... that's how much I like these anodes!
I didn't put the electrolysis basics in here since it was just about my modifications, but I use Washing Soda as my electrolyte and a manual 2/10/50 amp car battery charger. Always set on 2 amps!
Feel free to post or PM me if anyone has any questions or wants clarification.


