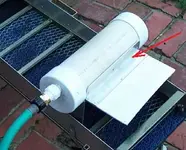
My Diy Fluid Bed Gold Trap Sluice

johnedoe said:
I agree with ya on the price and modifications........ and it was the unfinished one that I was looking at. even at 59 bucks I think it is a little steep ........ I was looking at some of the Plastmo plastic rain gutter components particularly the downspout section and thought it could be used and for a lot less than 59.95......... http://screencast.com/t/f1V2nMJ8U2d
Not sure how to post images here but there's the link to what I wanted to show you.

Uh Oh you're hooked now......... You'll be making them out of all kinds of stuff.... I know I did :tongue3:
 

LOOKS HANDY AND EASY TO MAKE AT HOME.... BUT THE IMPROVEMENTS ARE JUST AS EASY.
GREAT LITTLE HOME PROJECT.

WELCOME TO TNET JOHNDOE.
:coffee2: :coffee2:
MIKEL
 

Thank you everyone for the warm welcome......... I been messin with metal detectors and hobby digging for years.... I lived up in Nome for a couple years also..... man that was an experience.....LOL never did strike it rich...... of course I was unfamiliare with fluid beds then too.... would love to take one back up and hit the beaches again.
 

Would love to get back up to AK. and do some nugget shooting...... that little 7 day vacation cost around $3,000 not counting the gettin there............ But wouldn't that be a hoot.
On a side note I talked to an old friend of mine that I met in Nome back in the 80's... He's in Anchorage now and knows a guy that went up there, anyway I ask him if sluicing was allowed and he had said a friend of his went there and did just that, so it's not just limited to MDing....... I guess his friend got a couple ounces out of it.
 

GoodyGuy said:
The 1" overflow port for discharge of the lighter material is cut to be 1/2" lower than the grizzly

Wow GG pretty cool! :icon_thumright: Ok downright genius - border line mad scientist!

Can you describe the angle and spacing between the 3 rows of holes?
What holds the end of the spray bar up?
What supports the weight of the tube? Is there something under the end caps for bearing the weight?

I have all these parts laying around - but I want a 16" version for the GMS highbanker. (this week even!) :sign13:
What kind of pressure is needed for your 10" version? How many GPH or GPM do you think your pump runs at and how much does the fluid bed need?
Is it a noticeable amount or rather did you lose much pressure on your highbanker spray bar? Did you have to run your pump faster?

How does it perform? Would you just say skip it and build the fluid bed box instead?


I just found this forum through a friend and you can tell I am excited about this!

So hi all by the way!

Thanks GG for sharing your experience and great designs.
 

ebuyc said:
Can you describe the angle and spacing between the 3 rows of holes?

the center row holes are spaced 1/2" apart.
The top row is 1/4" above the center holes and spaced 1/2" apart and are placed between the center holes.
The bottom row holes are 1/4" below the center holes and spaced 1/2" apart and placed between the center holes.
Drill straight into your tube on all holes and the angle takes care of itself.

ebuyc said:
What holds the end of the spray bar up?

I cut a piece of 3/4" pvc tubing in half and used the pvc glue to attach it to bottom of the spray bar end cap.


ebuyc said:
What supports the weight of the tube? Is there something under the end caps for bearing the weight?

addatrap5.jpg
An angle bracket is pop riveted to the tube front and rear. The one in front is much smaller.
The next one I build will use only 1/4" punch plate attached with an angle bracket, instead of expanded mesh with aluminum sheet metal pop riveted onto it and then attached by angle bracket. :icon_thumleft:


ebuyc said:
What kind of pressure is needed for your 10" version? How many GPH or GPM do you think your pump runs at and how much does the fluid bed need?

You will need a valve to control the GPM not that much pressure is needed ....only enough to keep the material in a liquified state of suspension. You should be able to push a stick down through the material and touch within a 1/2" of the bottom with no resistance.


ebuyc said:
Is it a noticeable amount or rather did you lose much pressure on your highbanker spray bar? Did you have to run your pump faster?

Did not have to run the pump any faster.

ebuyc said:
How does it perform? Would you just say skip it and build the fluid bed box instead?

I have been using it all morning to run material I gathered from the tailings of a lake that was recently dredged.
It works like a charm. I am very satisfied with the performance although I probably should make another overflow port at the other end as well.
Just don't forget to add a baffle at the left underneath side of the grizzly if you do. And of course the baffle should be 1/2" lower than the overflow port. (keeps any floating gold from escaping)

Hope this helps.
GG~
 

FELLAS I'M JUST A LITTLE BIT AFRAID OF THAT GANES CREEK OPERATION...
I DON'T LIKE COLD WEATHER AT ALL, AND I'M AFRAID THAT IF I EVER WENT UP THERE,
I MIGHT NOT EVER COME HOME! :thumbsup:

THAT STUFF IS B E A U T I F U L !!!
:coffee2: :coffee2:
MIKEL
 

Astrobouncer said:
I thought I had posted my fluid bed trap for the highbanker here awhile back, but looking back I guess not.

Here's one I made for my highbanker back in Jun of last year or so.

http://southernprospector.s2.bizhat...t=vortex+highbanker&mforum=southernprospector

I do like your idea of using the PVC pipe better though. Much more durable and pretty dang cheap!

Hey Astro go ahead and post it on this thread or else give us your username and password :tongue3:
The link you gave is members only.
 

Howdy Astro - seems like I did see your fluid box for your highbanker already on the gpex - but a quick search and couldn't find it...

I too really like GG's pipe design. I have some 6" pipe laying around from a recent sewer installation I did last summer... and a bunch of 1" pvc and fitting.. So thinking about scaling this up some - but I will keep the 1/8" holes - just more of them! I could always go bigger not smaller!

Do you guys add a hose bib type screen or something before the fluid bed bar? Maybe run the bar through the end cap [rubber electrical grommet should seal it fine] and add a screw on purge cap for debris?

Thanks for the information GG - I will post what I come up with and even better how it performs in the field! (supposed to hit 39 F again this Saturday, I am hoping we don't get too much snow!)

Astro likes his holes pointed straight down - GG any thoughts?

"They are facing down. You can try them sideways as well though and they seem to work ok like that too (my first fluid bed had sideways holes), but I swear I catch finer gold with them facing down." - Source: http://gpex.ca/smf/index.php?topic=8565.msg59277#msg59277

Seems to me with a square box the fluid dynamics would be much different then in a tube - So on the sides with a row 1/4" above and below seems great to me.

Holding the holes back from the end caps 1" seems like a good idea too - Thoughts on that?

Yep I will start laying out the parts tonight :coffee2:

Thanks for the quick response GG!
 

HEY ASTRO,
I JOINED THE OTHER FORUM. I HAD A HARD TIME FIGURING OUT HOW TO NAVIGATE THERE.

SO I'M WITH G.G. ON THE POSTING OF THE PICS. I WOULD LOVE TO SEE IT TOO.

THANKS.
:coffee2: :read2: :coffee2:
MIKEL
 

I have never experimented with the holes facing straight down........
My reasoning was....... why stir up the flour gold that has already settled down onto the bottom? :icon_scratch:

But I don't see why it would hurt :dontknow:

Also I keep my stratifying tubes within a 1/2" off the bottom anyway and I know the jets of water tend to curl some after leaving the tube, both upward and downward.
 

A friend of mine is going to send me some nome beach concentrates to experiment with, I have a couple design ideas stewing in the ol noggin......LOL
 

Here is Howard Schmidt's patent for the sluice trap that the Bazooka gold trap sluice was designed from:
(His has a row of holes on the bottom of his stratifying tubes in addition to the ones in the sides)
http://www.freepatentsonline.com/5476177.pdf
 

Sorry I thought those forums were open to anyone. I will ask the owner about changing permissions so guests can view the threads too.

Here's the thread I copied from there:

I didnt get a chance to go prospecting so instead I worked on the fluidized bed gold trap for the highbanker. The purpose of the fluidized bed is it should catch any size gold going out the highbanker and instead hold it in the trap. A fluidized bed works by pumping in a low volume of water from underneath, just enough to keep the material in the trap suspended in water. Heavies should sink deeper into the water while lighter tailings will float on out the back exit. I will have a pressure gauge when I finish the PVC so I know how much pressure the chamber is getting. Fluidized bed traps can work with as low as 1 psi.

Here's the little fluidized bed box I fabricated, 13 inches wide by 10 inches long.


Here's the spray bars, these are pointing downward with about an inch and a half of clearance underneath them to the bottom of the trap. This way there's room for the heavies to settle into the trap and sink down into the water.


Here's the alignment bars to keep the spray bars in the right place and off the bottom. Also you can see the silicon sealer I used on the seams.


My huskies, Kara and her twin sister Kira came by to see what I was doing since the drilling was making a lot of noise.


Here's the trap almost done, just needs more water proofing, painting and then mounting. And of course I have to seal the water inlet sides.


Here's how its going to be mounted to the end of the highbanker. I am going to have to figure out a way to swivel it up so ground clearance wont be an issue when rolling the high banker over rough ground.


Of course it still needs paint and more little stuff but its a good start. I have almost all the PVC now to hook it up to the other pipe, but I got to get one more Y piece first.


The exit side of the fluidized bed gold trap is 5/16s of an inch and the entrance is 4 mesh. But I can easily swap the screen out if needed for different mesh sizes.


Also something I learned is you should slant the exit grizzly somewhat down, otherwise material will find a way to hang up!
 

Astrobouncer :hello2:
I'm calling your design "Trap Vader"
 

Top Member Reactions

Users who are viewing this thread

Latest Discussions

Back
Top