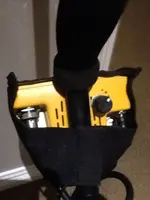
Garrett Ace 350 / Euroace manual Ground Balance mod

craighkzn

Tenderfoot
Sep 4, 2013
8
5
Hi all


New to these forums, but thought I would tell you about a mod that I have done to my Euroace. Would also work on ace 250 / 350.

Warning....will void your warranty etc... But man, what a difference. Like having a PRO for 250 money...

The detector works amazingly on low mineralised ground, but really starts to miss things on highly mineralised ground, like we have here in some parts of SA. I would get to the point where a coin that is readeable in air at 12 inches, would be invisible at 3 inches in an open hole.

I started digging around in my ACE, and found the onboard potentiometer that seems to set the factory GB preset. All I did was carefully remove the SMD 20k pot from the board with a small soldering iron, and ran two wires to a Mini 20k pot which I mounted under the onboard speaker ( Where some guys mount the volume control mod..) this now allows me to press the pinpoint button, and ground balance the euroace just like any other manual GB machine.. I can set it to null, positive or negative with my external control.. This now picks up the same coins up to 8 inches in really heavily mineralised ground, but does not effect the target ID.

I am so chuffed with my euroace now, so thought I would just let you guys know that this is possible (not sure if it has been done elsewhere)

Pics attached...pcb pic from another forum, but points to correct pot..
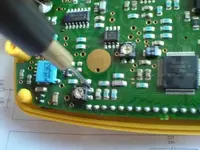
image-1714365475.jpg


Cheers

Craig

image-3060519363.jpg
 

Last edited:
Hi all


New to these forums, but thought I would tell you about a mod that I have done to my Euroace. Would also work on ace 250 / 350.

Warning....will void your warranty etc... But man, what a difference. Like having a PRO for 250 money...

The detector works amazingly on low mineralised ground, but really starts to miss things on highly mineralised ground, like we have here in some parts of SA. I would get to the point where a coin that is readeable in air at 12 inches, would be invisible at 3 inches in an open hole.

I started digging around in my ACE, and found the onboard potentiometer that seems to set the factory GB preset. All I did was carefully remove the SMD 20k pot from the board with a small soldering iron, and ran two wires to a Mini 20k pot which I mounted under the onboard speaker ( Where some guys mount the volume control mod..) this now allows me to press the pinpoint button, and ground balance the euroace just like any other manual GB machine.. I can set it to null, positive or negative with my external control.. This now picks up the same coins up to 8 inches in really heavily mineralised ground, but does not effect the target ID.

I am so chuffed with my euroace now, so thought I would just let you guys know that this is possible (not sure if it has been done elsewhere)

Pics attached...pcb pic from another forum, but points to correct pot..

View attachment 857518


Cheers

Craig

View attachment 857517

Hi does it matter if pot is Linear or Logarithmic, cheers?
 

Hi all

Sorry.. I've been away for a while..

Yes, this is the preset GB pot, which, with my mod, you are making external.

By simply pumping the coil off the ground, and adjusting the pot, you are nulling out the ground (ie: ground balancing the machine)

It works really well. I have since purchased a Atpro, and was able to use them together before Selling the 350.. With the GB mod, it was exactly as sensitive as the Pro in all ground situations...
 

Just to clarify guys..

When using my mod to GB, the following applies.

When pressing the pinpoint button, bring the coil down to the ground ( or pump up & down)

Should the tone get louder near the ground, ground is hot.... Turn dial until the tone remains unchanged as the coil reaches the ground....this is now balanced.

Should the tone disappear as you approach the ground, you have gone too far ( negative GB)

Release & press pinpoint again, and turn the pot until tone remains unchanged ( neither louder or softer near the ground)

Cheers

Craig
 

Ok, I tested this on my 350 and it does not adjust GB, it only adjust TID. In other words, it does not work.

At first it seems like GB, because when you press pinpoint and lower the coil, as the tone increases, you can reduce the tone with the knob. BUT: Raise coil, press pinpoint again, and you will need to do it again, and then again, and then again, until you have the knob turned all the way in one direction and it behaves exactly as it did the first time except the target ID is wrong.

I also tested in wet sand, and it made no difference in target depth, only id.

IMO this pot is for only tuning target id, which explains why it's set at the factory.

And now I've voided my warranty :|
 

Last edited:
Ok, I tested this on my 350 and it does not adjust GB, it only adjust TID.

At first it seems like GB, because when you press pinpoint and lower the coil, as the tone increases, you can reduce the tone with the knob. BUT: Raise coil, press pinpoint again, and you will need to do it again, and then again, and then again, until you have the knob turned all the way in one direction and it behaves exactly as it did the first time except the target ID is wrong.

I also tested in wet sand, and it made no difference in target depth, only id.

IMO this pot is for only tuning target id, which explains why it's set at the factory.

And now I've voided my warranty :|
That is why i will not mod my detectors...And i would never buy a detector that someone had added any type of mod to..
 

Well, I just soldered the original pot back on, no real harm done except for the hole in the case where I had the pot mounted. Fortunately it's hidden inside the battery compartment. Wish I'd found these threads before I started:

I already did a mod where I panel mounted both those trimmers. I mounted two pots under the battery cover up in the top corners. I figured one was GB and the other was threshold. Well all it did was mess up my TID. I called Garrett and they told me that both trimmers were for TID. They said the GB could not be adjusted. So I put it all back. Those trimmers were a pain to desolder and resolder. I will tell you from experience. Don't waste your time.

(Links removed by mod for rule violation)
 

Last edited by a moderator:
... read further down mod does seem to work ... (edited my earlier posts about it not working)
 

Last edited:
Please note we do not allow posting links to other forums..
 

Hi All

In response to those who say this mod does no work.... You must have something wired wrong, as this absolutely does work, and I tested it successfully with all kinds of VDI... Was able to completely null out a ferrite test rod, as well as ground interference, without any impact on VDI readings.....

I was merely sharing what absolutely works..tested against my AT pro....I suspect you wired the wiper to the wrong contact, thus varying the total through resistance..
 

Last edited:
With the correct pot & wiring, I was able to swing the GB completely from one end to the other, with no impact on VdI....this was the first thing I tested, using foil, copper, ferrous etc....

Once set, the ground would have no impact on my pinpoint tone...I'm sure you have wired your pot wrong....

I would not have posted this had I not been very happy with the results, and would not have expected any different response from the manufacturer...

You need to ensure that the total through resistance of the pot is the same as the small SMD pot that you remove....all 3 contacts must be wired...

I have since sold my 350 to a friend who continues to enjoy it with the GB mod....

Good luck guys....just sharing what worked for me...and I doubt they changed the circuitry for different markets.. (Unless the Euroace is different to the 350) My pot was a 20K linear pot.... Would be interesting to hear if yours was too?
 

Last edited:
This mod works good, in fact very good. when you are connecting the potentiometer to the board you have to only use two wires. On the board connections #1 and # 2 are on the same trace. You must use only # 2 and # 3 connections points. Likewise you only use #2 and # 3 connections points on the potentiometer that you will be installing. If you don't know the #'s of a potentiometer, which is #'s 1, 2 and 3 you can google potentiometer number layout and see which number is in which position. When wired up correctly the VID, TID will not be effected in anyway.

I have owned and operated a radio and electronics shop for the past 30 years.

I hope this will help someone, but remember you have to be very careful because the traces in that part of the board are very fragile. For safety of the traces, I followed the traces backward and forward until I come the the next component and made my connections there.

Thanks, hope this helps
Dig-SC
 

Last edited:
Ok thanks for the clarification. Well maybe I wasn't ground balancing correctly, I just wired it up again ... this time it did seem to ground balance correctly in my yard (although it did last time sort of also). The beach is where I had the big problems and ground balancing was impossible and target id went nuts.

I'll try again and let you guys know!
 

Attachments

  • IMG_3624.JPG
    IMG_3624.JPG
    227.7 KB · Views: 750
Last edited:
The process I used to safeguard what I had before I modified the 350 was to check the Ohms of the internal pot for the factory setting. The pot was factory set at 4.5K Ohms. I then new that if something went wrong I would know where to set the pot back. I then took the proper tool to adjust the pot until the detector was ground balanced for my soil. I checked the Ohms at that point and it was 10.1K Ohms. Then I removed the internal pot, and soldered a 10K Ohm (very small) resistor across #2 and #3 attachment points on the board. Went outside and checked ground balance and it was perfectly ground balanced. Then I removed the resistor and installed a 20K Ohm potentiometer on and through the bottom of housing, on the side with the most room. It works great, with no effects to the operation of the other functions of the detector.

I now know, if I want to go to factory settings, that factory setting is 4.5K Ohms. I also can use a 4.7K Ohm resistor, which is the most popular resistor without a special order, in that range and will work. If the potentiometer went bad, in a pinch, I could use a 10K Ohm resistor in it's place for a neutral GB. I could also replace the original potentiometer in it's original place. That is why it's important to know what the Ohms were before you started and what the Ohms are when you are ground balanced for your area.

Keep in mind that these ground balanced Ohms of 10K is for my area and will be different wherever you are detecting.

This was my experience with my Garrett ACE 350 and it works great for me and I am happy with it.
Try at your own risk.

Thanks everyone,
Dig-SC
 

Ok, ground balance does appear to work. I tried ground balancing at the beach and had limited success. No real improvement over wet sand... still massive chatter, pinpointing useless. The Ace is still a great detector for soil or dry sand, but not wet sand even with manual ground balance. So, manual ground balance may give you some extra depth, and may be worth doing. It's still not even close in performance to the AT Pro. It would be far better to just upgrade, but if you can't, then this mod may be worth doing...
 

Last edited:
I'm Glad you got it working as it should...it will not be as good as the ATPro on wet sand, as it does not have the GB range to cover that and will false a lot as it is not designed for that, however on dry beach, or any other condition, the modified 350 is as good as a Pro..whereas when left standard, it suffers badly as soon as ground becomes slightly more mineralized than its preset.

Good luck guys, happy detecting
 

Top Member Reactions

Users who are viewing this thread

Latest Discussions

Back
Top